d.i.y.

[AVOCADO DYE] SCARF

avocado dye

months keep passing between my blog posts while life keeps going at light speed. like my previous post months ago, i’m playing catch up! it’s better late than never, right? >.<

投稿と投稿の間にあっという間に何ヶ月も経ってしまっています。知らないうちに時間が過ぎていて、前回の投稿と同じように、今回も1年弱前のプロジェクトをお見せします☆

during 2020, the year of COVID-19 quarantining, i had gotten so many projects done! this is one of them 🙂

昨年は、新型コロナウィルスの影響で長々とステイホーム生活が続いていましたね。その間に試してみた制作の1つを紹介します。

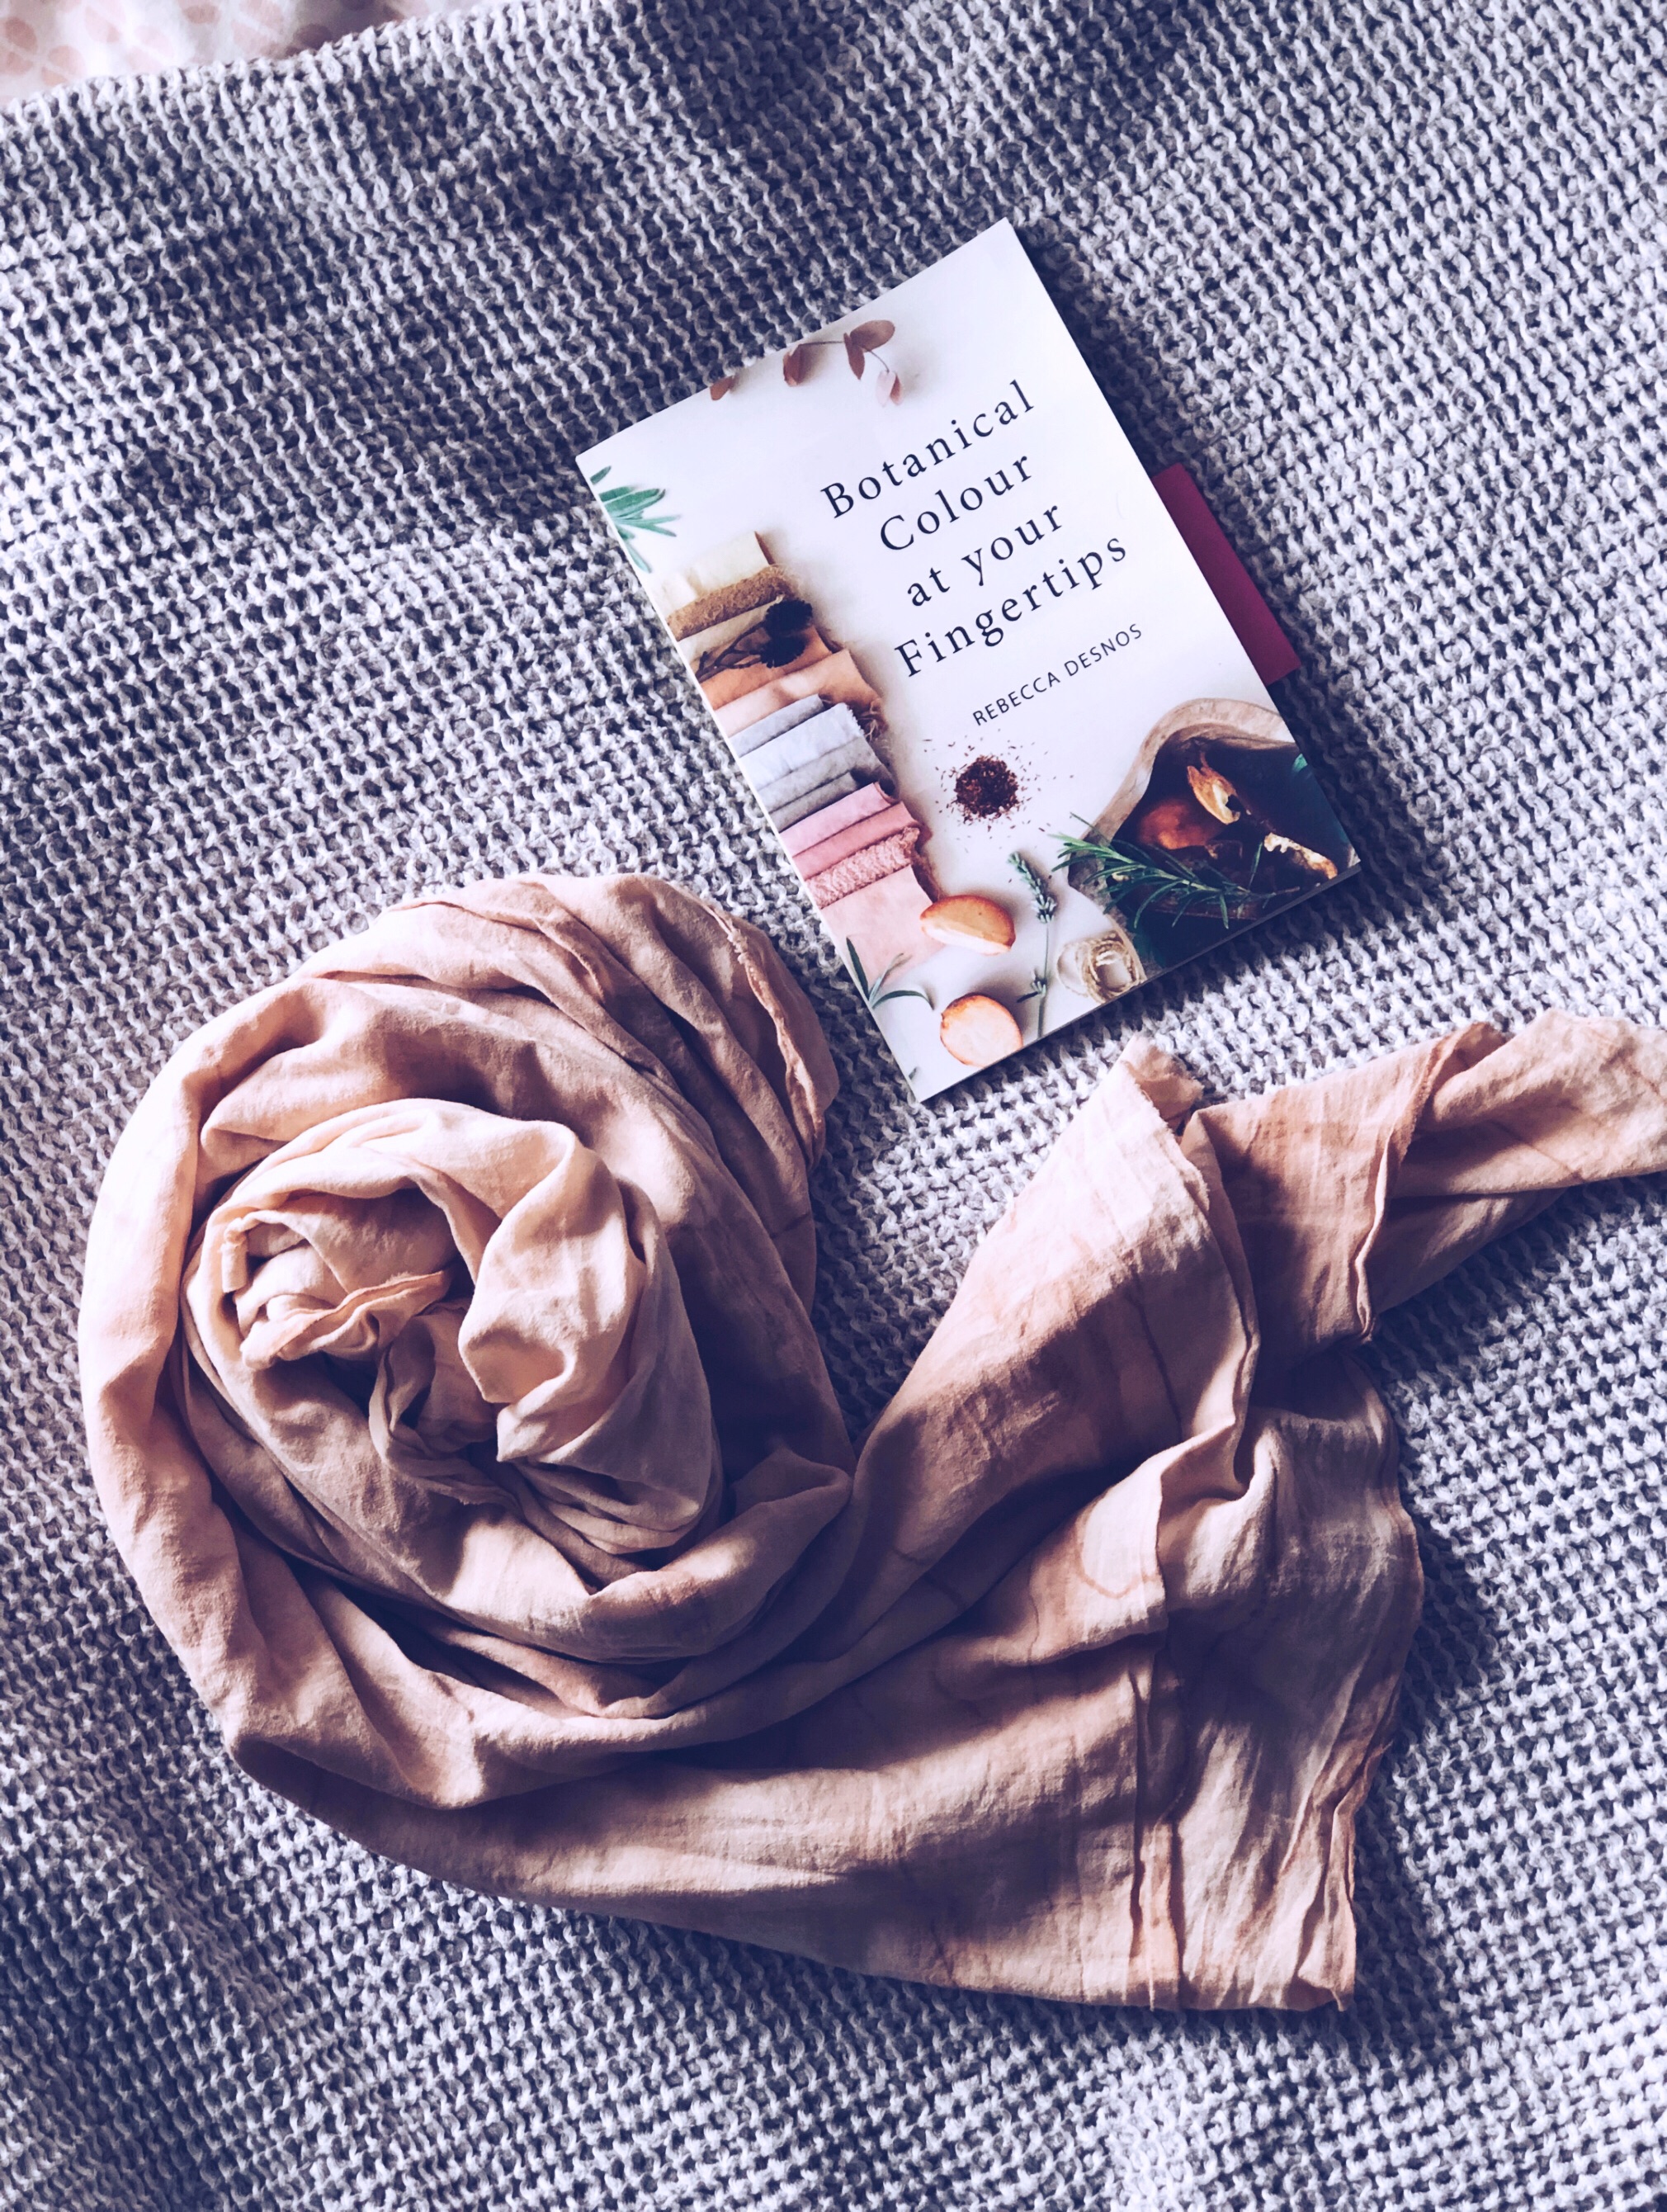
“Botanical Colour at your Fingertips” by Rebecca Desnos

for the longest time, i was curious about avocado dye.  i came across some posts and accounts that talked about natural dyes, which led me to finding this book, Botanical Colour at your Fingertips, by Rebecca Desnos.  it’s such a beautiful book with lots of pictures and step-by-step instructions.  i’m pretty much a beginner dyer (i did a little in fashion college), and the dye turned out very satisfactory.  before purchasing her book, i had read her blog post, when researching how to store avocado pits and skins, and to mordant (a method of prepping) the fabric.

以前からアボカド染色に興味を持っていました。SNSなどを通して、こちらの本に出会いました。アボカドのみならず、色んな種類の植物性染色方法が載っています。ほぼ初めての染色体験(服飾専門学校で少し勉強しましたが)でも、ステップ・バイ・ステップでたくさんの写真が載っていて分かりやすく進められました。元々は、染色するにあたってアボカドの保管方法と生地の媒染工程について調べている中で、この本の作者、リベッカ・デスノスが書くブログを見つけたのです。

overall, the process took a couple of months to complete: from mordant (a way to prep fabric to take dyes better), which is recommended to let sit for at least 1 week; extracting the dye, which takes a few hours on the stove and another 24 hours to let sit; and finally, dyeing the fabric, which you let sit another week after drying the dyed fabric.  every step of the way was so exciting to see the outcome and smelled delicious along the way (the soy milk i use has a very sweet and fresh scent).

全体で言うと、下準備から染色完了まで、全部で2ヶ月くらいかかりました。と言うのも、生地の先媒染(豆乳ベースの液体に浸け、乾いてから少なくとも1週間置く)、染料作り(半日ほど煮込み、24時間は置いておく)、そしてやっと実際の染め作業(乾いてからまた少なくとも1週間ほど)に入る。待つ時間が長いだけに、ずっとわくわくソワソワしていました。この間、無調製豆乳の香りが甘くて爽やかに漂っていました。

  1. setting the fabric in the soy milk mordant.  i believe the fabric is 100% cotton (but it was so long ago that i purchased it…), if not cotton, i’m pretty sure it is a natural fibre with the lighter test to prove.
    豆乳を使った完全植物性の先媒染液に生地を浸ける。生地は確か100%コットンだったと思うのですが、かなり前に購入していたので、覚えておらず。ただ、ライターテストをして自然の繊維はほぼ確かです。
    [AVOCADO DYE] SOY MILK MORDANT
  2. after setting the fabric overnight in the refrigerator (to prevent the milk from spoiling in the summer heat).  then let dry.
    repeat the soak and dry process 2 more times.
    i let the fabric sit in a paper bag (closed well) for about 1 month.  the paper bag kept the fabric dry, but prevented bugs (the soy milk smelled delicious, and if i could smell it…).
    媒染液に一晩浸けてから乾かす。
    この工程を後2度続け、最低1週間のところ、1ヶ月ほど紙袋の中で保管しました。紙袋であれば、通気性はよく、(豆乳の香りが漂っていたので)真夏でも虫が入ってこないかなーと思って、しっかり閉じました。
    [AVOCADO DYE] SOY MILK MORDANT
  3. to store the avocado pits and skins, i washed the flesh off really well and stored them in the freezer.
    アボカドの種と皮はしっかり果肉を取り除いてから冷凍庫で保存しました。
    [AVOCADO DYE] PITS AND SKINS
  4. adding water!  i bought an aluminum pot specifically to dye in, as the book recommends.  apparently, the aluminum helps as a mordant as well, without having to include aluminum in the dye itself.
    水を投入!アルミの鍋を染色用に購入しました。
    染色する際に、鍋のアルミも媒染力があるようです。
    植物性ではない染料には染料そのものにアルミなどの金属が媒染用に含まれていることがあり、多少人体に害があると本に記載されています。
    [AVOCADO DYE] PITS AND SKINS
  5. simmer and stir, simmer and stir, simmer and stir.  then, cool.
    じっくり煮込んで、混ぜ、煮込んで、混ぜ、そして冷ます。[AVOCADO DYE] SIMMERING
  6. after breaking apart the softened pits and skins, simmer and stir more.  then, cool again.
    柔らかくなってくるので、粗熱が抜けたアボカドを手袋をした手で崩す。
    その後、また煮込んでは混ぜ混ぜを続ける。そしてまた、冷ます。[AVOCADO DYE] SIMMERING
  7. the pits and skins have softened quite a bit and mash really well.
    だいぶ柔らかくなったので、粗熱が取れたらもっとしっかり崩す。
    [AVOCADO DYE] SIMMERING
  8. i simmered and stirred one more time.  after cooling, i strained them through a muslin cloth layered on top of a sieve.
    もう一回煮込んで混ぜてを続けて、いい感じに染料が抽出できました。
    こし器にシーチングをかけ、染料をこす。[AVOCADO DYE] STRAIN
  9. look at that mush!  the avocado pits contain lots of tannins which help to fix the dye.
    アボカドの種と皮がこのように!
    種の中にはよりよく染まるためのタンニンがたくさん含まれています。
    [AVOCADO DYE] STRAIN
  10. after letting the dye sit in the pot for 24 hours, the dye is complete.  then, in goes the fabric!
    染料を24時間、鍋のまま放置。染料の完成です!
    生地を投入!
    [AVOCADO DYE] DYEING

ta-da!  for a first time, i was looking forward to having a perfectly imperfect, organic finish.
出来上がり!初回はあえてムラのある仕上がり。

[AVOCADO DYE] SCARF

[AVOCADO DYE] SCARF

aside from this scarf, i have one more batch of dyed fabric to hopefully sew a sundress in the future!
このスカーフ以外に、いつかワンピースを作るための生地も染めました♡

[AVOCADO DYE] SCARF


[M & G WEDDING] MOTHER OF THE BRIDE

M & G is UnMe

last november, i had the honor of being a part of one of my best friends’ wedding; not only as a bridesmaid, but also to design their wedding stationery.

昨年の11月に、親友の結婚式でブライズメイドをしました。それに合わせて、結婚式当日のペーパーアイテムデザインも担当しました。

[M & G WEDDING] IL GASTRO SARA

the destination wedding was held in okinawa, at a gorgeous restaurant (il gastro sara) that features organic local ingredients and a breathtaking sunset.

沖縄で行ったデスティネーション・ウェディングのロケーションがまた素敵なレストラン (皿の上の自然)で、沖縄産の食材を使った絶品メニューと美しい夕焼けが最高でした。

[M & G WEDDING] PROGRAMS

the wedding colors were baby pink and baby blue. now, maya (the bride) is one of the most stylish people i know—her style is one that only she can pull off. so, it was super exciting to help execute the ideas she had in her mind.

デザインをするに当たって、ウェディングカラーとカップルの雰囲気を知った上で、ご要望に合わせたデザインを考えていきます。今回のカラーはベイビーピンクとベイビーブルー。新婦のマヤは、普段からスーパー個性的なファッションセンスを持っているので、彼女の創造を形にするお手伝いが出来て、凄くワクワクしました。

some key words to get the creative juices flowing were: sunset, ocean, “love & peace”, and the logo for their husband & wife hip-hop/r&b duo, UnMe. i started off with painting a watercolor background to use for print. i personally love using this method of scanning textured paintings or fabrics in high resolution to use for the background of a printed product. although i am a fan of uber simple, modern and minimalistic design, filling a background can instantly portray vibes, mood, and/or personality.

夕陽、海、彼女のモットー 『love & peace』、そして、二人が夫婦で組んでいるヒップホップ r&b コンビ UnMe のロゴを元にデザインスタート。テクスチャーのあるマーメイド紙に水彩画でいくつかのピンクと青のグラデーション背景を作り、スキャンして取り込みました。無地でミニマルなデザインも好きですが、このように高画質でテクスチャーのある紙や生地を背景にするのも一つの工夫です。

[M & G WEDDING] WATER COLORS
[M & G WEDDING] PARENTS OF THE GROOM
[M & G WEDDING] MOTHER OF THE BRIDE

[M & G WEDDING] MOTHER OF THE BRIDE

these paintings became the backgrounds for the food and drink menus, programs, mother and father of the bride and groom seating cards, and the thank you tags. for the font, we went with a soft gray to match the pink and blue. the logo seen on the program is the UnMe logo.

このように水彩画グラデーションがそれぞれのペーパーアイテムの背景となりました。フォントとUnMeロゴの色はグレージュにし、全面カラーでも洗練されたシンプルかつ個性的なデザインに仕上がりました。

aside from the stationery, i designed their welcome board. i had made one once before for my cousin, and it truly is a lasting piece of the couple’s wedding to have in their home together. since i don’t have the machinery to do the engraving myself, i go to a tokyu hands in tokyo, which has a wood shop and laser engraving service (they only engrave products purchased in store). first, i choose the slab of wood—organic edges give it a more natural feel—which i then take home to create a design within the board’s size (i double check with the engraving counter to make sure that they will allow me to take it home and bring back on a later day with a receipt). it does get pricey since the engraving fee depends on the total square area of the design (including the blank spaces). honestly, though, the finished board is just so beautiful for price to matter.

ペーパーアイテムとあわせて、結婚式当日の思い出として家に飾られるウェルカムボードをギフトとしてデザインしました。以前にいとこのウェディングギフトとしても贈ったことがありますが、ずっと残る世界に1つのアイテムになります。木材へのレーザー彫刻は、東急ハンズで(前回は池袋店でしたが、レーザー彫刻工房が終了し、こちらは渋谷店)注文しました。東急ハンズで購入した木材であれば、木材を持ち帰り、後日デザインデータと持ち込めば、注文ができます(店内購入商品であれば、木材に限らず色々なオリジナルアイテムを作成できます)。値段は少し張りますが、木材に刻まれたオリジナルデザインの完成品は感動物です!

[M & G WEDDING] WELCOME BOARD

2018 winter holiday handmade greeting cards

after a whirlwind of a year, christmas night is almost through, and the new year just ahead. this year’s holiday season greeting cards were a simple dedication to my tokyo life.

あっという間に過ぎ去った2018年、気がついたらクリスマスは終わりかけていて、年の瀬がすぐそこ。今年のクリスマスカードは、大好きな東京をテーマに、シンプルに仕上げました。

m a r u n o u c h i ,  t o k y  o  |  j a n u a r y  2 0 1 8

the inspiration came from this photo i took in marunouchi, this past january. which reminds me of when i lived in wall street, nyc.
1月に撮った東京駅、丸の内の写真。学生時代に住んでいたニューヨークのウォール街を思い出させるこのショットが2018年を通して、一番お気に入りだったのです。

. . . . .

handcut tree window
ツリー型の切抜き

gold and white spray paint

…from tokyo…

H A P P Y  H O L I D A Y S ! !

handmade greeting cards for 2017 holiday season!

december is already halfway through! the past couple months has flown by faster than light years! exaggerating? yes, but really… i still had to squeeze in this batch of handmade holiday cards for friends and fam. once an idea comes to mind, i just must. do. it. here, i share the process!

もう12月が半分過ぎてしまい、この数カ月が猛スピードで過ぎ去ってしまいました。でも、どうしても作りたいクリスマスカードのアイデアを思いついてしまい、作っちゃいました!今回は、親戚や友人宛なので販売しませんが、特別にプロセスお見せしちゃいます☆

. . . . .

i started off by creating the layout on adobe illustrator
パソコンでレイアウトを作る

handcut letters
文字の切抜きはすべてハンドカット

these transparent origami sheets are from daiso.  i’ve been waiting for the perfect opportunity to use them! instead of using traditional christmas colors, i wanted to go with a “holiday neutral” color scheme. a bit of 90’s and a bit of neon and every bit pop!
以前にダイソーで一目惚れした透明のおりがみ。使う機会を待っていました〜!海外の友人でクリスマスを祝わない方もいらっしゃるので、あえて赤とグリーンにこだわらないカラーテーマを考えました。90年代風なネオン&ポップになりました!

after covering the backside of the transparent sheets, i wrote in the “holidays”. i’ve been practicing my lettering, and these are the perfect opportunities to put them to use!
friends and family won’t judge 😉
おりがみの裏面をカバーし、手書きで 『holidays』 を入れました。最近レタリングに力を入れていて、家族や友人に贈るカードであれば、プレッシャーなく実践できます ^_^;

i switched the string to this glitter thread i found at another 100yen shop!
最後の最後に、キャンドゥーで見つけたラメ入り糸を見つけたので、こちらに変更!

v o i l a !

H A P P Y  H O L I D A Y S ! !

handmade denim sleeve

i’ve been spending the past couple of months going through my stock of fabrics and materials, and boy do i have lots of them that have accumulated over the years since fashion school. i had been putting off tons of projects that i bought fabric for and never got through to realizing. some projects i have finished, some have become things of my mind’s past, and in their place new ideas have formed–one of them being this denim sleeve.

この数ヶ月間、服飾学校時代から溜めてきたたくさんの生地や材料を整理していました。その量も半端ではありません。。。^_^;; やっと完成したアイデアもあれば、もう作らないであろう物もあったり、代わりになる新しいアイデアもたくさん考えています!完成した物の中で、今日はこのデニムのスリーヴを紹介しま〜す。

having been raised in seattle, i have a soft spot for starbucks and tully’s coffee, which are both found in tokyo. unlike in the states, most people use public transportation in this country. thus, our love for bags that are just big enough to cram all of our essentials in (representing people like moi). granted, there are many a cool, stylish girl that can seem to leave the house with a compact clutch holding just a smartphone (in a smart case that carries their train passes and credit cards all-in-one, or even better–apple pay), a tiny wallet, and lip tint. i mean, what about 3 packs of tissue, water bottle, makeup bag, notepad, pen, handkerchief, ipod, extra smartphone charger, etc….?? my point being: having to carry a personal tumbler or mug to my local caffeine joint, is way too much luggage than i already have to carry–especially for that unplanned stop-in to kill time.

私は、シアトル出身なのですが、「シアトルと言えば!」と言うとスターバックスがほぼ第一にあがりますよね?実は、タリーズ・コーヒーやシナモンロール専門店のシナボンなどもシアトル発なんですよ(シナボンがシアトル発とは、恥ずかしながら今年初めて知りました。。。)!どれも日本で楽しめるお店で、シアトル愛が熱いのか(ただのトレンド好きなのか?)どれも大ファンなんです♡
このように、レギュラーでコーヒー店に通っていたらどうしてもエコフレンドリーさを考えると、「手持ちのマグやタンブラーを使用したいなー」と思うことが多々あります。ですが、打ち合わせや待ち合わせで急遽立ち寄る場合があると考えると、普段からただでさえ荷物が多い私にとっては、持ち歩くことは楽ではありません。

although it’s not as green as having a personal tumbler at hand, i decided to make this fabric sleeve to replace the brown cardboard sleeves made of recycled material. yes, they are eco-friendly, however, not so much if they’re going straight back to waste after a couple hours of usage. there was a time where i would hold onto the sleeves for next time, but starbucks and tully’s have differently shaped cups, and i order anywhere between a short and grande, which would result in carrying around 4 sleeves at a time (at least starbucks uses the same size for tall & grande #marketresearch). they all started cluttering my bag again and became inspiration to make an all-inclusive sleeve for 3 different sizes at two different cafe chains.

確かに、紙のカップを使う点から、手持ちタンブラーやマグほどエコではないかもしれませんが、数時間しか使わないダンボールの使い捨てスリーヴよりはだいぶマシです。一時期は、スタバやタリーズのスリーヴを使い回してバッグにずっと入れていました。ショート、トール、グランデサイズ、そしてスタバとタリーズではカップの形が違うので、それぞれのお店の物を集めていたら、普通に4〜5枚持ち歩くことになってしまい、諦めました。実は、これがきっかけでどちらのお店でも、どのサイズでも対応できる1枚のスリーヴを作りました。

the result, i patched together some of my favorite leftover denim scraps (these are
another story on their own!) to sew up a denim sleeve that works for all three sizes at both stores (yay velcro!)! even more, i used quilting to function as insulation, working better than the cardboard.

たくさん余っていたデニムの残布(このデニムにも
ストーリーがあるんです!)をパッチワークにし、マジックテープを縫い付け、キルト芯を挟んで仕上げたらスリーヴとしての機能がしっかり実現できました。

it’s pretty cool to say, “no sleeve please!” and the barista goes, “umm… please be careful, it’s very hot” and BAM! i flash my swanky chic denim sleeve (brush that dirt off my shoulder, uh huh). before it all goes to my head, i understand that my next step is to create a portable, collapsable cup that i can carry around (or someone else can do the work for me? kickstarter?)… in the meantime, i’ll happily flash my washable sleeve that will be reusable for years. =)

レジで、「スリーヴはいらないです」と伝えると、「ええ、とても熱いので気をつけてくださいね。。」とキョトンとされたり戸惑われたりされます。そういう時に、ランプの下でドリンクの受け取りを待って、自信たっぷりにスリーヴを広げるのが気持ち良いんです!笑 こんな小さな事で快感を得るような私ですが、確かに手持ちタンブラーを超すエコフレンドリーな事はないですよね。いつか、もっとコンパクトに手持ちできる入れ物ができるまでは、このスリーヴを自信満々持ち歩きます!

have a great cup of caffeine!
みなさん、今日も美味しい一杯をいただけますように!

p.s. please do let me know your thoughts about this sleeve and if i should sell it on either or both of my shops!
このスリーヴを商品化するか悩んでいます!ご意見、ご感想、ご質問などありましたら、お気軽にご連絡ください〜

handwritten spice jar labels

this past month has been quite a hassle! i had some sort of stomach flu combined with a cold, that led to sinusitis… after 3 weeks in bed, i’ve slowly tried to come back to my daily routine. rolling around in bed so long had me restless and got me into an organization frenzy! which brings me to today’s topic: handwritten spice jar labels.

この1ヶ月間、大変でしたー  風邪と感染性腸炎のダブルパンチで3週間も寝込んでしまい、やっといつもの生活習慣を取り戻しつつありそうです。そんな何もできずにゴロゴロしてる日々が続き、治ってきたら家のいたるところを整理整頓したくなってしまいました。そこで、今日の本題に入りまーす:手書きラベルのスパイス入れ。

ALL

during my visit to santorini, i had bought some wonderful herb and spice mixes, which i had been wanting to find the perfect spice jars for. after much brainstorming and contemplation (of whether to buy a label printer or which jars to buy), i decided to go analog and handwrite labels to put on these jars from the 100 yen shop (seria probably has the bestest trendiest selection!).

サントリーニの旅中で購入したハーブやスパイスミックスを入れる瓶を探していました。どういう瓶をどこで買えば良いのか、テプラとかを買ってラベルを作るかとか、色々と悩んだ末、セリア(セリア、素敵すぎです❤️)の瓶と手書きのラベルを作ることに決めました!

i had A4 size printable adhesive label sheets (the kind that isn’t pre-cut) leftover from a past wedding project. these are great for handwriting or printing any size stickers up to A4, and you have the freedom to create any shape (as long as you’re willing to cut them yourself!). not to mention, the grid lines show through a little bit, helping out with measuring out multiple labels.

過去のウェディングアイテム制作から余っていた、プリンタ兼用のラベルシールを使用しました。ノーカットタイプなので、自由自在にサイズとレイアウトが決められ、うっすら台紙のマス目が透き通って見えるのも便利なのです!

HANDWRITTEN

handletter. cut. stick. / 作って、切って、貼って。

INDIVIDUAL

i felt SO accomplished afterward!! WOOHOOO!
久しぶりに達成感を感じましたー!!

finished

[d.i.y.] super easy name placements

you’ve hit wedding crunch time and your guest list is finally finalizing. of course, this has to be at the last minute. if you can find a calligrapher at the last minute, that’s great, but you just don’t want to think about it and want to use the ol’ computer and printer for name placements. however, you still want your name placements to look great! here’s a d.i.y. for you!! (if your guest list is mostly finalized and you want to check this off your list earlier on, it doesn’t hurt to make some name placements for the “maybe”‘s and a few blank ones for last minute “i can make it!”‘s.)
結婚式の準備のラストスパート!ゲストリストが確定してやっと始められる準備の一つが席札。印刷会社に頼むのも時間とお金がかかるし、できればご家庭のパソコンとプリンターで済ませたいところ。もちろん、見た目もちゃんとしたいし・・・そこでこのDIYがオススメです!(ゲストリストがある程度確定していれば、お返事をいただいていないゲストの分も多めに作って早めにこの作業を終わらせる手もあります。また、念のため、何も書かれていない席札を多めに作っておくのもオススメです。)

LET’S START! / 始めよう!

the goods

what you need / 材料:
card stock (optional: 2 types for front and back) / 厚紙または画用紙 (オプションとして表と裏で別々の紙を2種類)
printed names / 印刷されたネーム
cutting board / カッティングボード
cutter / カッター
(if available, a paper cutter will speed things up! pre-cut the names and card stock to size before hand (see below steps for sizes. front and back are the same size). / ペーパーカッターがあれば早いです!前もってネームと厚紙を人数分切り出しておくと、なお効率いいです。下記ステップに各サイズを表記しています。厚紙は、表裏共に同じサイズです。)
ruler / 定規
(i used a transparent sewing/patterning ruler (see step 1) to measure and cut simultaneously. / 透明のパターン用定規(ステップ1をご参照ください)を使うと測りながら切ることが出来て、スピードアップ出来ます。)
double stick tape / 両面テープ

cut out  names
1. cut out the names to 8.7cm x 4.7cm/3 1/2in x 1 3/4in (i cut 5mm/1/8in around the rectangle using my patterning ruler). / 印刷されたネームを8.7cm×4.7cmに切る。(透明の定規を使って長方形の周り5mmでカットしました。)

double stick names
2. apply double stick tape to the backs of the names and apply to the center of the front card. / 両面テープをネームの裏に貼り、表になる厚紙の中心に貼る。

cut out card
3. cut out the front card to 10cm x 6cm/4in x 2 3/8in (here i cut 7mm/1/4in around the name paper using the patterning ruler). / 表カードを10cm×6cmに切る。(透明定規を使用してネームの周囲7mmでカットしました。)

cut out backing
4. match the front card to a corner of the back card, and cut to the same size. / 裏紙の角に表カードを合わせ、表カードのサイズに合わせて切る。

score backing
5. with a cutter, lightly score the back card 2cm/3/4in inside one of the longer sides. / カッターを使用して、裏カードを長い辺から2cm内側に軽〜く切り込みを入れる。

close up of score
here’s a close up of the score. / 切り込みのアップ。これくらい軽くでいいのです!

fold score
6. LIGHTLY fold score, with the cut side on the inside. / 優しく折り目を作る。切った面が内側の谷面になります。

double stick backing
7. apply double stick tape to the thinner side of the score, again with the cut side facing down. / 山面になる側の細い部分に両面テープを貼る。

attach backing to card
8. attach the backing to the front card, making sure that the name card is facing right-side up, and aligning the taped end to the top back side of the name card. / 裏カードを表カードと合体する。その際に、表カードのネーム面を手前に向け、裏カードのテープ面が表カードの裏の上端に合わさるように貼ります。

finished
FINISHED! / 出来上がり!

it's flat!
this name card is great because it is easily flattened to lessen the load to take to your wedding reception! / この席札は、平にしやすい上、最低限の場所をとるので披露宴の荷物を詰めやすくします!

[side note / ちなみに]
regarding my printer & paper for d.i.y. wedding paper items
d.i.y.ウェディングペーパーアイテムで使用しているプリンターと紙について

printer & paper
| my printerプリンター |
CANON PIXUS MG7530

an amazing purchase!! it prints both fine or fast, adjusts to many paper types, can print via wifi and from smart phones, and the quality is just great! for weddings, it’s best to print with a “fine printing” setting. it will look absolutely professional! / 重宝しています!ファインとスピーディで印刷設定を変えられ、様々な紙面に印刷できる上、wifiでスマホからも印刷できます。そして、何よりもクオリティが最高です!結婚式のためでしたら、ファイン設定がオススメです。

| aravealアラベール |
MY FAVORITE. i recommend it to all my customers for it’s supple texture and matte look. since i take orders for making name placements, i have my own batch that i order from this online shop and my computer prints perfectly on it. / お客様にいつもオススメしている紙です。表面の凹凸がさりげなく、なめらかでマットに仕上がります。席札のご注文をいただいているので、takeopaperさんから発注して常備しています。自宅のプリンターでも綺麗に印刷されます。

thank you