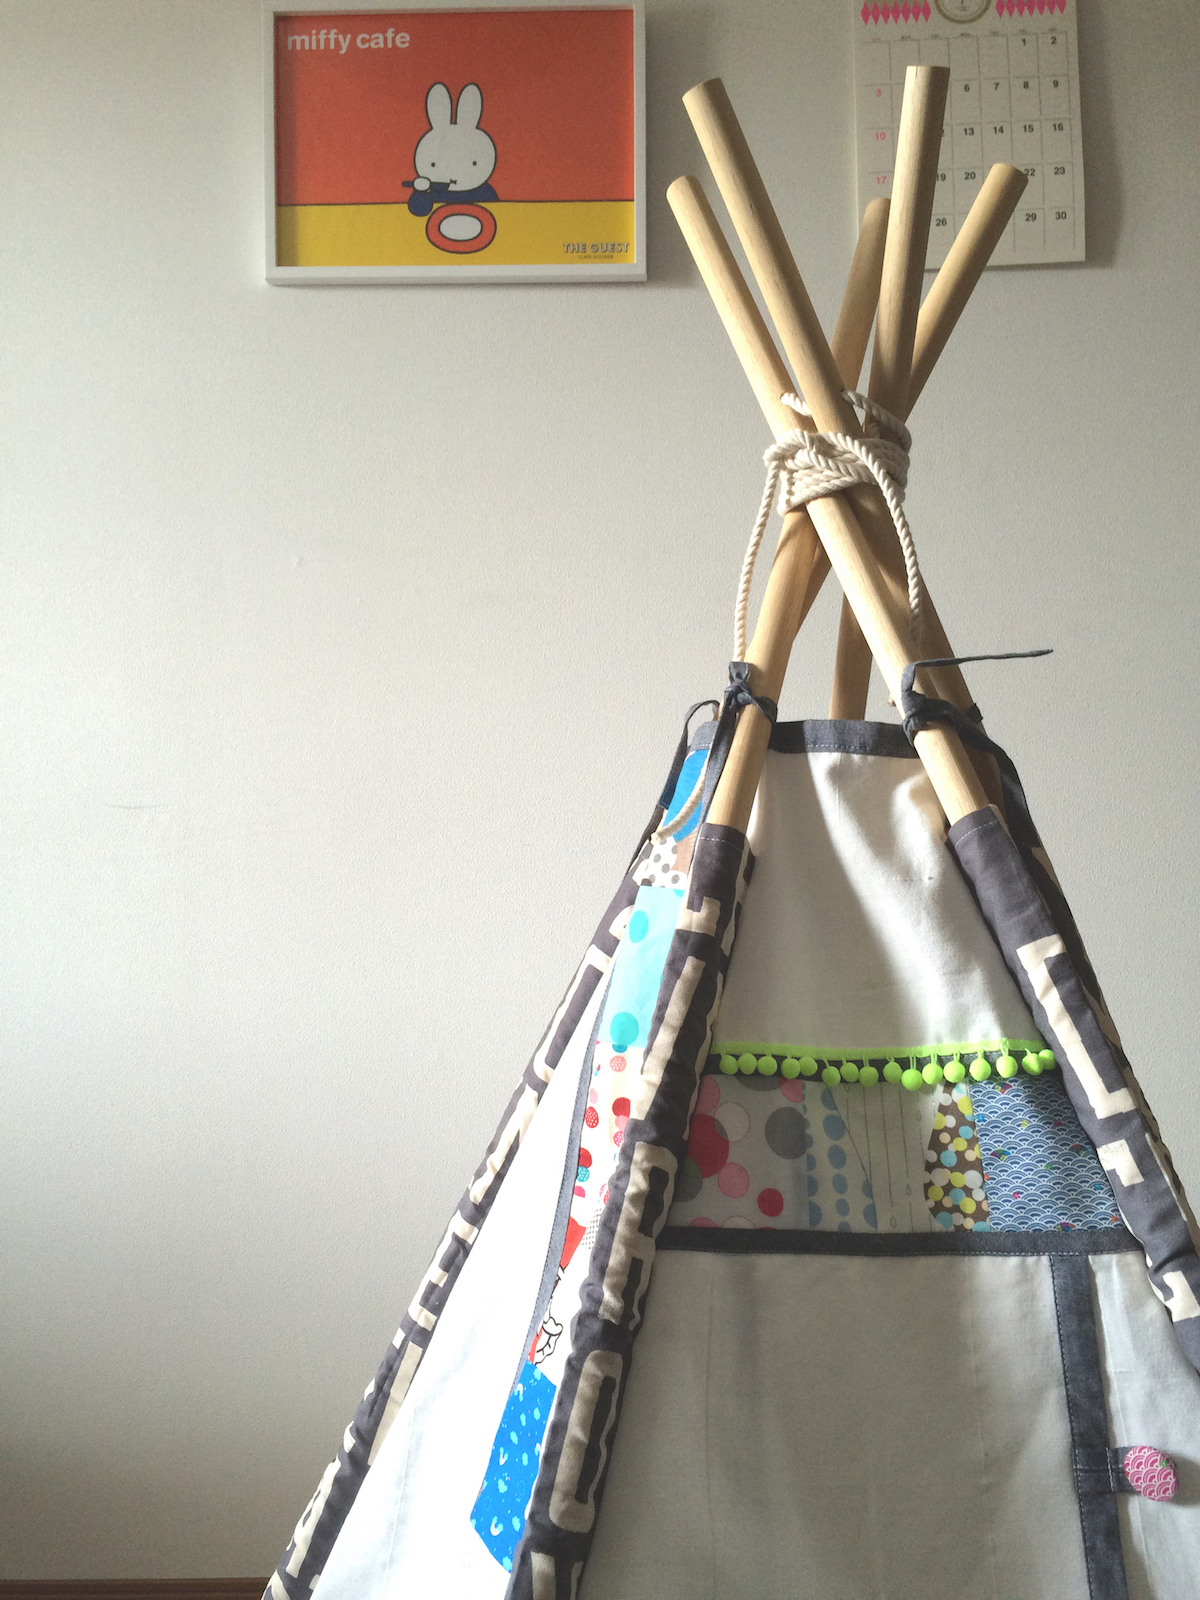
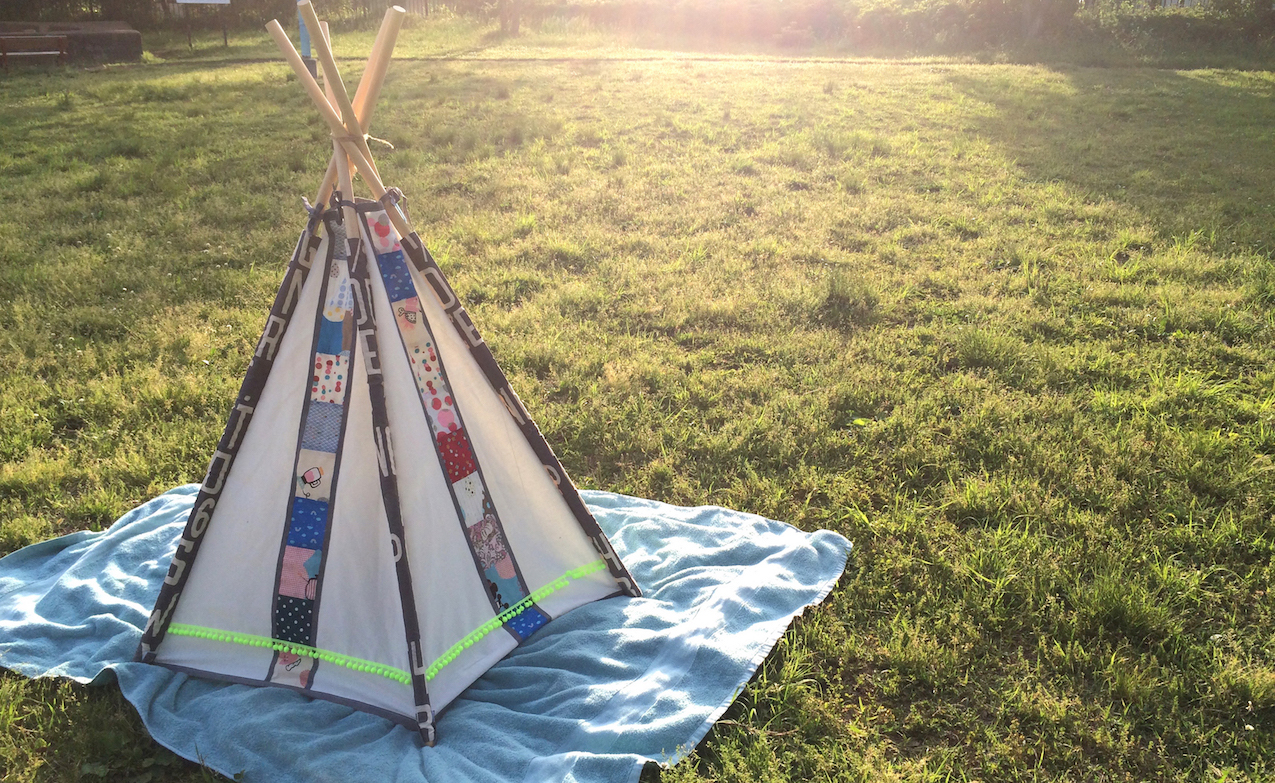
the idea started when i had a leftover ikea curtain material that i wanted to put to good use 🙂 the curtain was just enough fabric to make a full teepee! i patchworked my favorite fabrics and used a chic gray alphabet pattern + chambray to keep it adult-aesthetic-friendly. it was a great challenge but tons of fun to make. i made a second one for keeping or leasing out. (feel free to email me if you are interested in leasing)
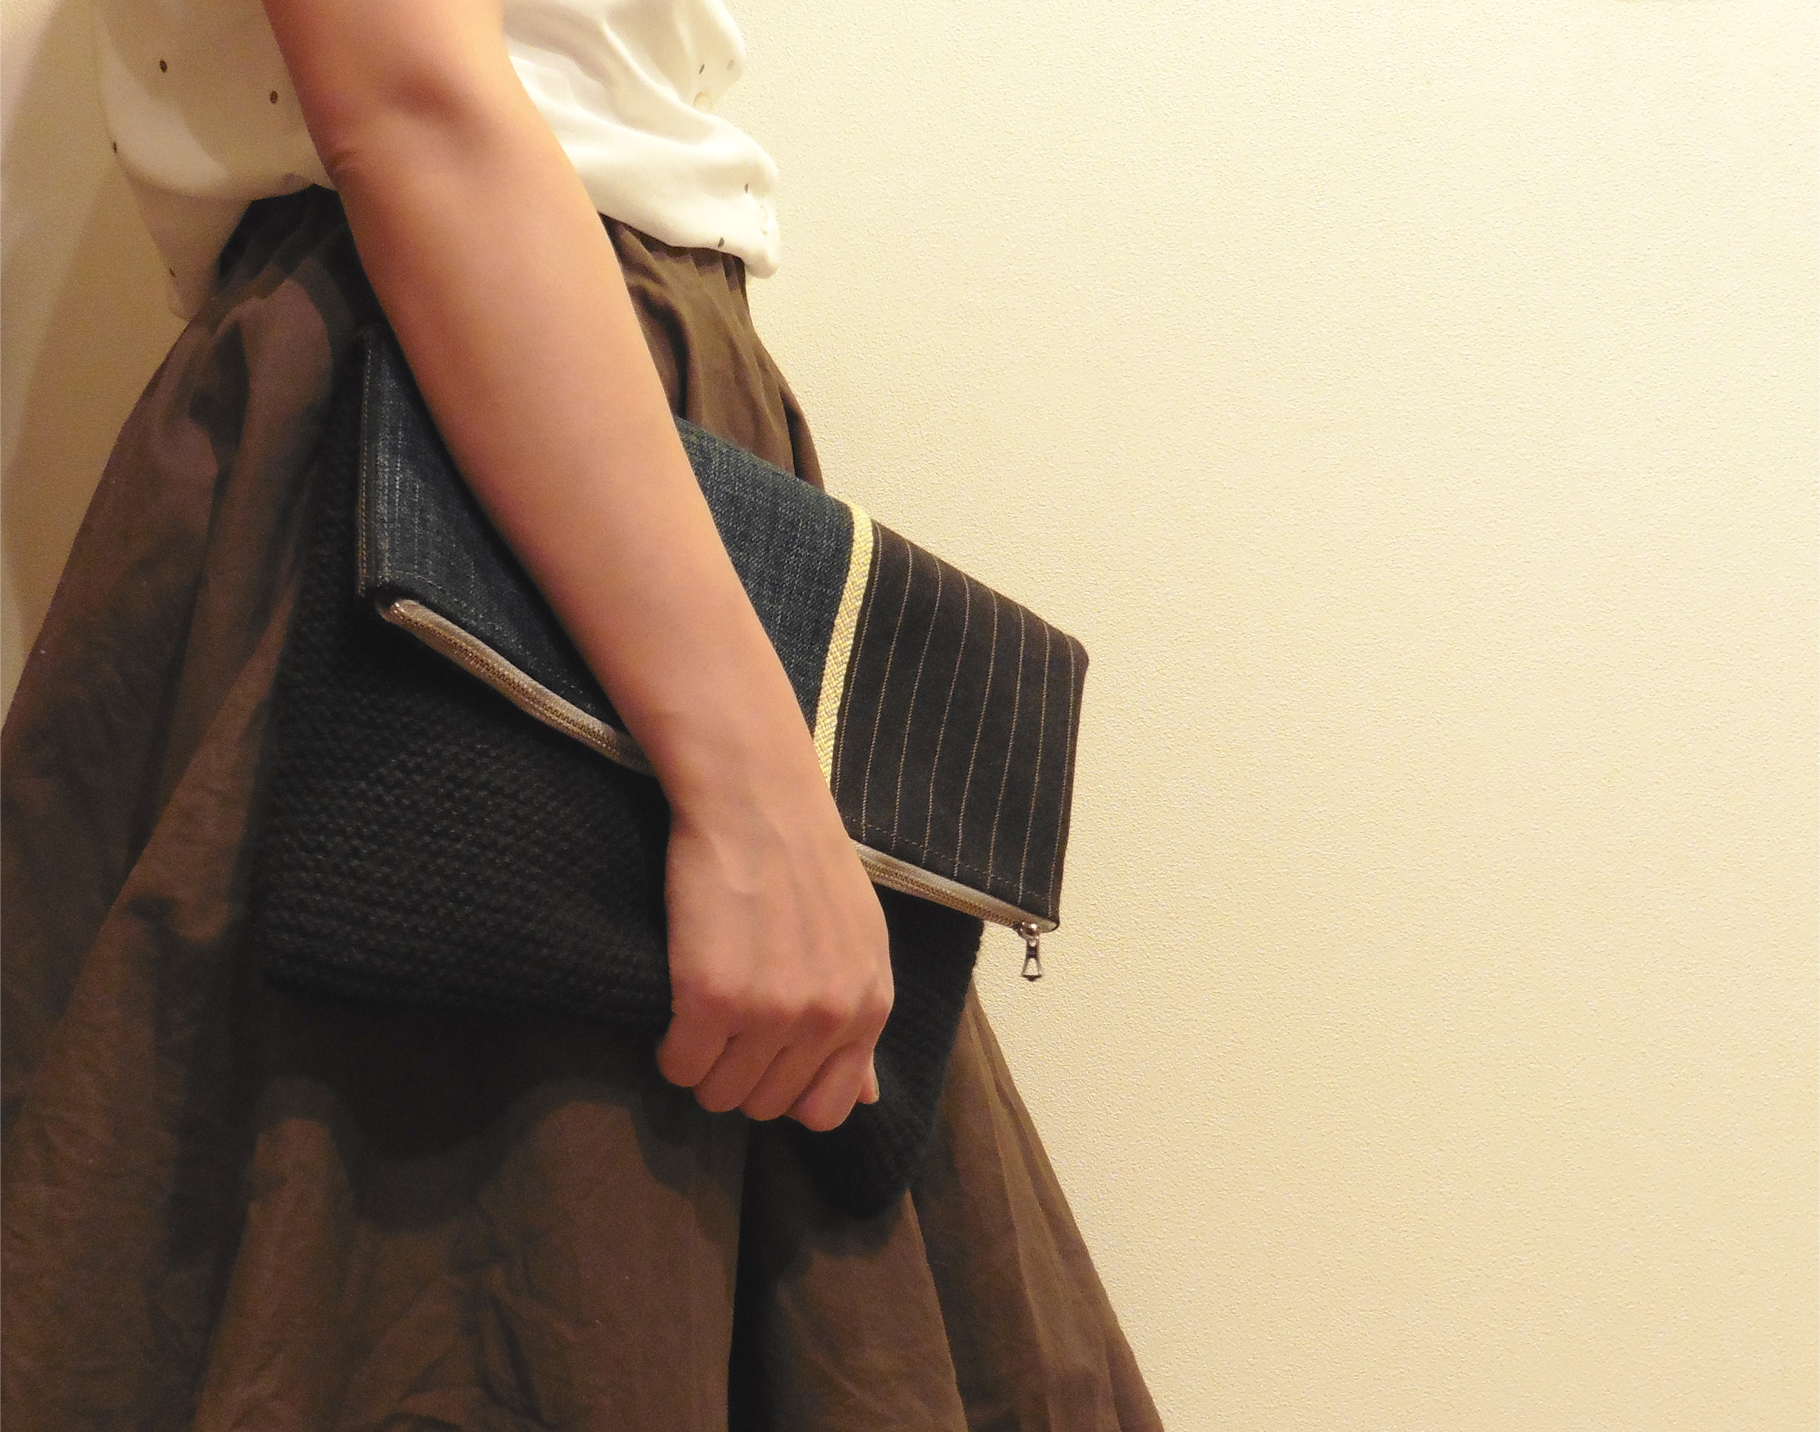
my most recent handmade item, is this upcycled clutch bag! there are only two in this world and i am so proud of them (only one will be sold)!! there’s a little story behind them that i want to share with you today 🙂
i teach english on the weekend, and one of my students and i talk about the importance of making clothes last (or rather he made me realize so: see my 2016 resolutions!). he tells me how he wears his clothes until they are worn thin and even then, he uses them as rags before tossing them. (side note: in japanese history, when materials and food were scarce, kimonos were used the same way: resized to fit children, upcycled into handbags or accessories, and eventually used as rags.) except, until this sweater–100% alpaca wool and made in ireland, it was the best quality–whose wool made him itchy and was unwearable. he told me that he had thrown this sweater away! i asked him immediately if it was still salvageable and fortunately it came into my hands.
after fashion college, i used to work for an italian clothing brand, where i was allowed to take home unneeded denim from pant alterations. i decided to combine this and the sweater to make clutch bags. two more things were needed though… instinctively i knew that pinstriped wool would be spectacular with it PLUS an “a-ha” moment led me to hand-weave a lemon yellow friendship bracelet specifically for the bag.
i added these super cute floral pin badges from the POOL AOYAMA (which closes tomorrow, march 21st, 2016 *GASP*) and “OMG” light-bulb brooch from niko and…. / 私のには、the POOL AOYAMA(明日、2016年3月21日閉店なんですー T^T)のピンバッジとniko and…の『OMG』電球バッジをつけて、ポップにしました。
the lemon yellow and silver friendship bracelet, lightens up the otherwise dark clutch, so it’s usable in the spring. denim and knit goes well with casual looks, while pinstripes go with cleaner minimal outfits. / レモンイエローとシルバーのミサンガでダークめのクラッチバッグが一気に明るくなるので、春使用でも全然使えます!また、デニム+ニットでカジュアルに、ピンストライプでキレイめにと様々なコーディネートで活躍するワンポイントになります。
in this illustration (by yours truly) / イラスト内のアイテム(私作です♥) : short sleeved shirt / 半袖シャツ : Acne Studios ready-to-wear SS16 “Morag pop white” rusty orange skirt / パンプキンスカート : ZARA SS16 mid-heel leather shoes / ミディアムヒールレザーシューズ : ZARA SS16
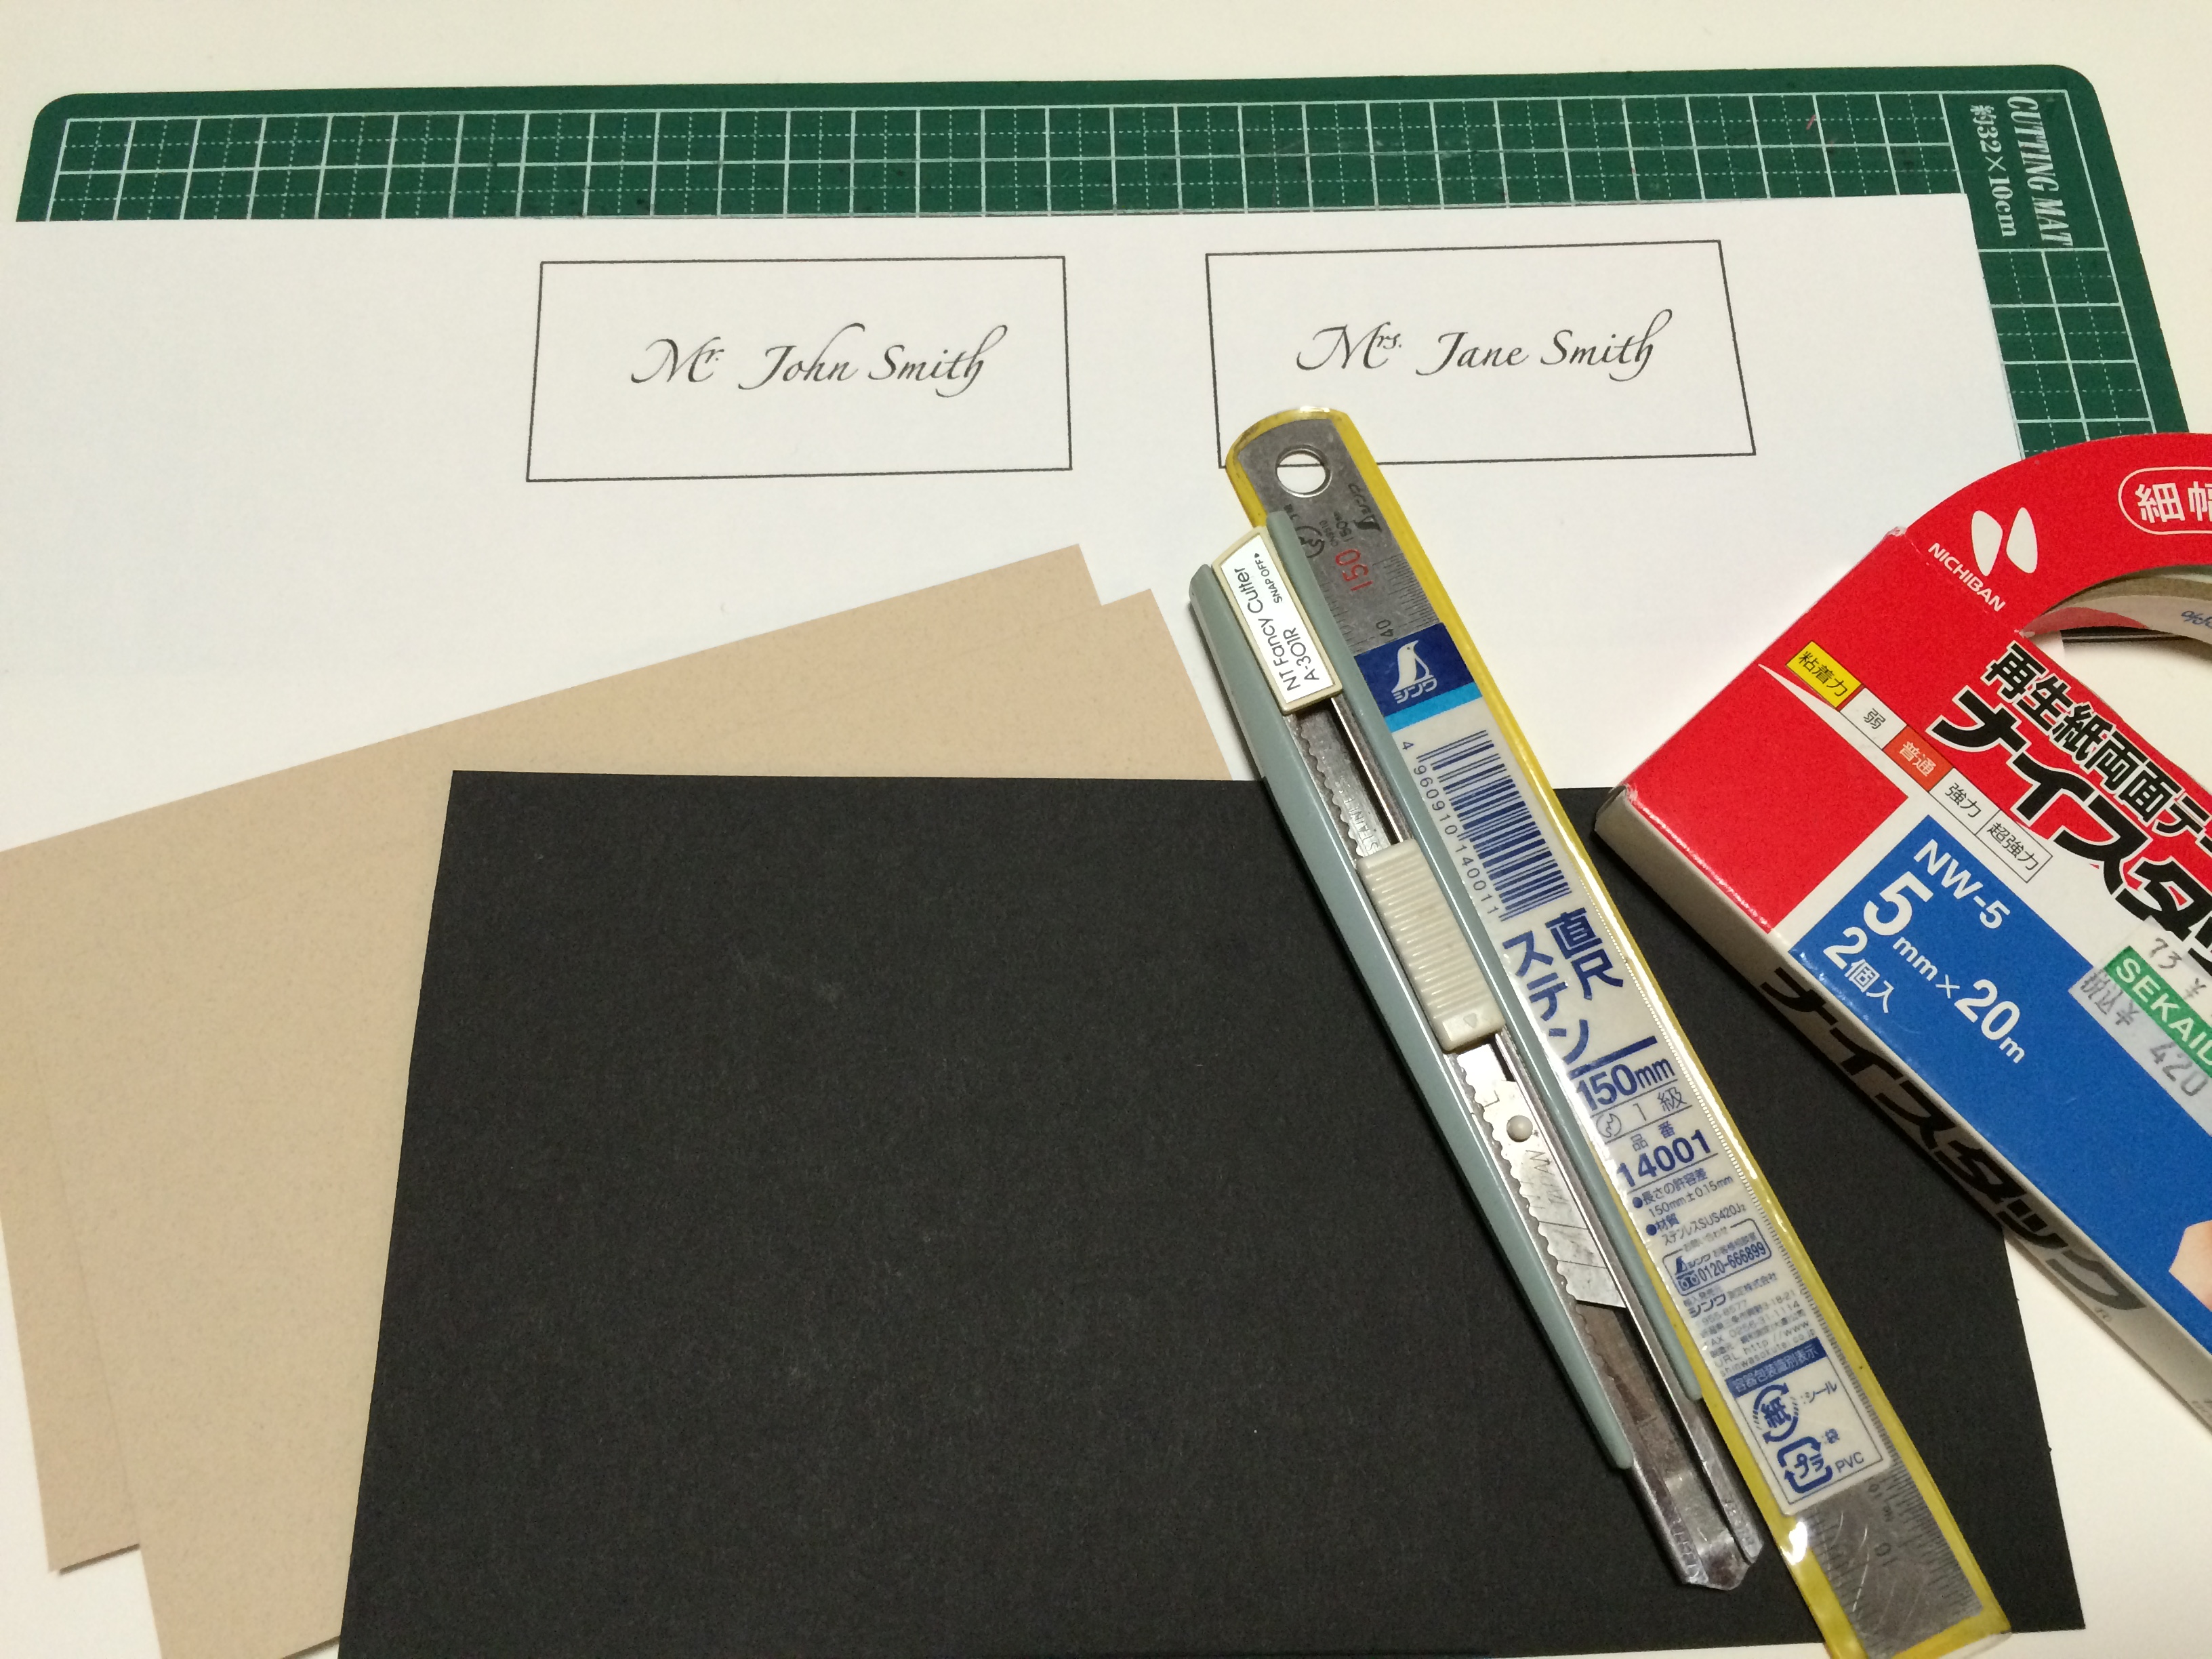
you’ve hit wedding crunch time and your guest list is finally finalizing. of course, this has to be at the last minute. if you can find a calligrapher at the last minute, that’s great, but you just don’t want to think about it and want to use the ol’ computer and printer for name placements. however, you still want your name placements to look great! here’s a d.i.y. for you!! (if your guest list is mostly finalized and you want to check this off your list earlier on, it doesn’t hurt to make some name placements for the “maybe”‘s and a few blank ones for last minute “i can make it!”‘s.)
結婚式の準備のラストスパート!ゲストリストが確定してやっと始められる準備の一つが席札。印刷会社に頼むのも時間とお金がかかるし、できればご家庭のパソコンとプリンターで済ませたいところ。もちろん、見た目もちゃんとしたいし・・・そこでこのDIYがオススメです!(ゲストリストがある程度確定していれば、お返事をいただいていないゲストの分も多めに作って早めにこの作業を終わらせる手もあります。また、念のため、何も書かれていない席札を多めに作っておくのもオススメです。)
LET’S START! / 始めよう!
what you need / 材料:
card stock (optional: 2 types for front and back) / 厚紙または画用紙 (オプションとして表と裏で別々の紙を2種類)
printed names / 印刷されたネーム
cutting board / カッティングボード
cutter / カッター (if available, a paper cutter will speed things up! pre-cut the names and card stock to size before hand (see below steps for sizes. front and back are the same size). / ペーパーカッターがあれば早いです!前もってネームと厚紙を人数分切り出しておくと、なお効率いいです。下記ステップに各サイズを表記しています。厚紙は、表裏共に同じサイズです。)
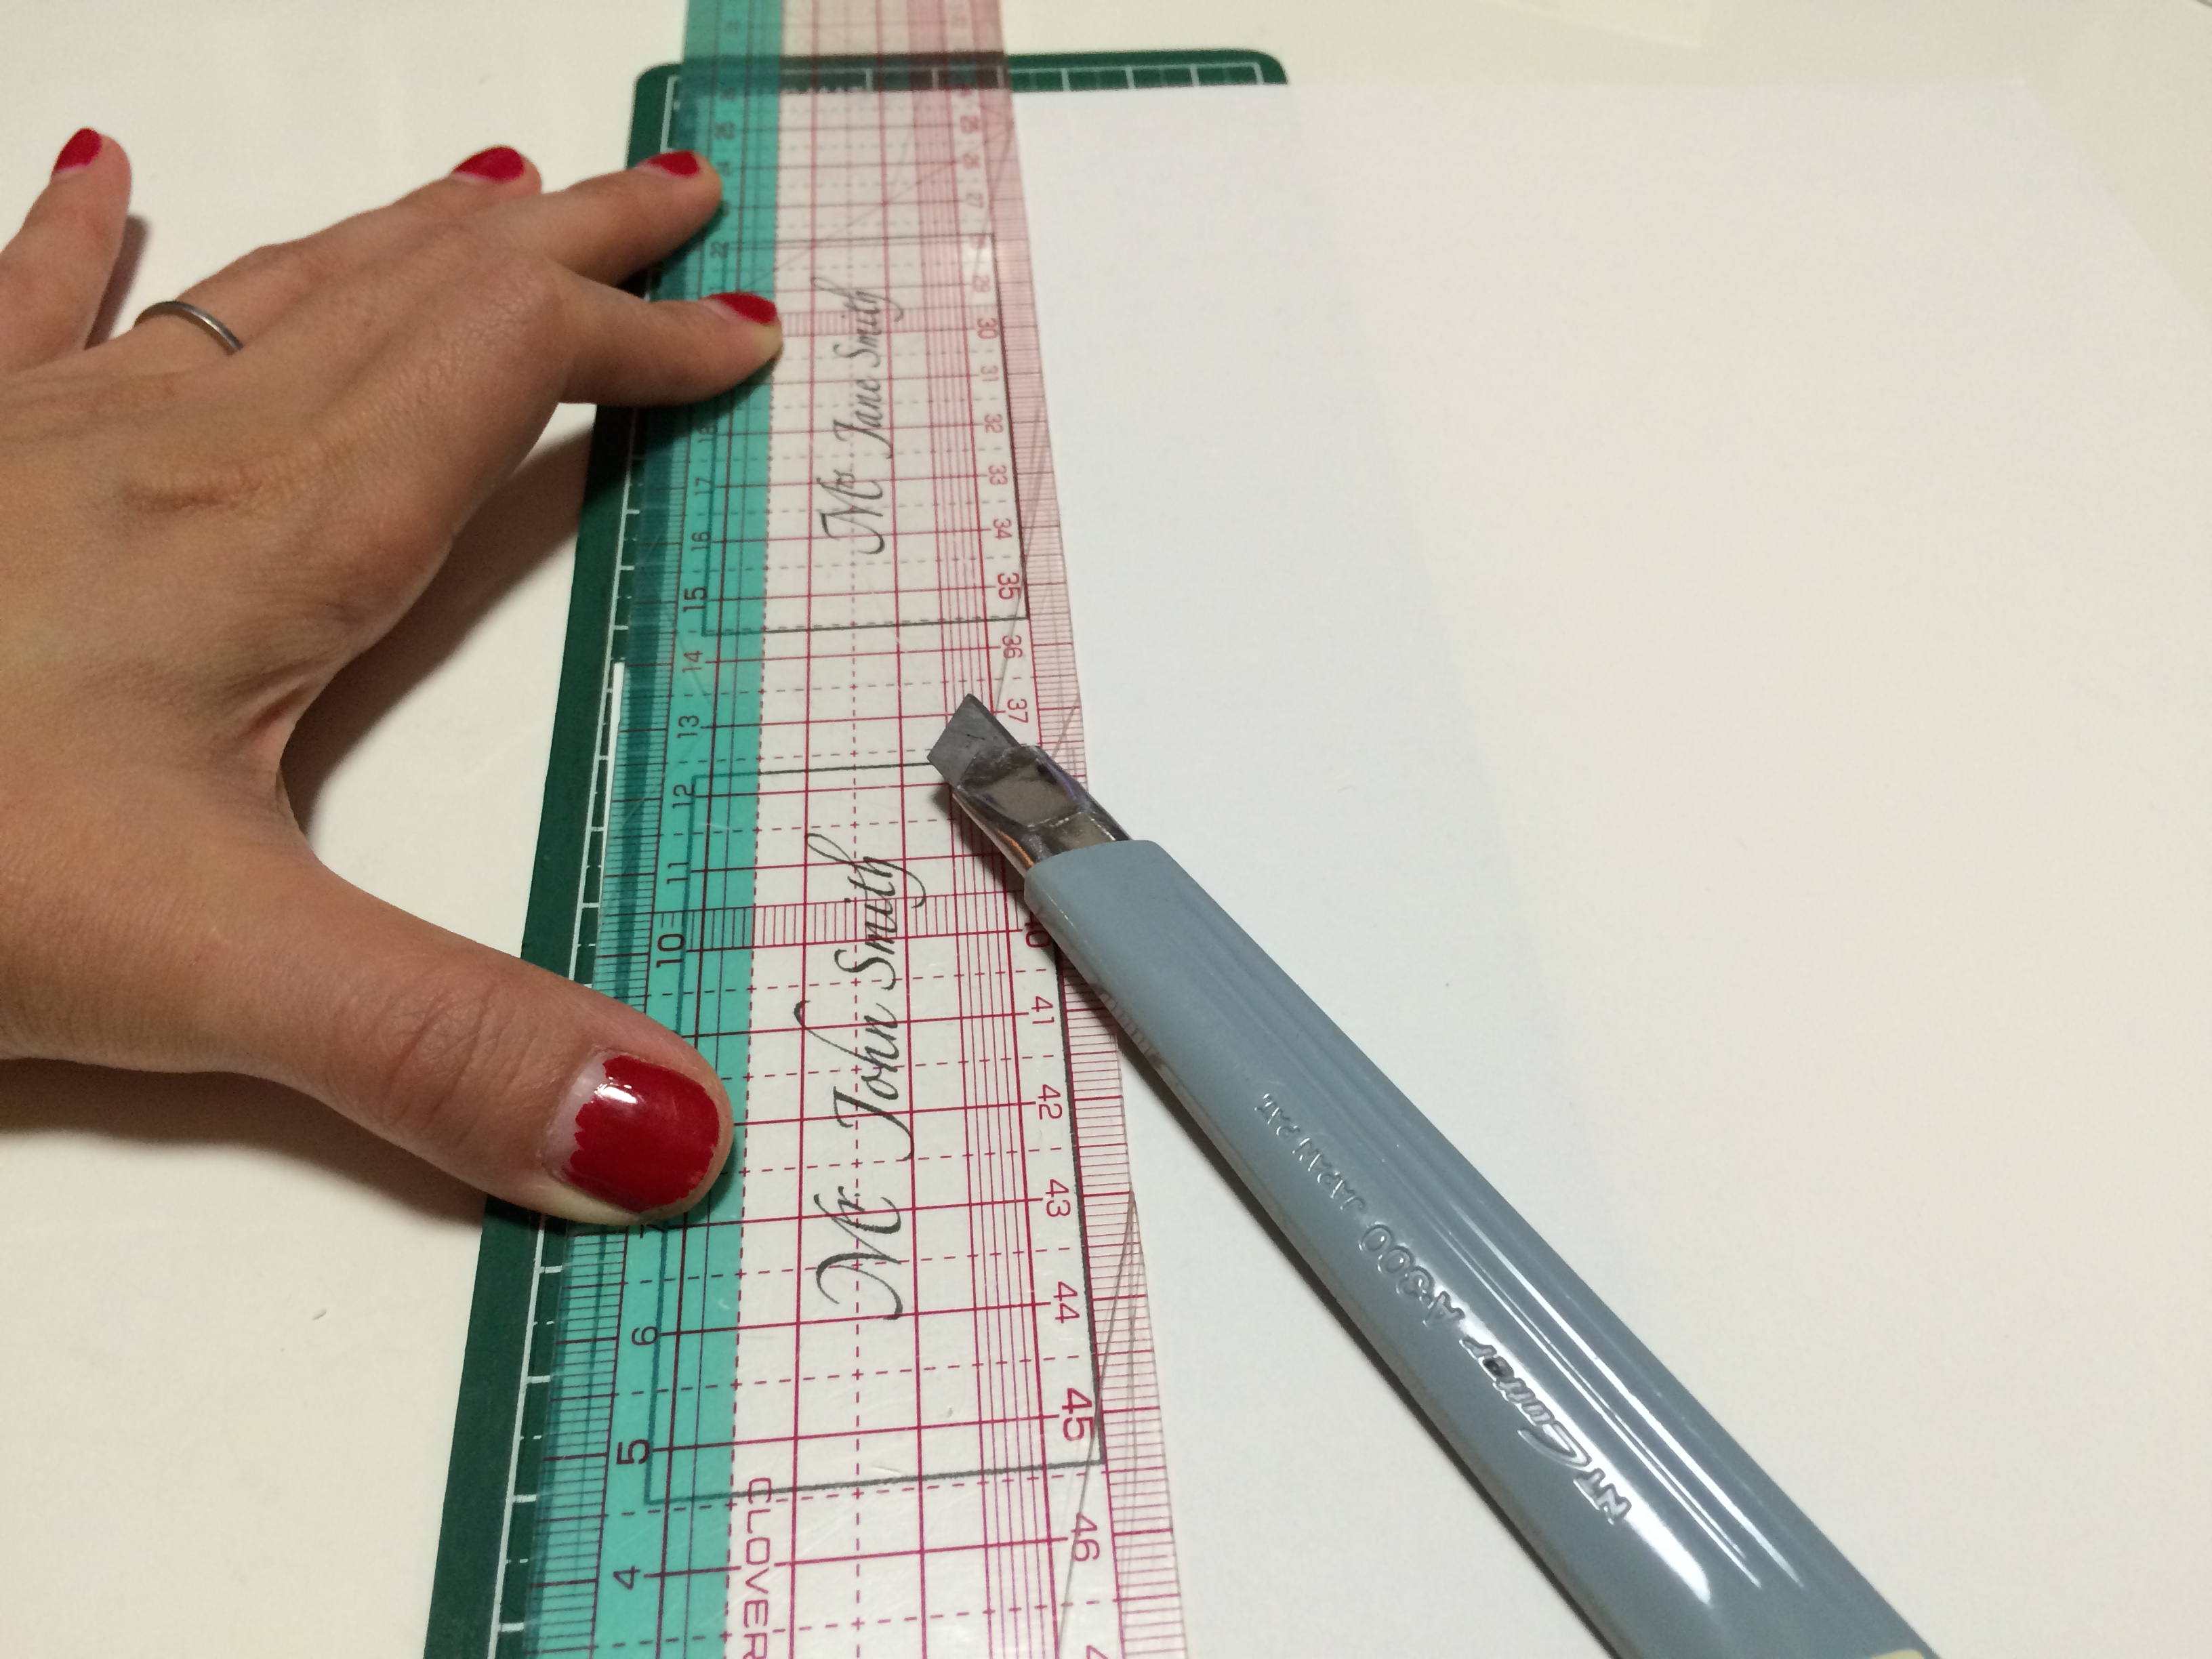
ruler / 定規 (i used a transparent sewing/patterning ruler (see step 1) to measure and cut simultaneously. / 透明のパターン用定規(ステップ1をご参照ください)を使うと測りながら切ることが出来て、スピードアップ出来ます。) double stick tape / 両面テープ
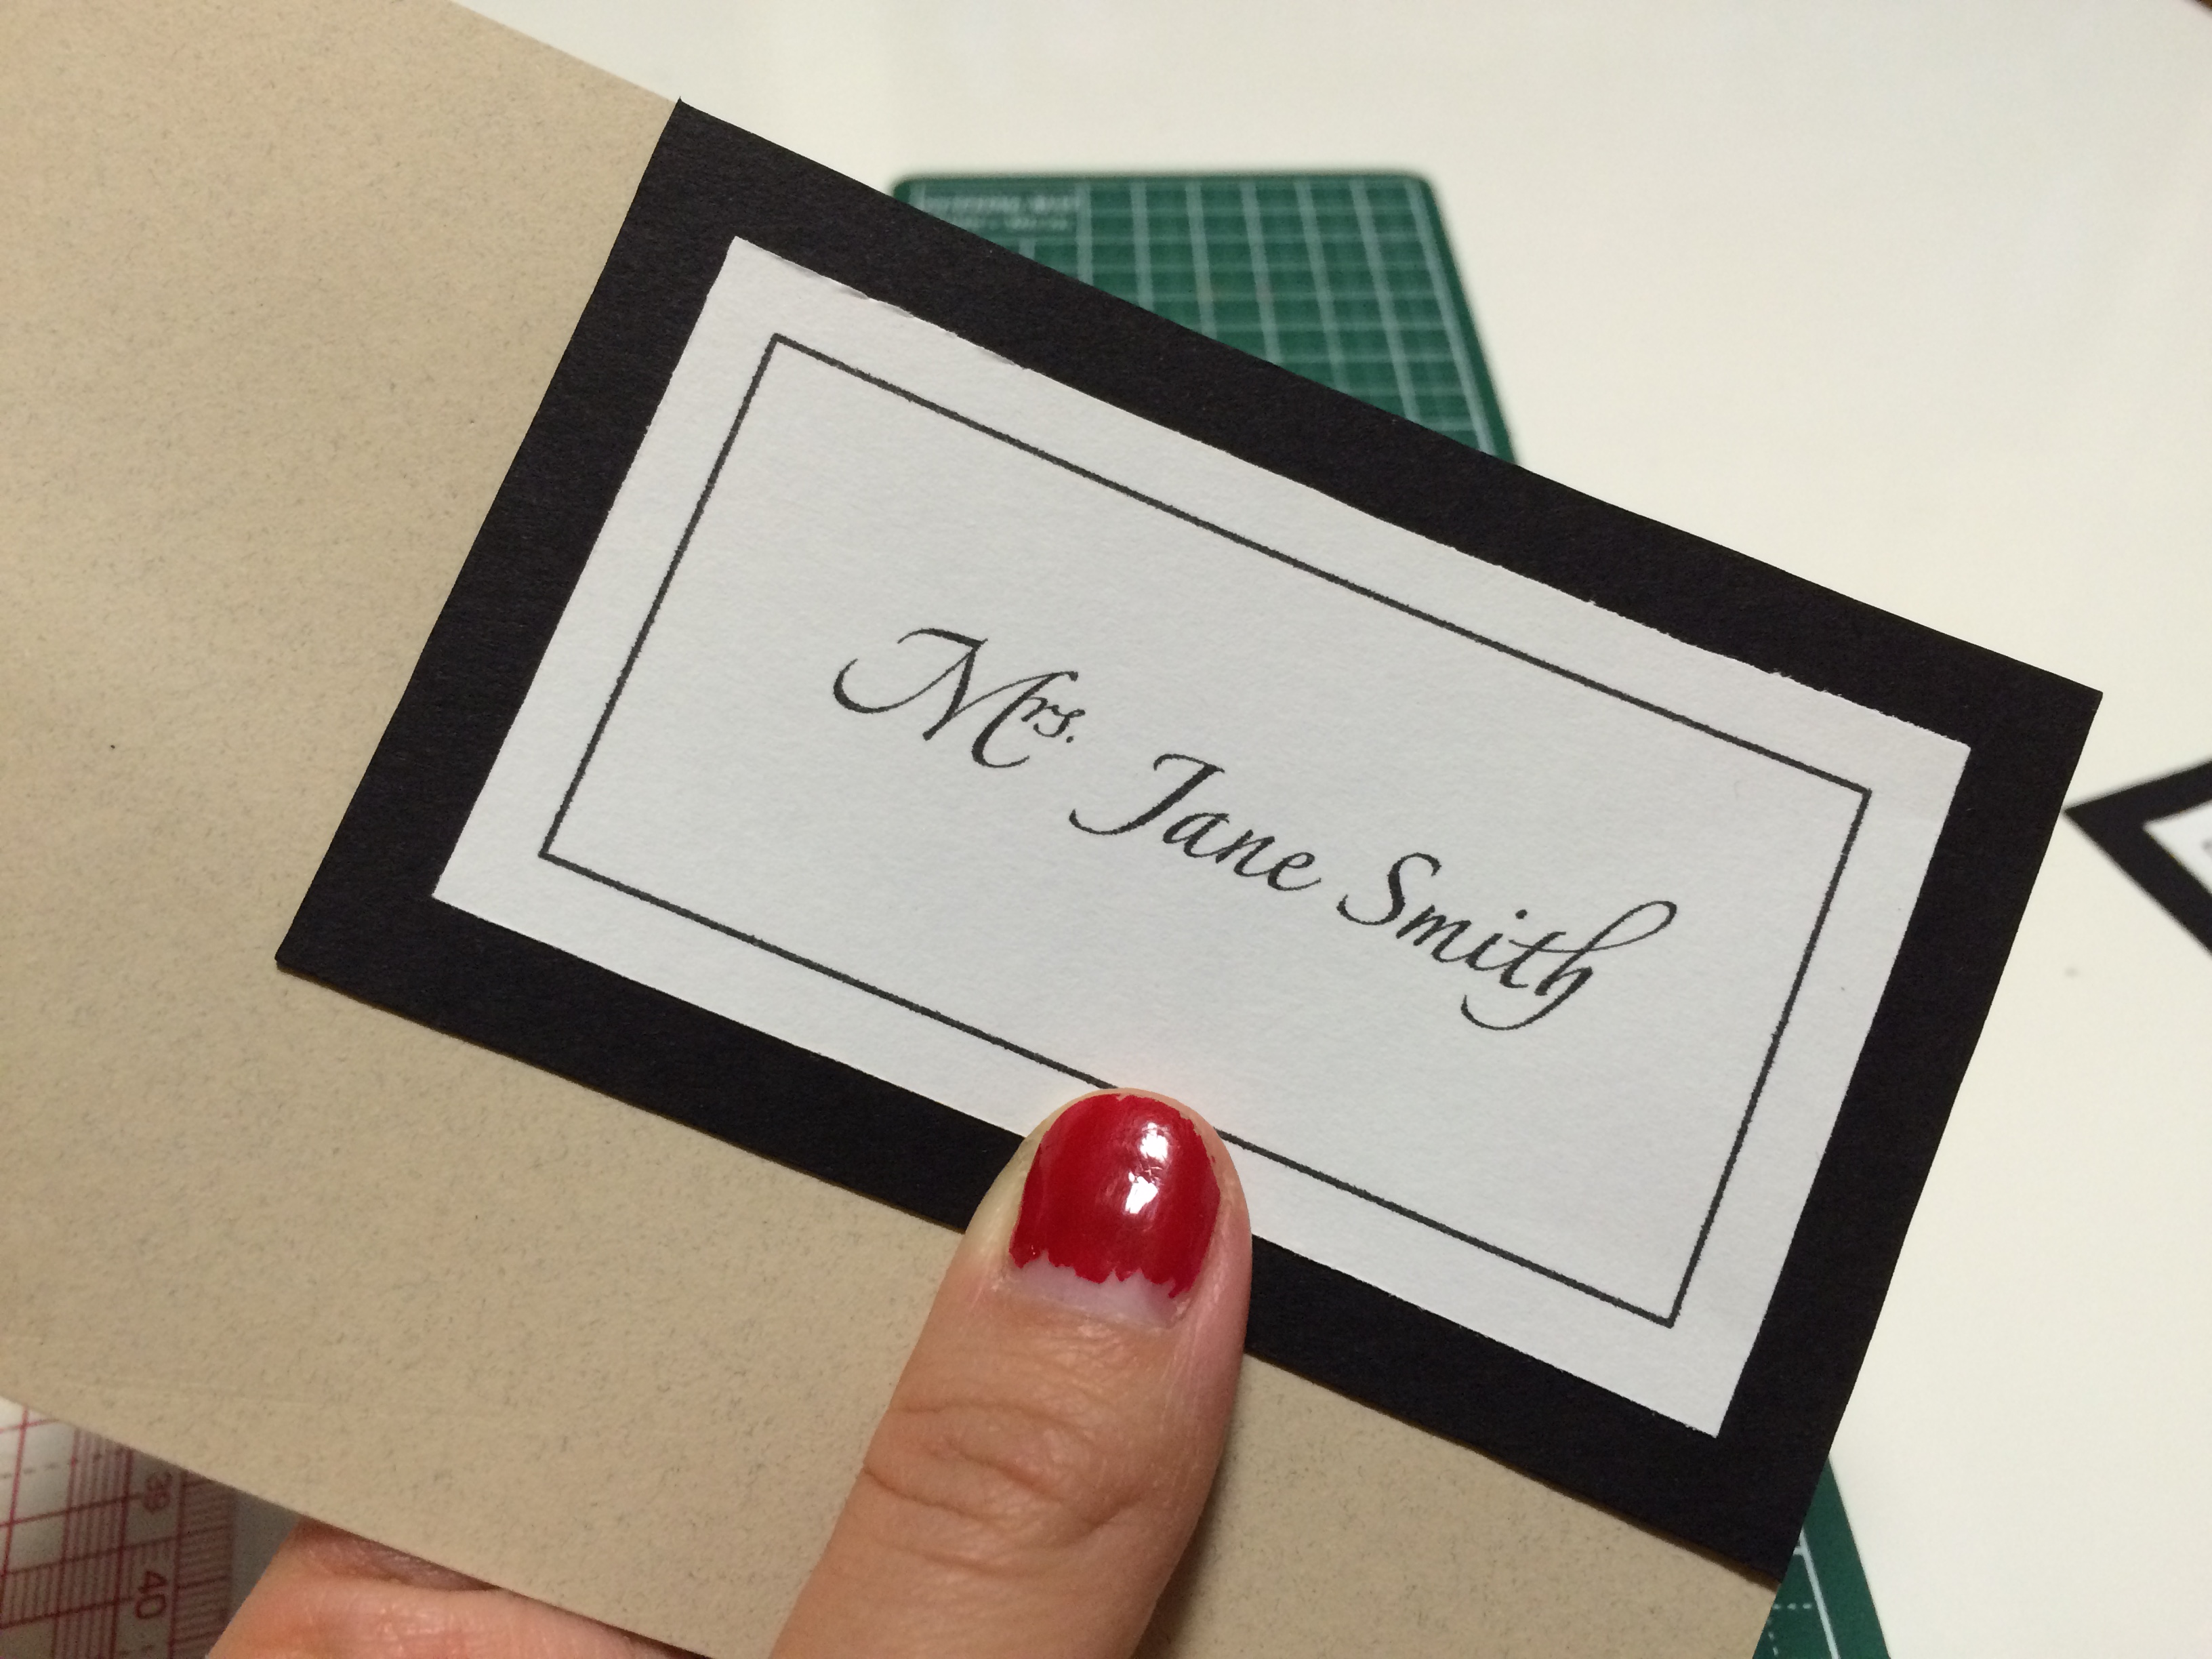
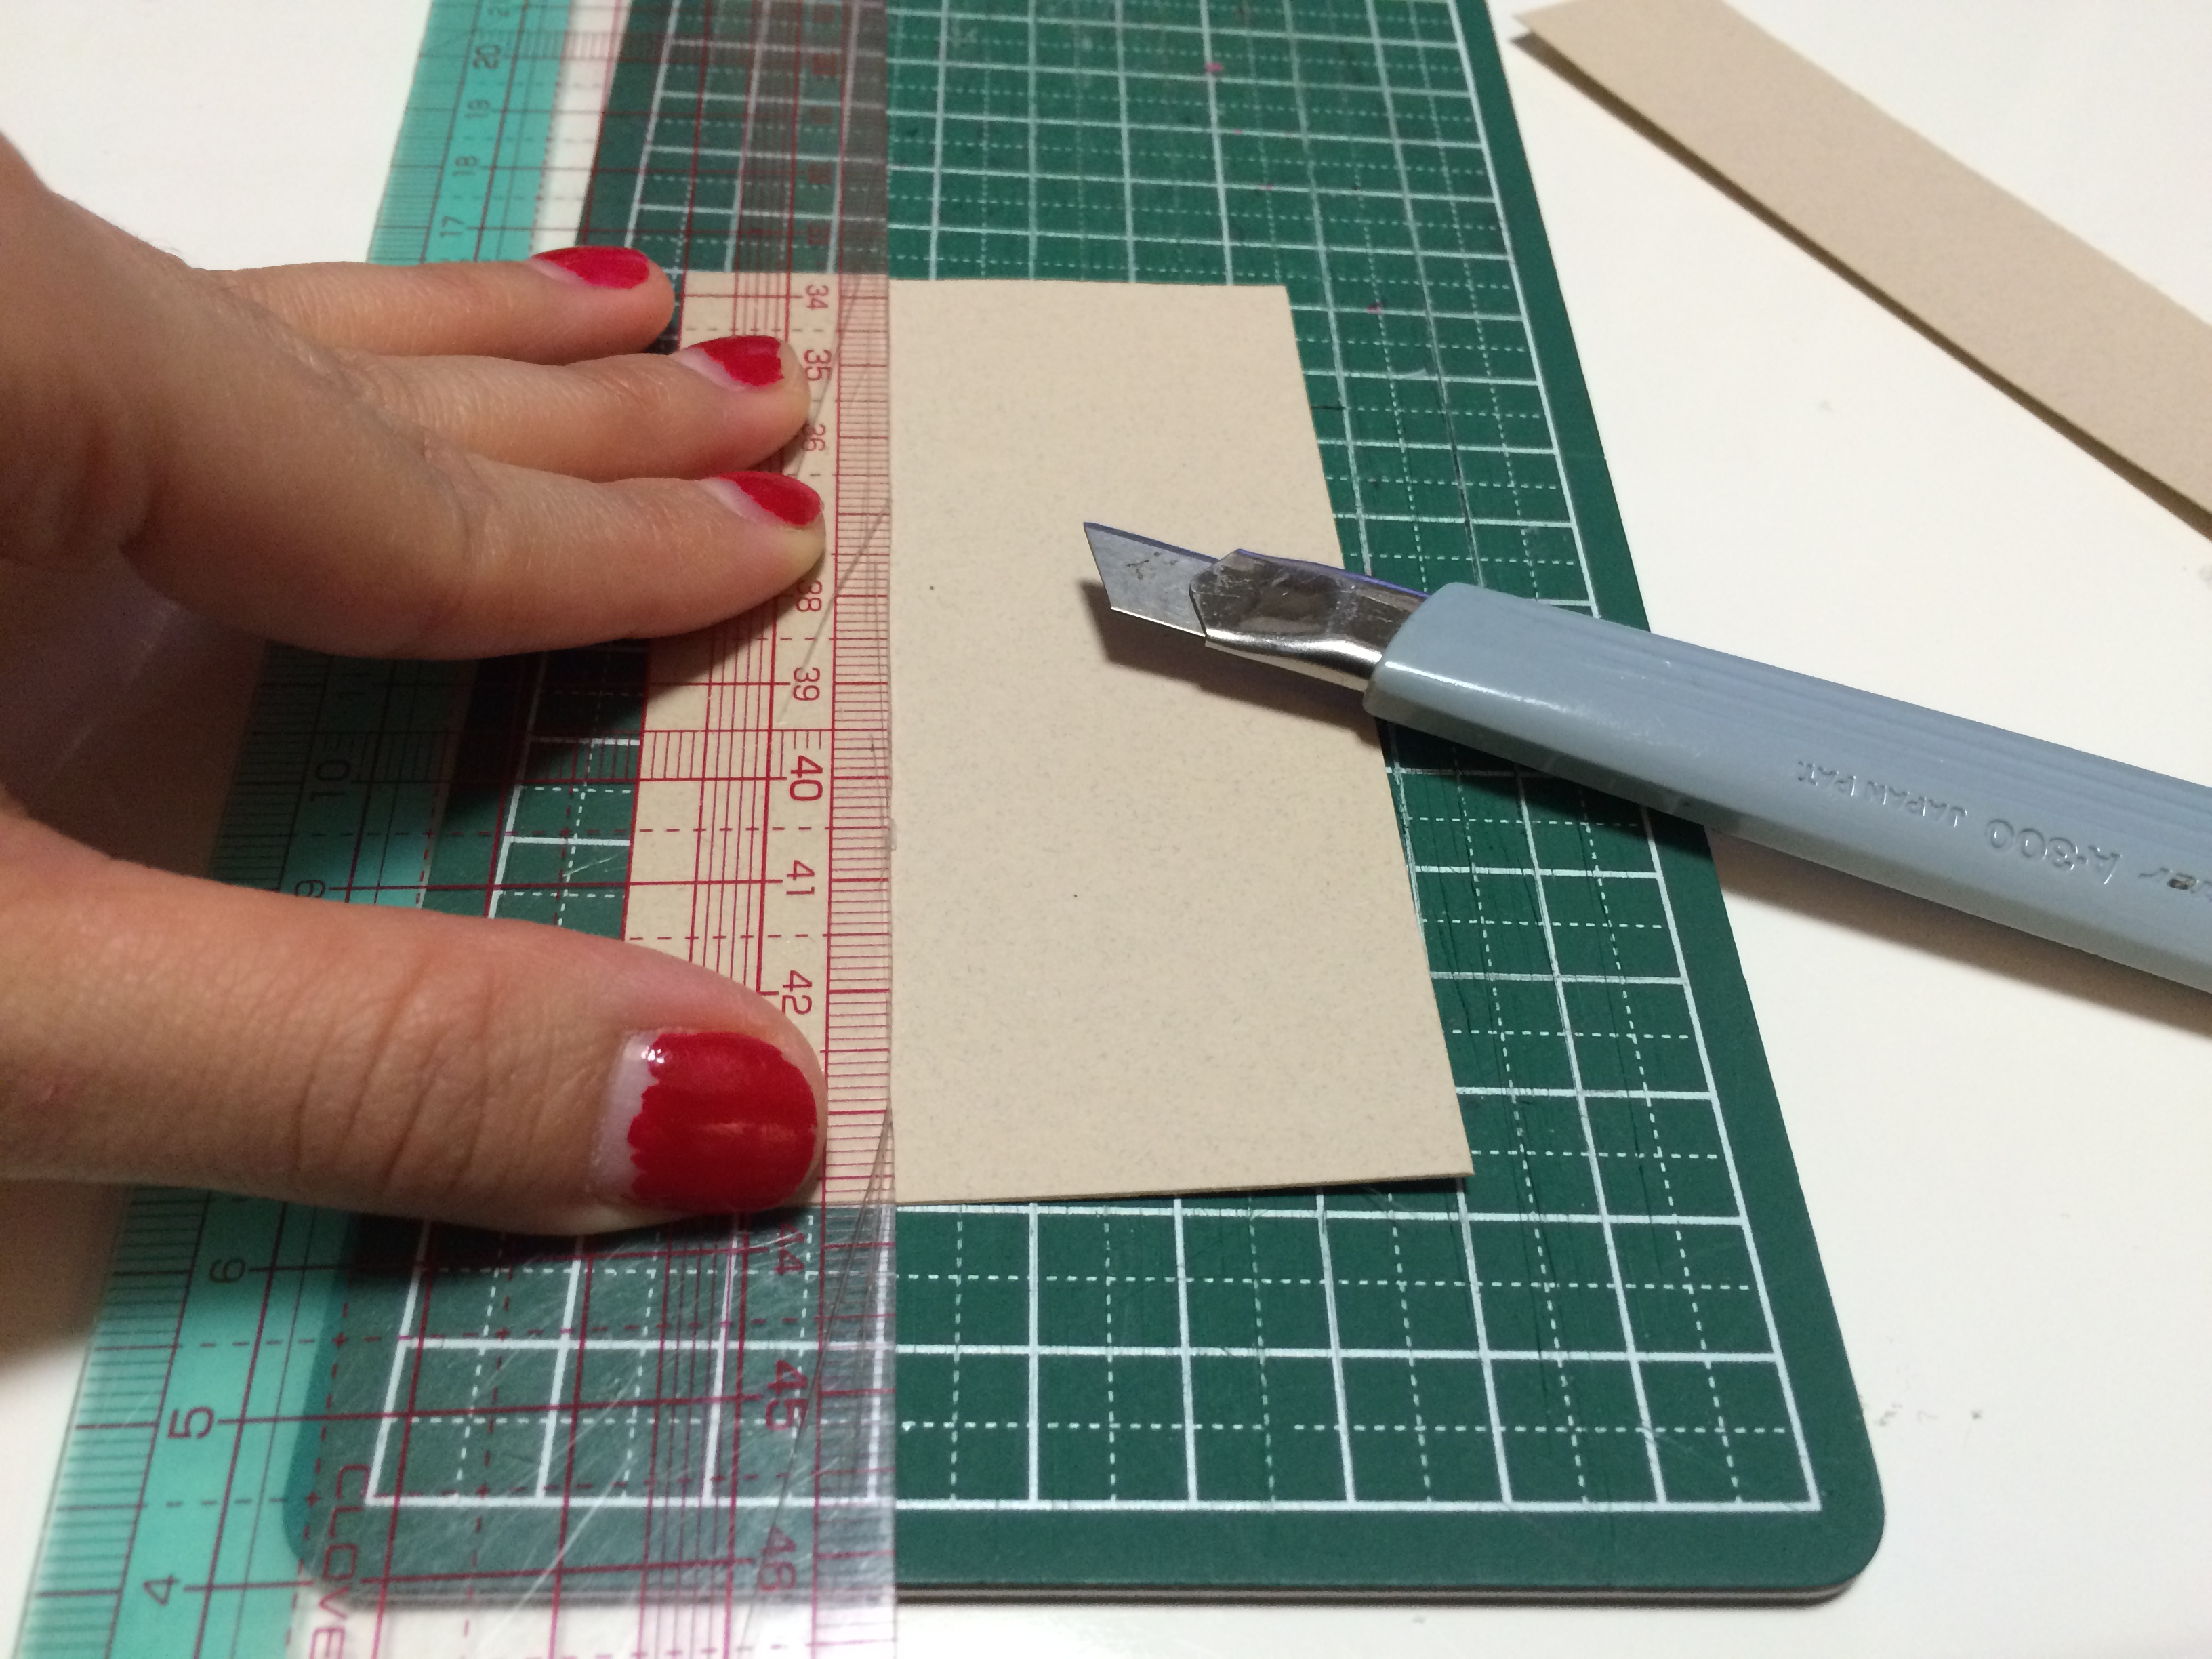
1. cut out the names to 8.7cm x 4.7cm/3 1/2in x 1 3/4in (i cut 5mm/1/8in around the rectangle using my patterning ruler). / 印刷されたネームを8.7cm×4.7cmに切る。(透明の定規を使って長方形の周り5mmでカットしました。)
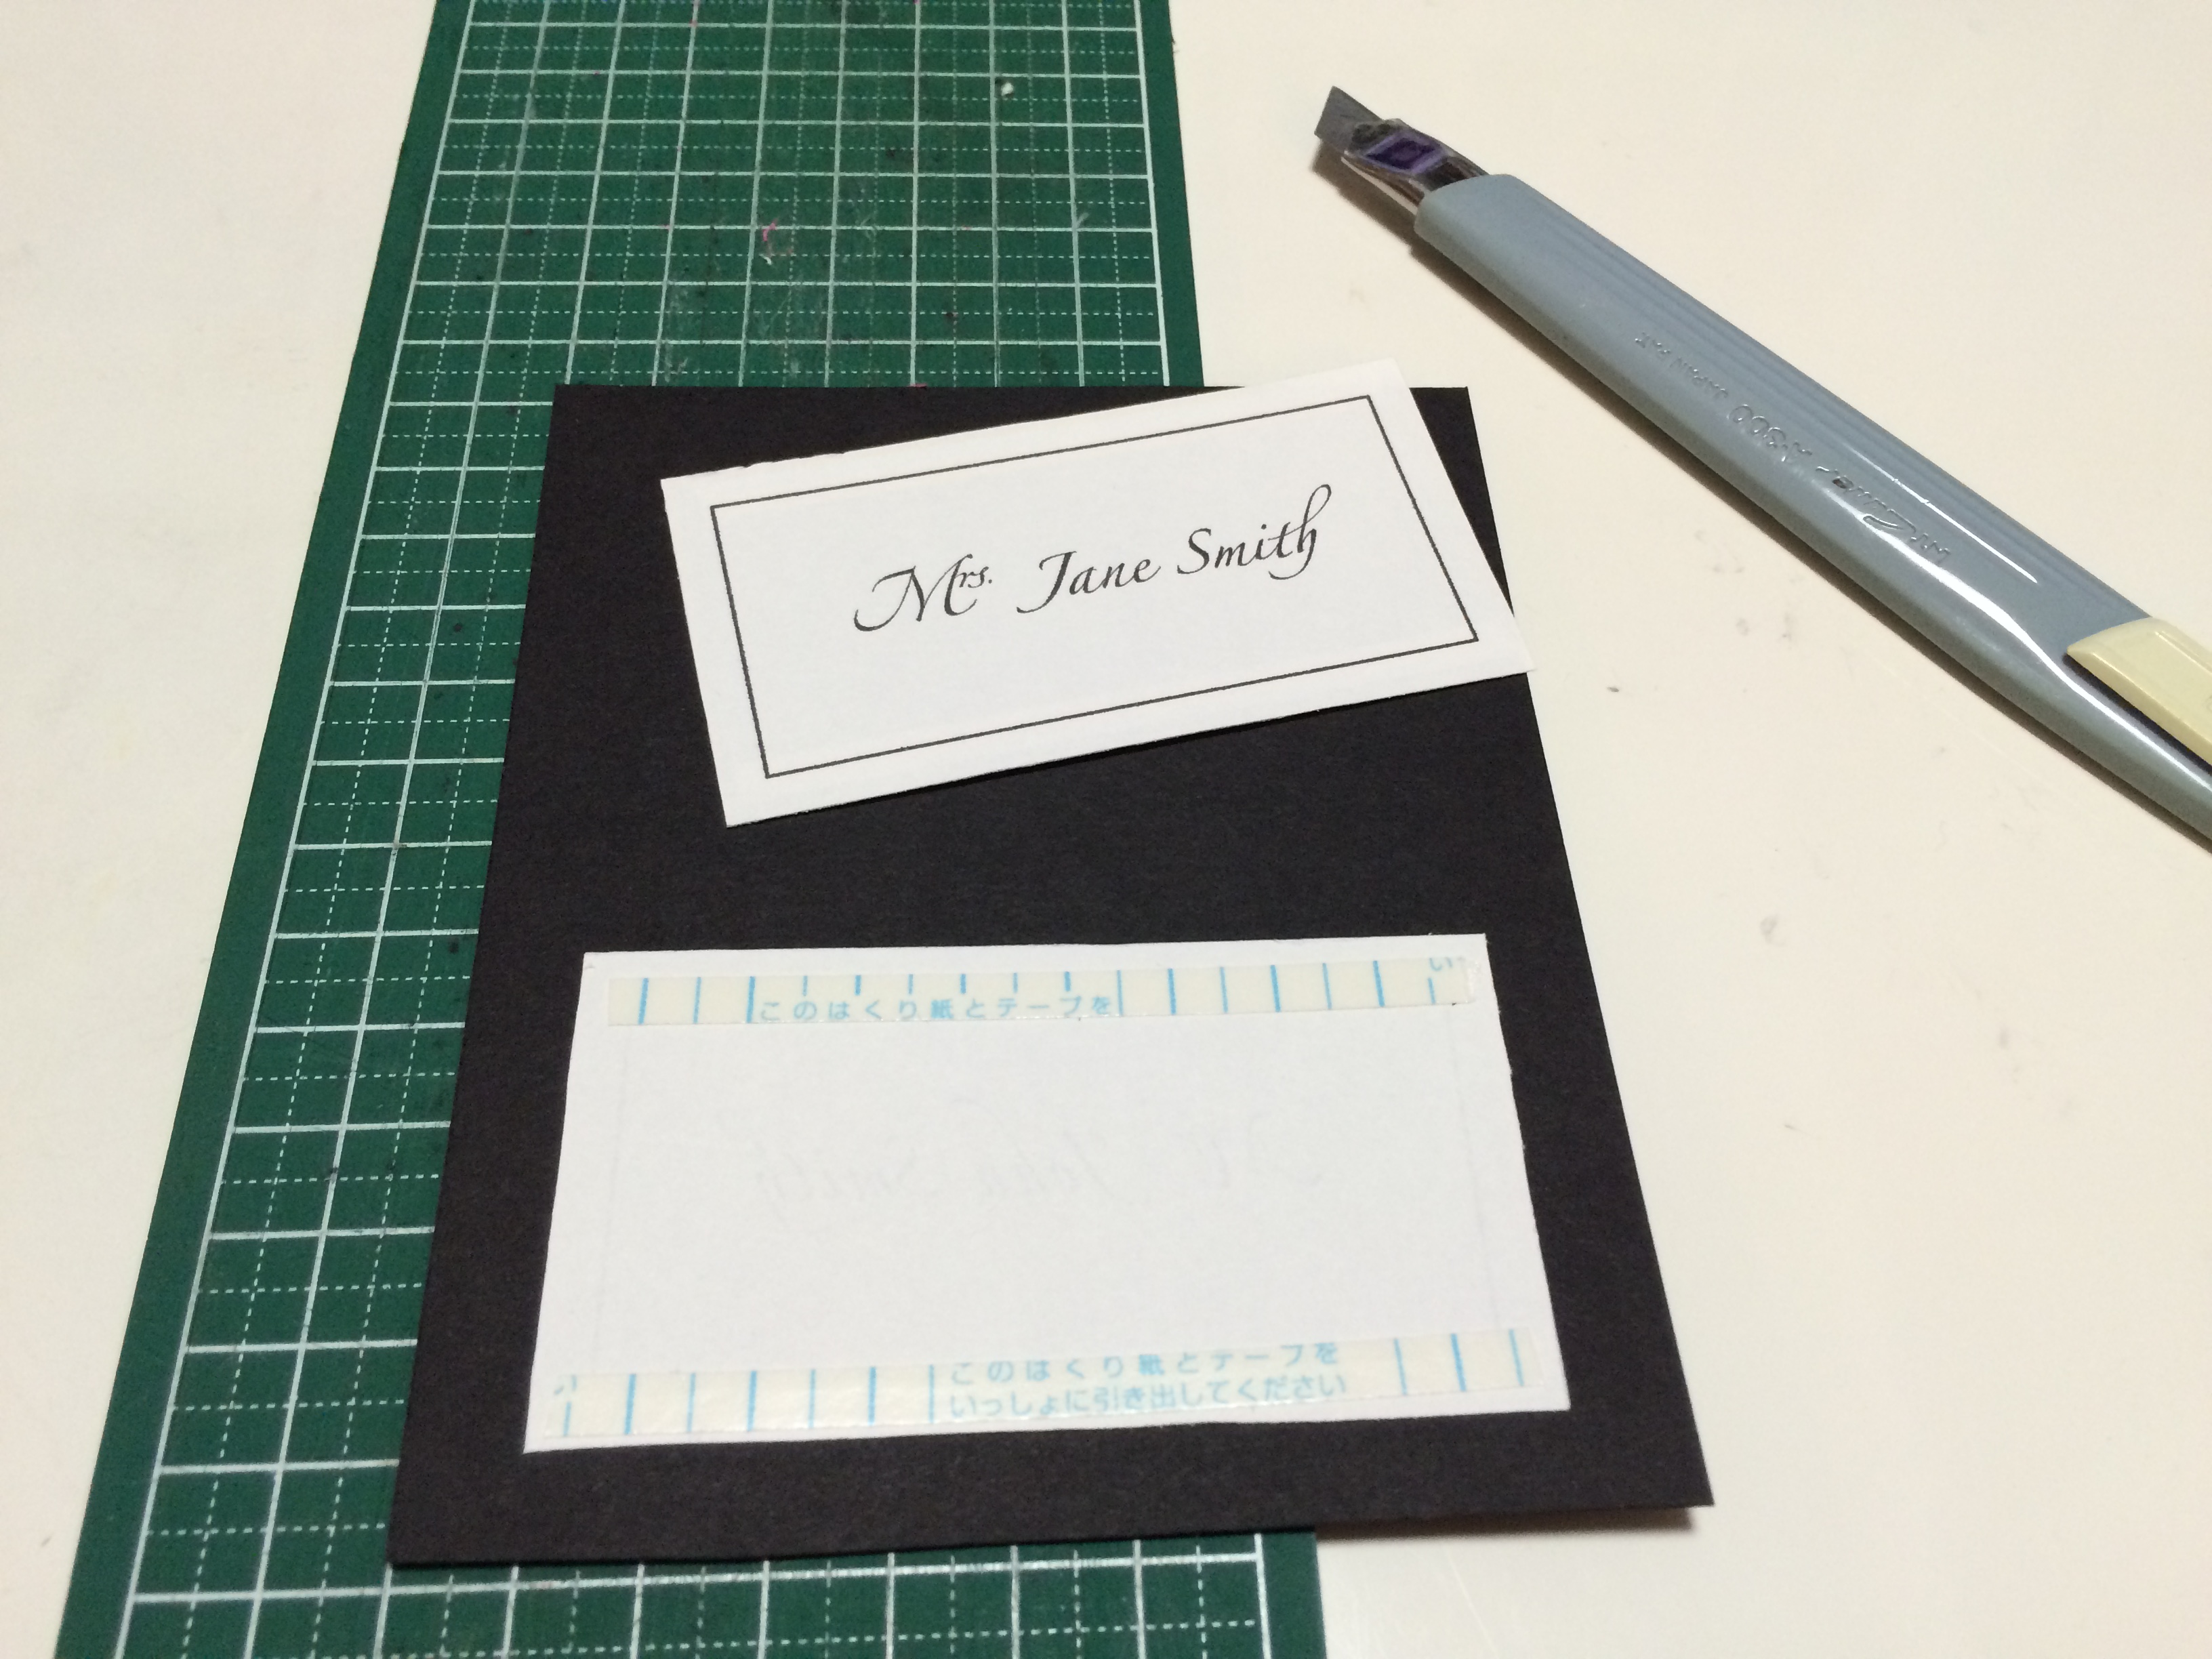
2. apply double stick tape to the backs of the names and apply to the center of the front card. / 両面テープをネームの裏に貼り、表になる厚紙の中心に貼る。
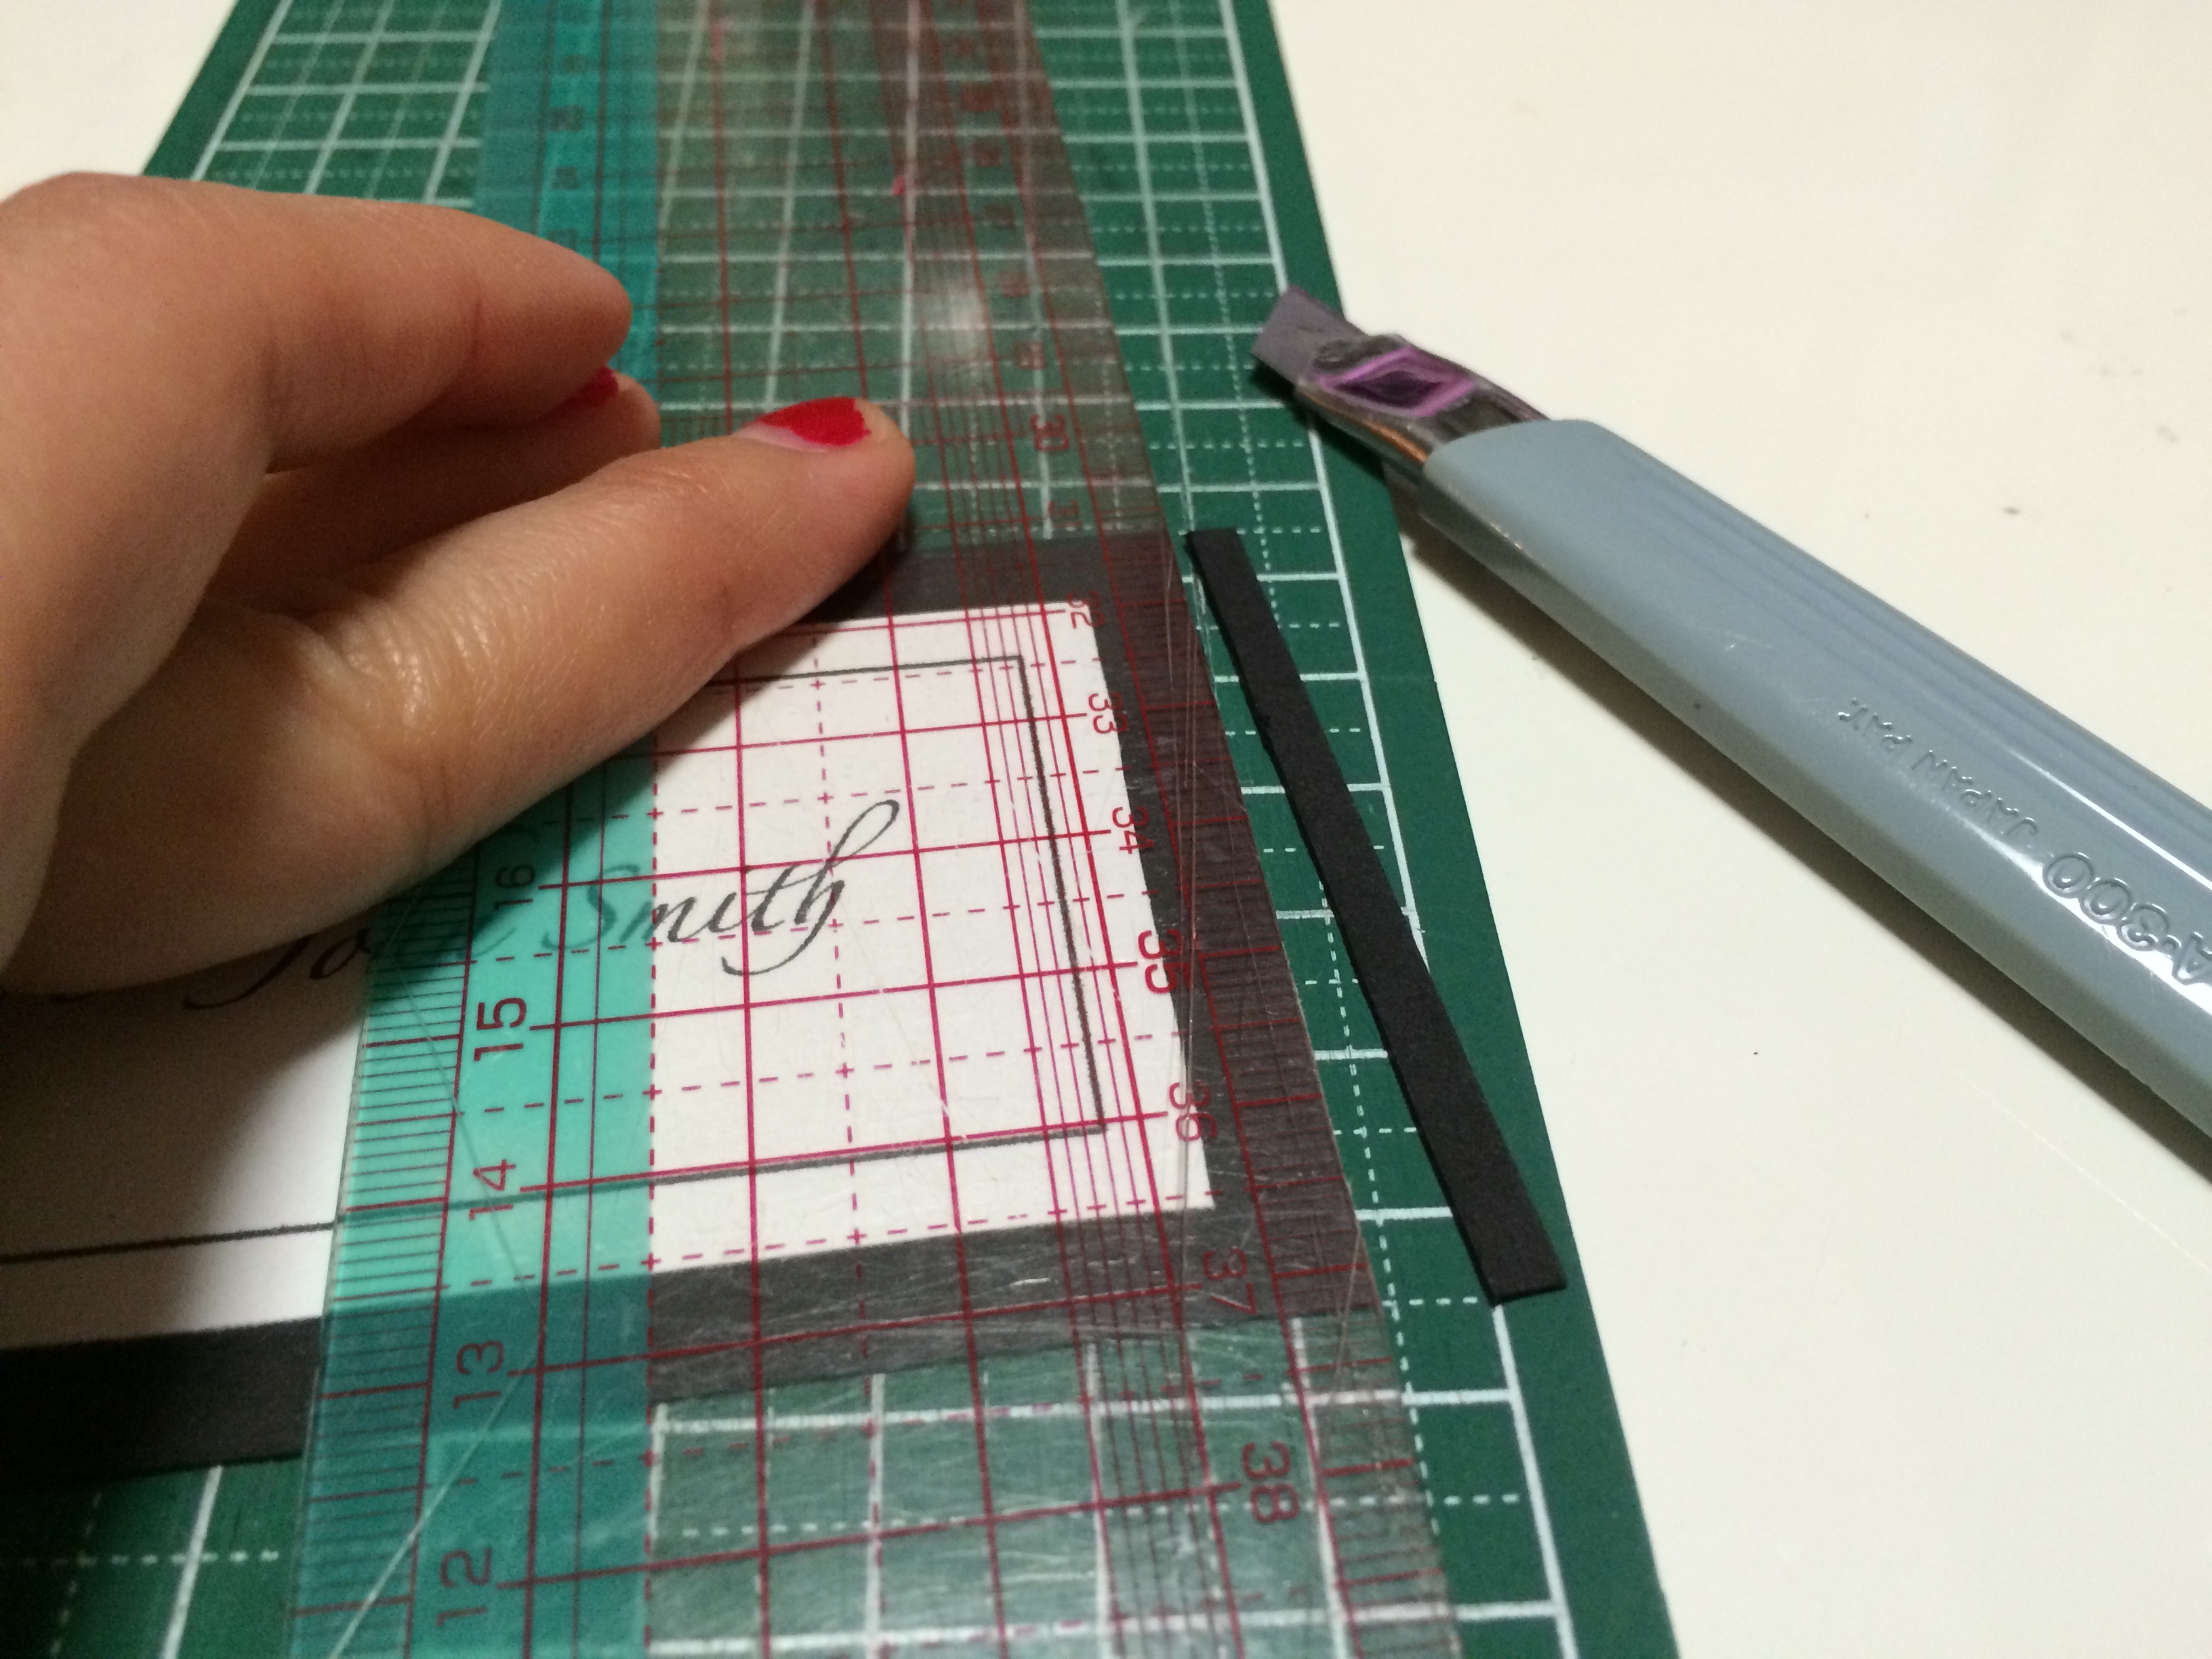
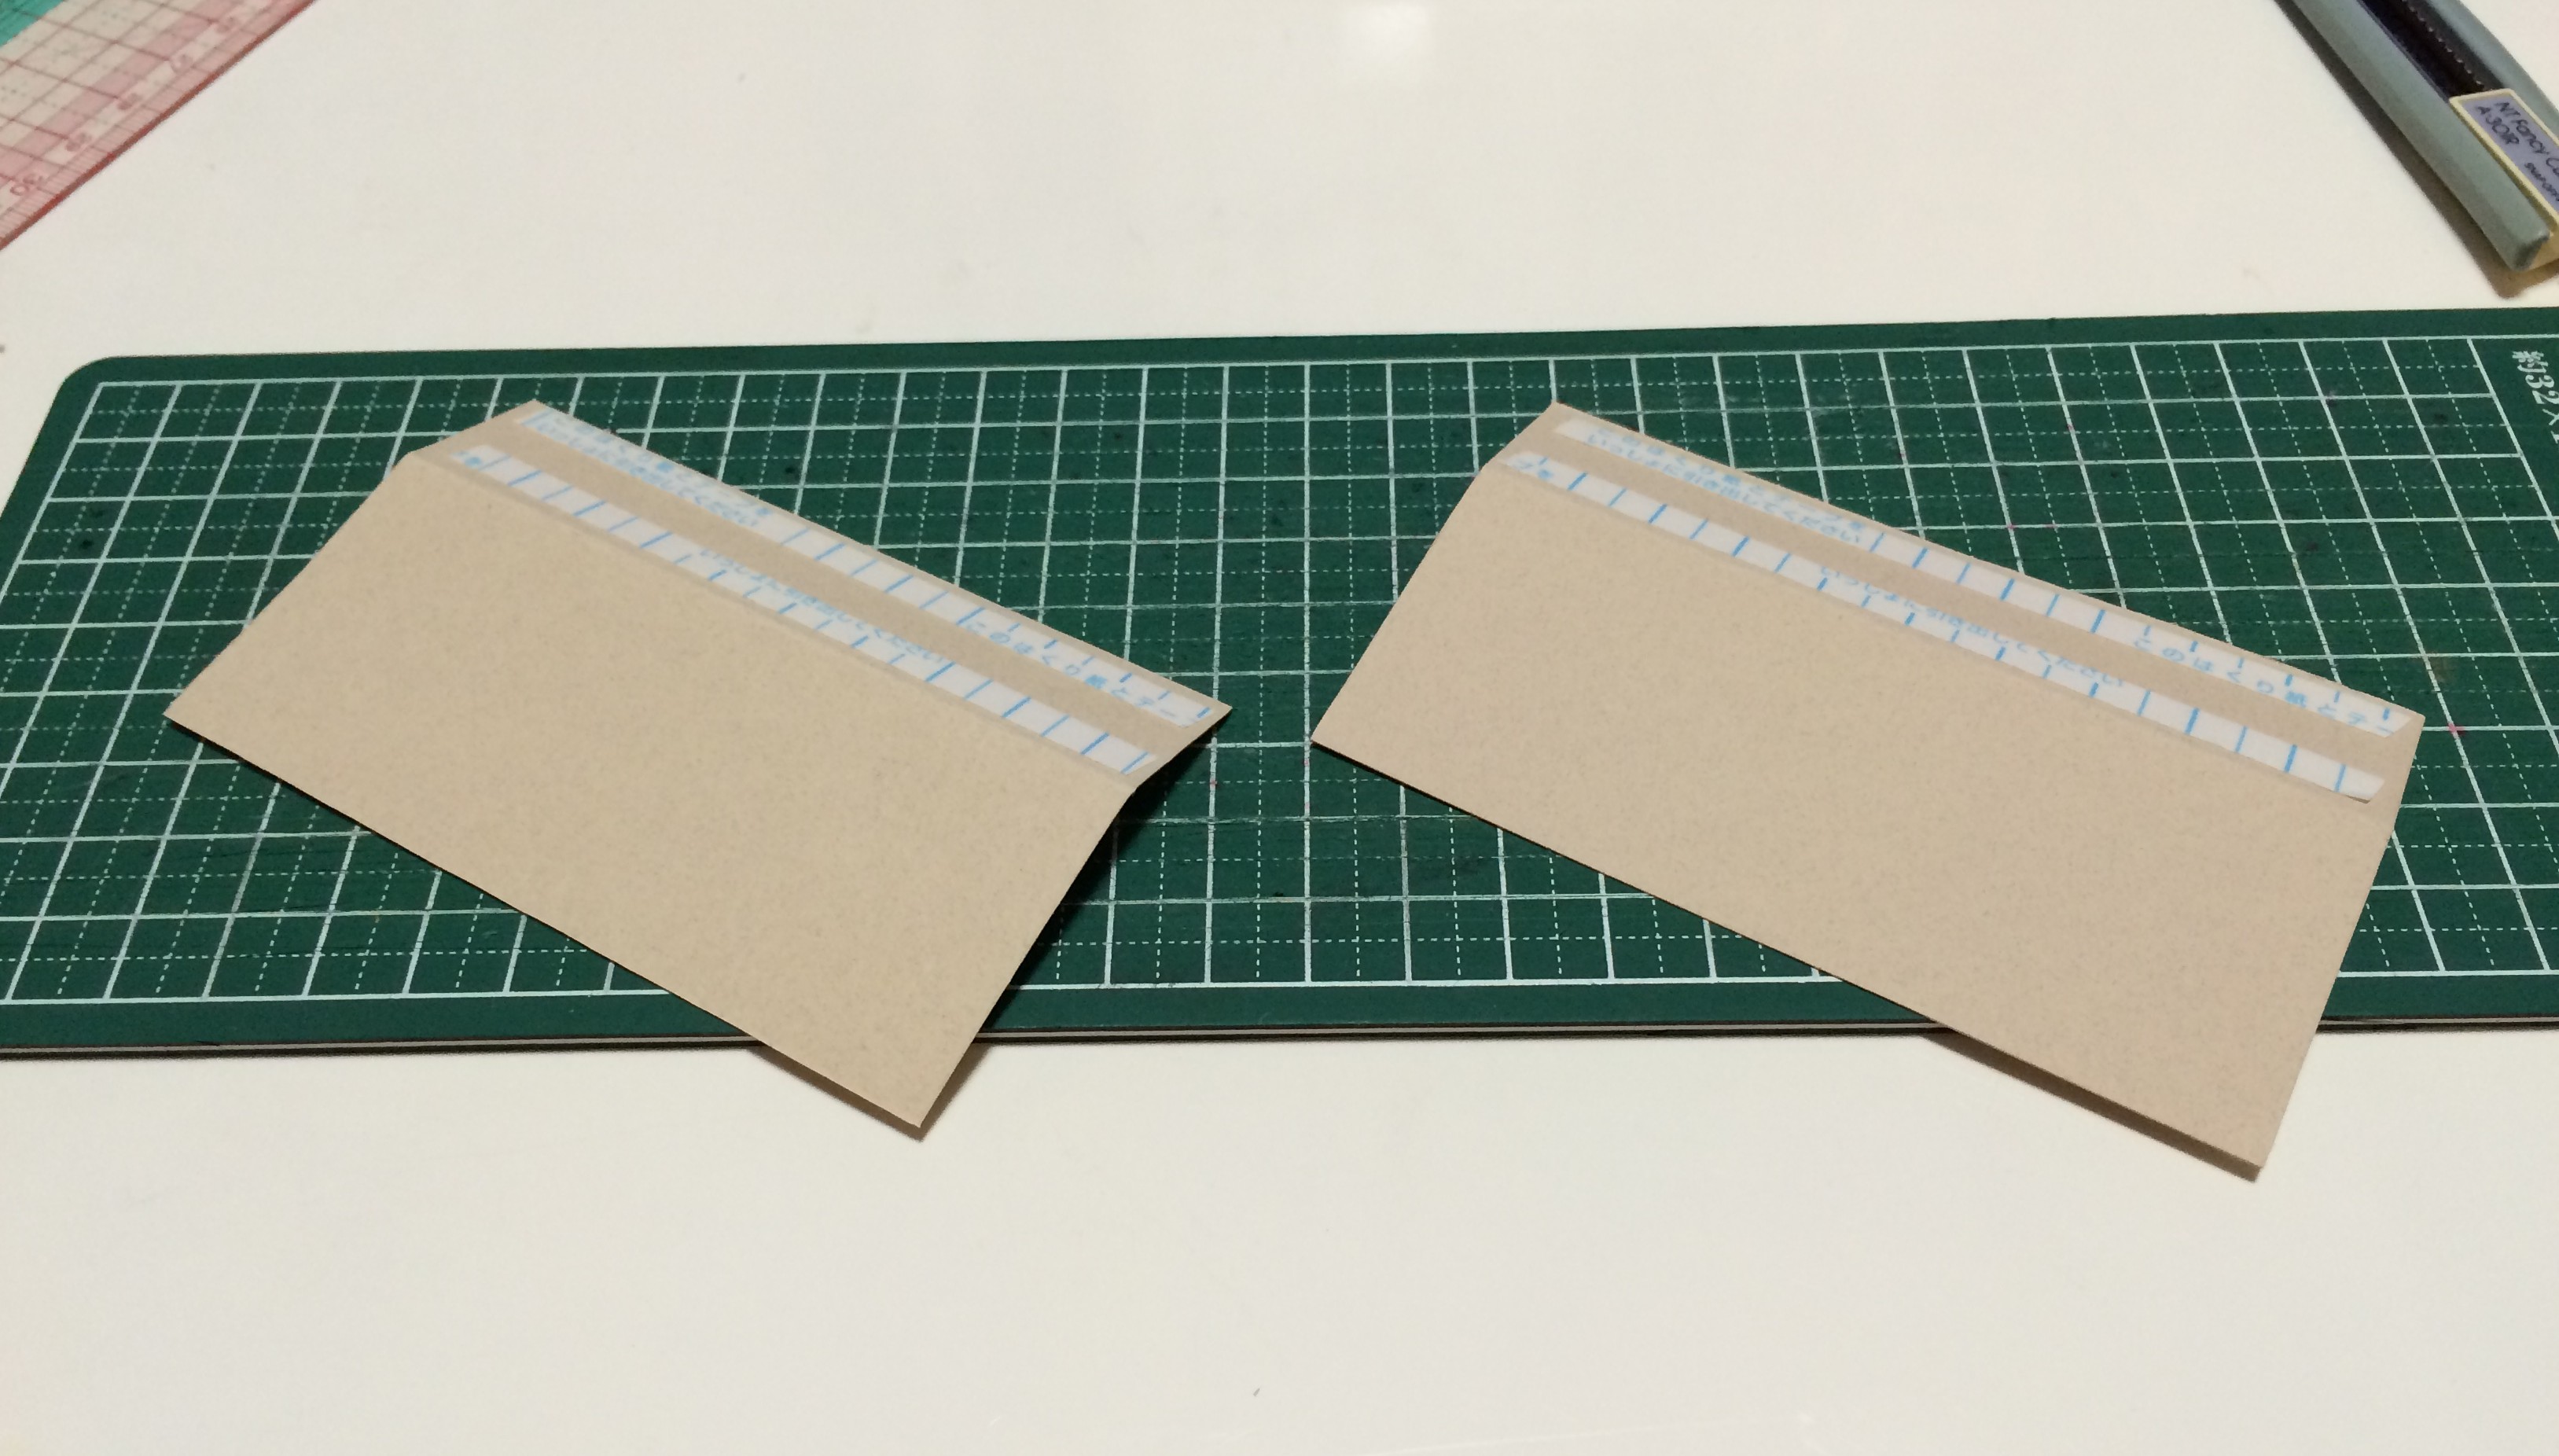
3. cut out the front card to 10cm x 6cm/4in x 2 3/8in (here i cut 7mm/1/4in around the name paper using the patterning ruler). / 表カードを10cm×6cmに切る。(透明定規を使用してネームの周囲7mmでカットしました。)
4. match the front card to a corner of the back card, and cut to the same size. / 裏紙の角に表カードを合わせ、表カードのサイズに合わせて切る。
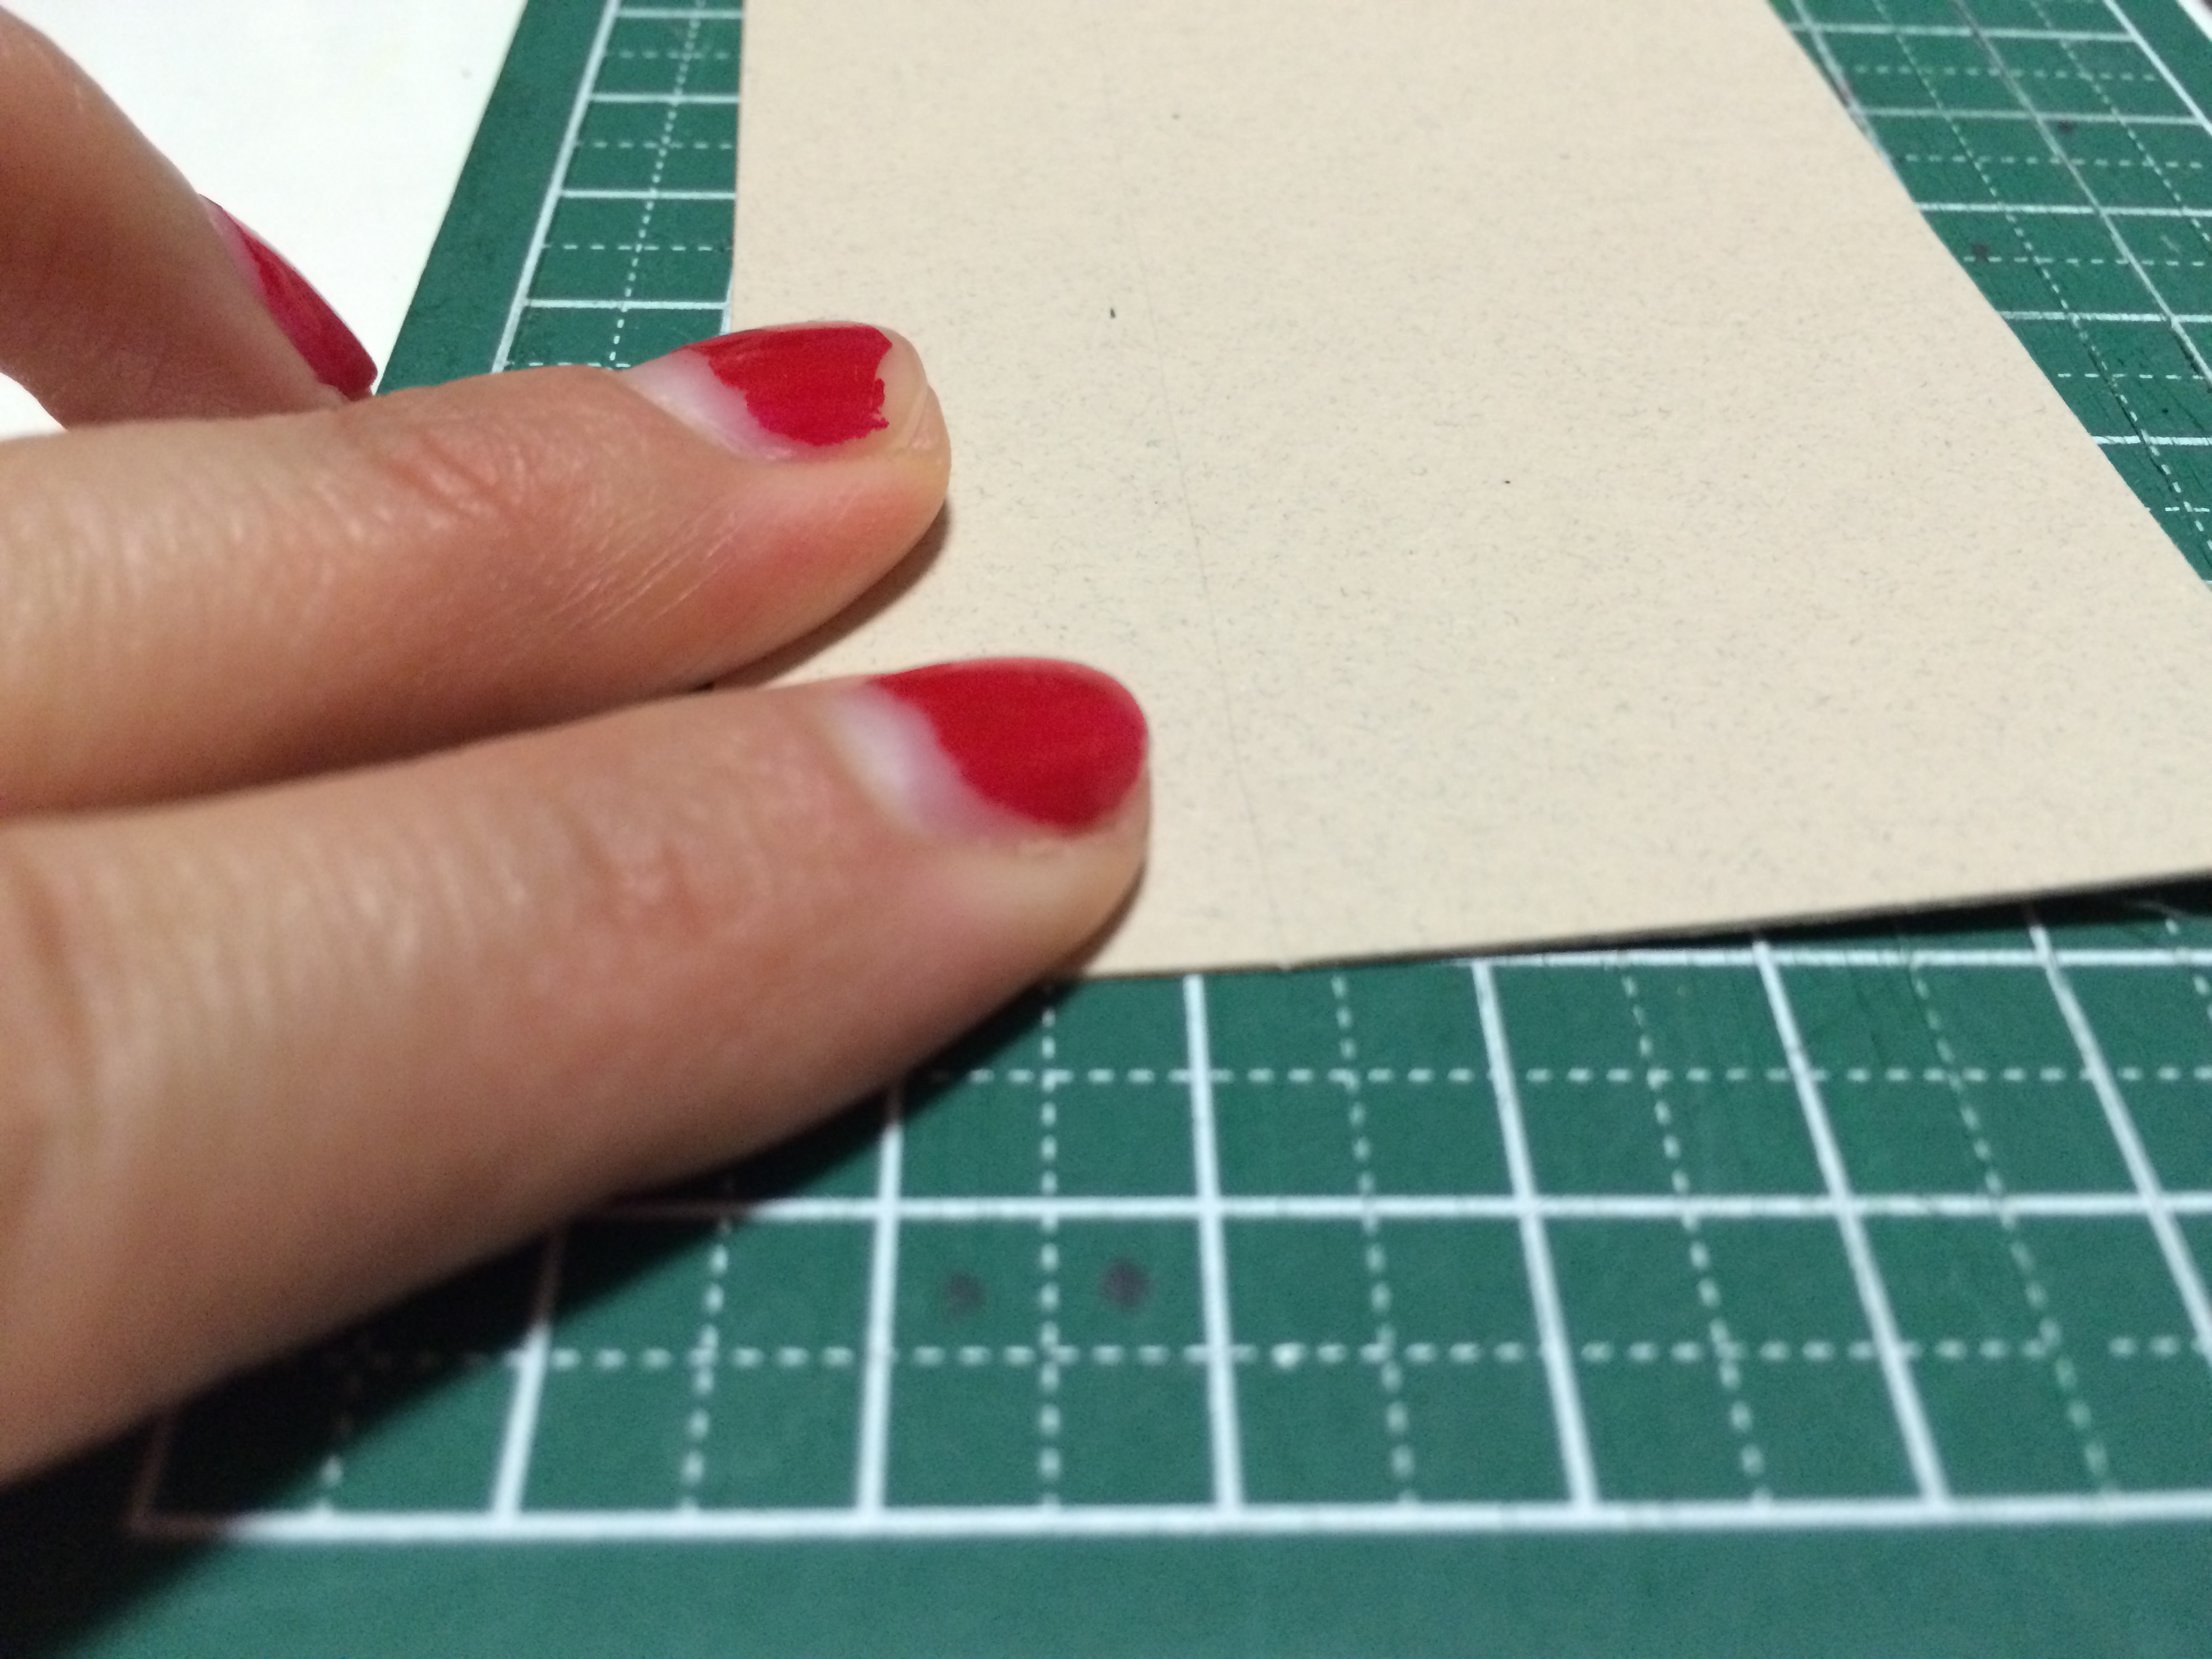
5. with a cutter, lightly score the back card 2cm/3/4in inside one of the longer sides. / カッターを使用して、裏カードを長い辺から2cm内側に軽〜く切り込みを入れる。
here’s a close up of the score. / 切り込みのアップ。これくらい軽くでいいのです!
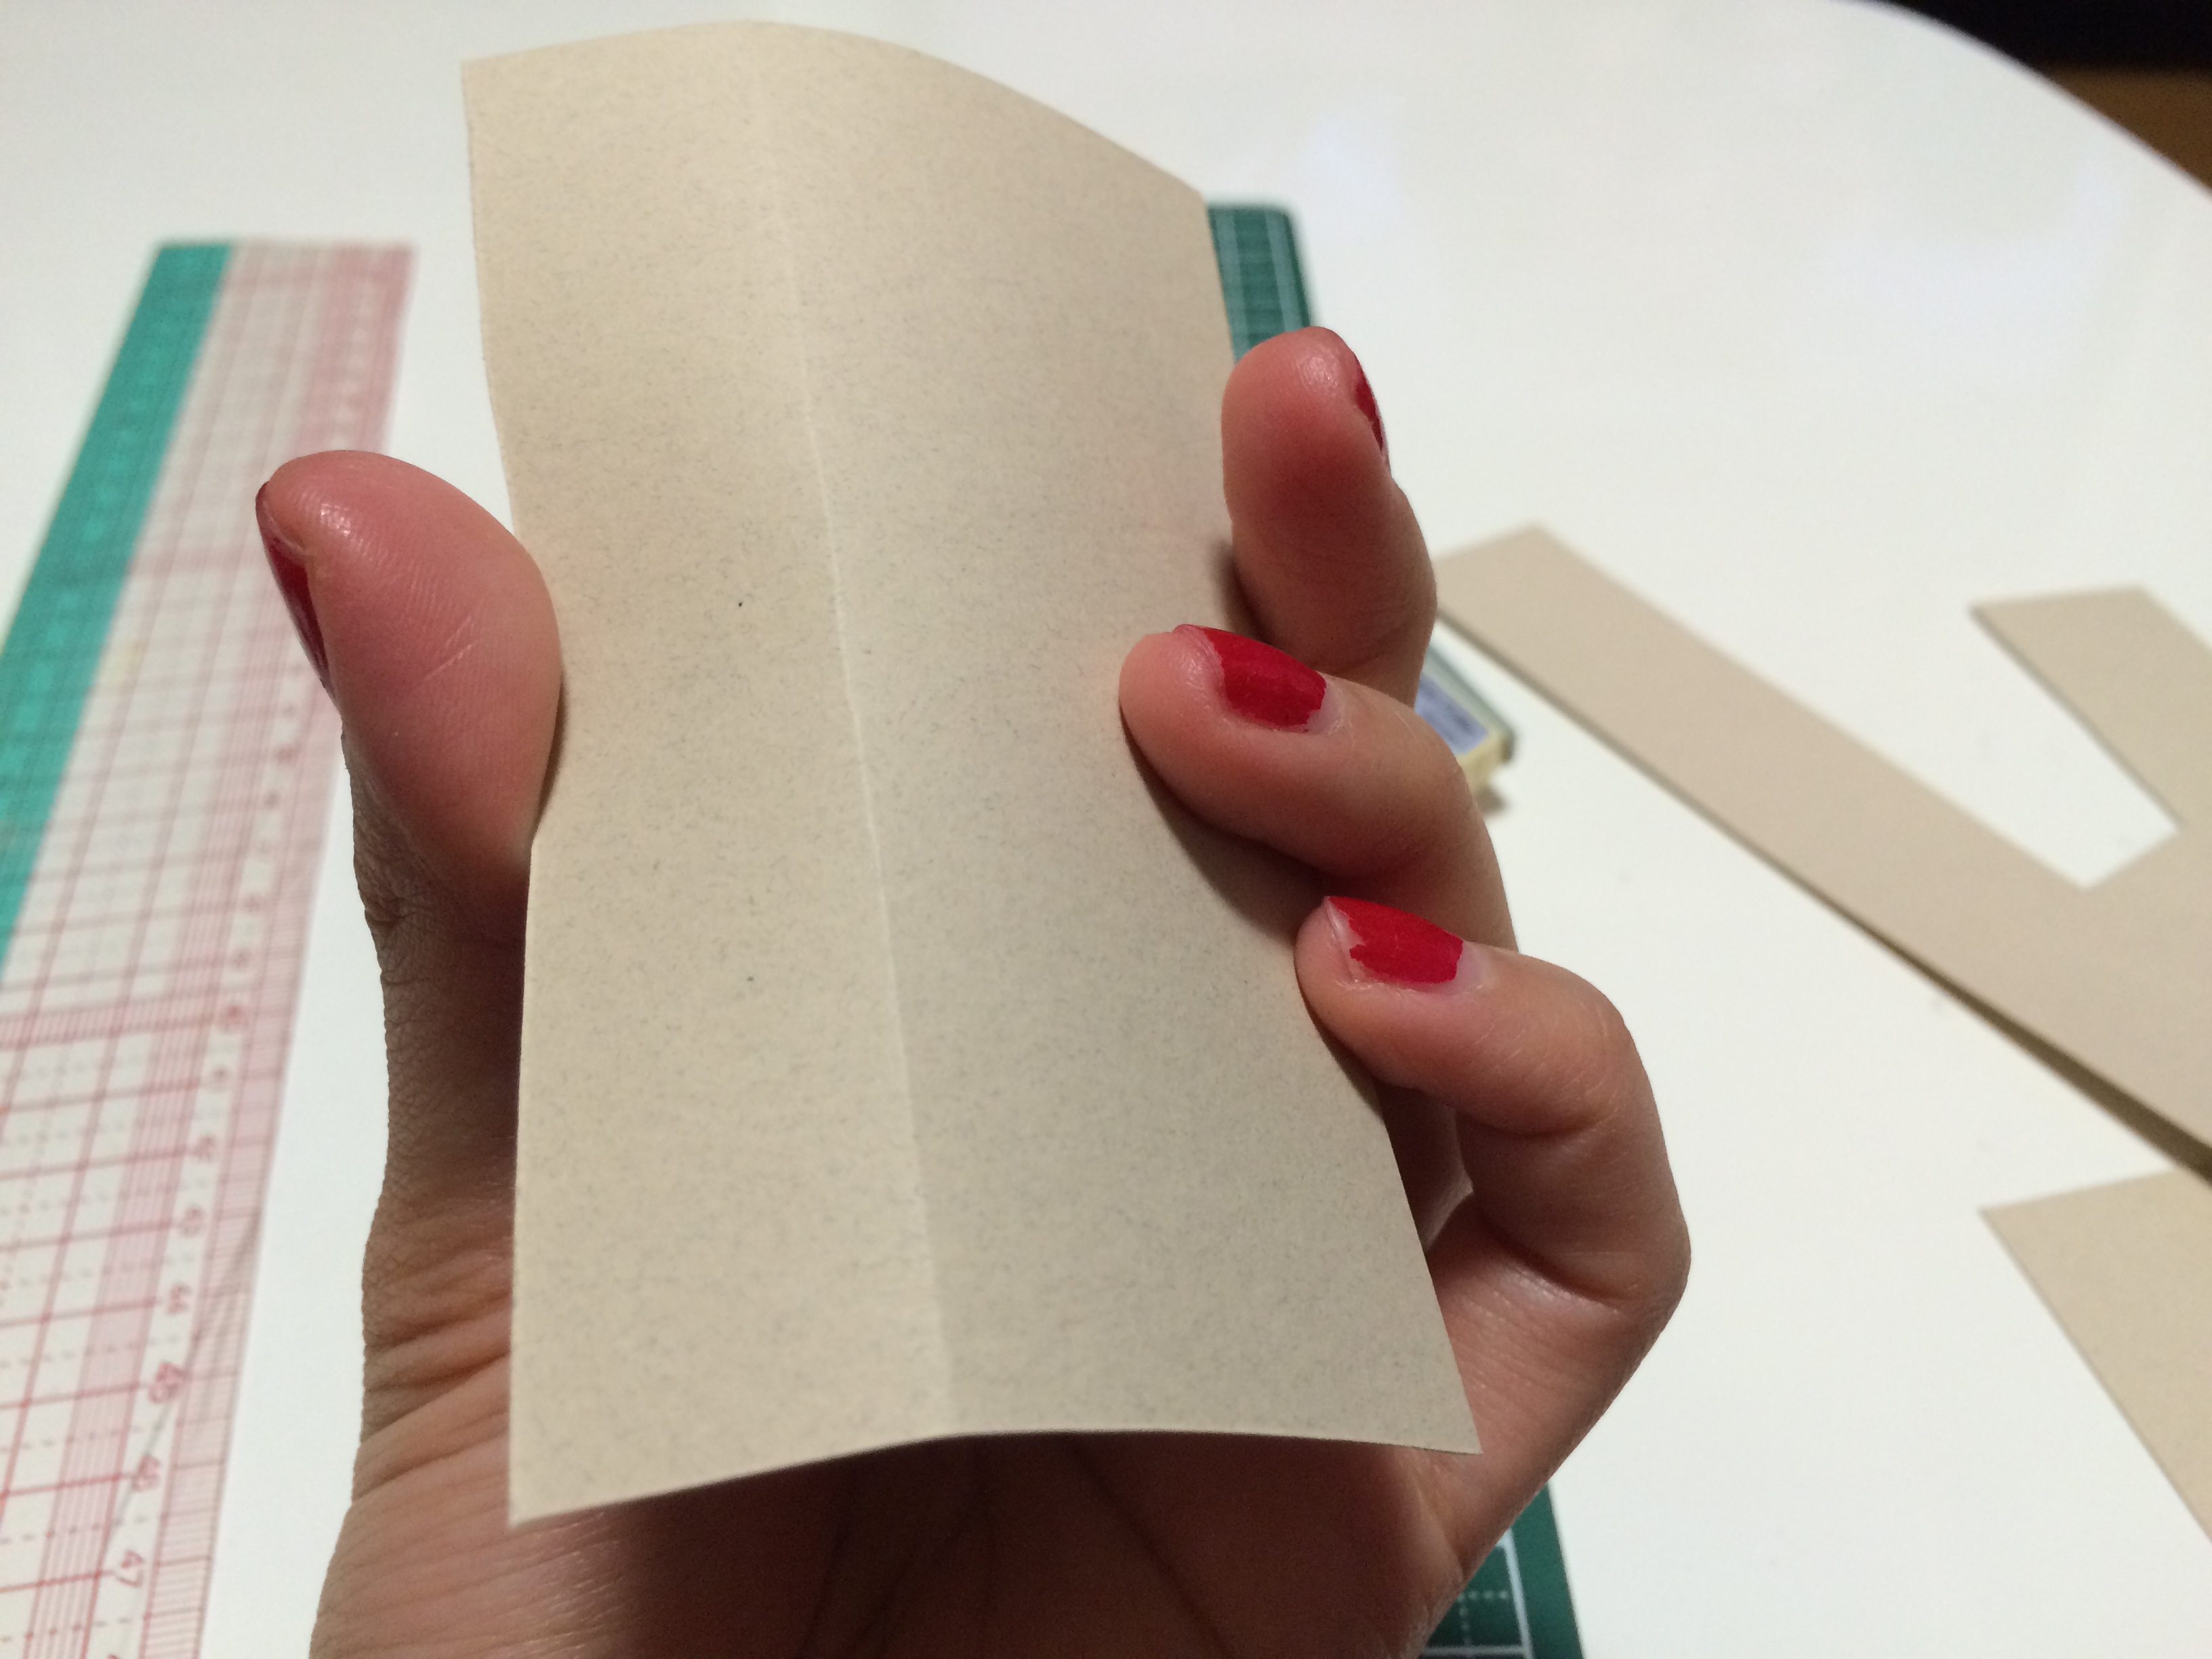
6. LIGHTLY fold score, with the cut side on the inside. / 優しく折り目を作る。切った面が内側の谷面になります。
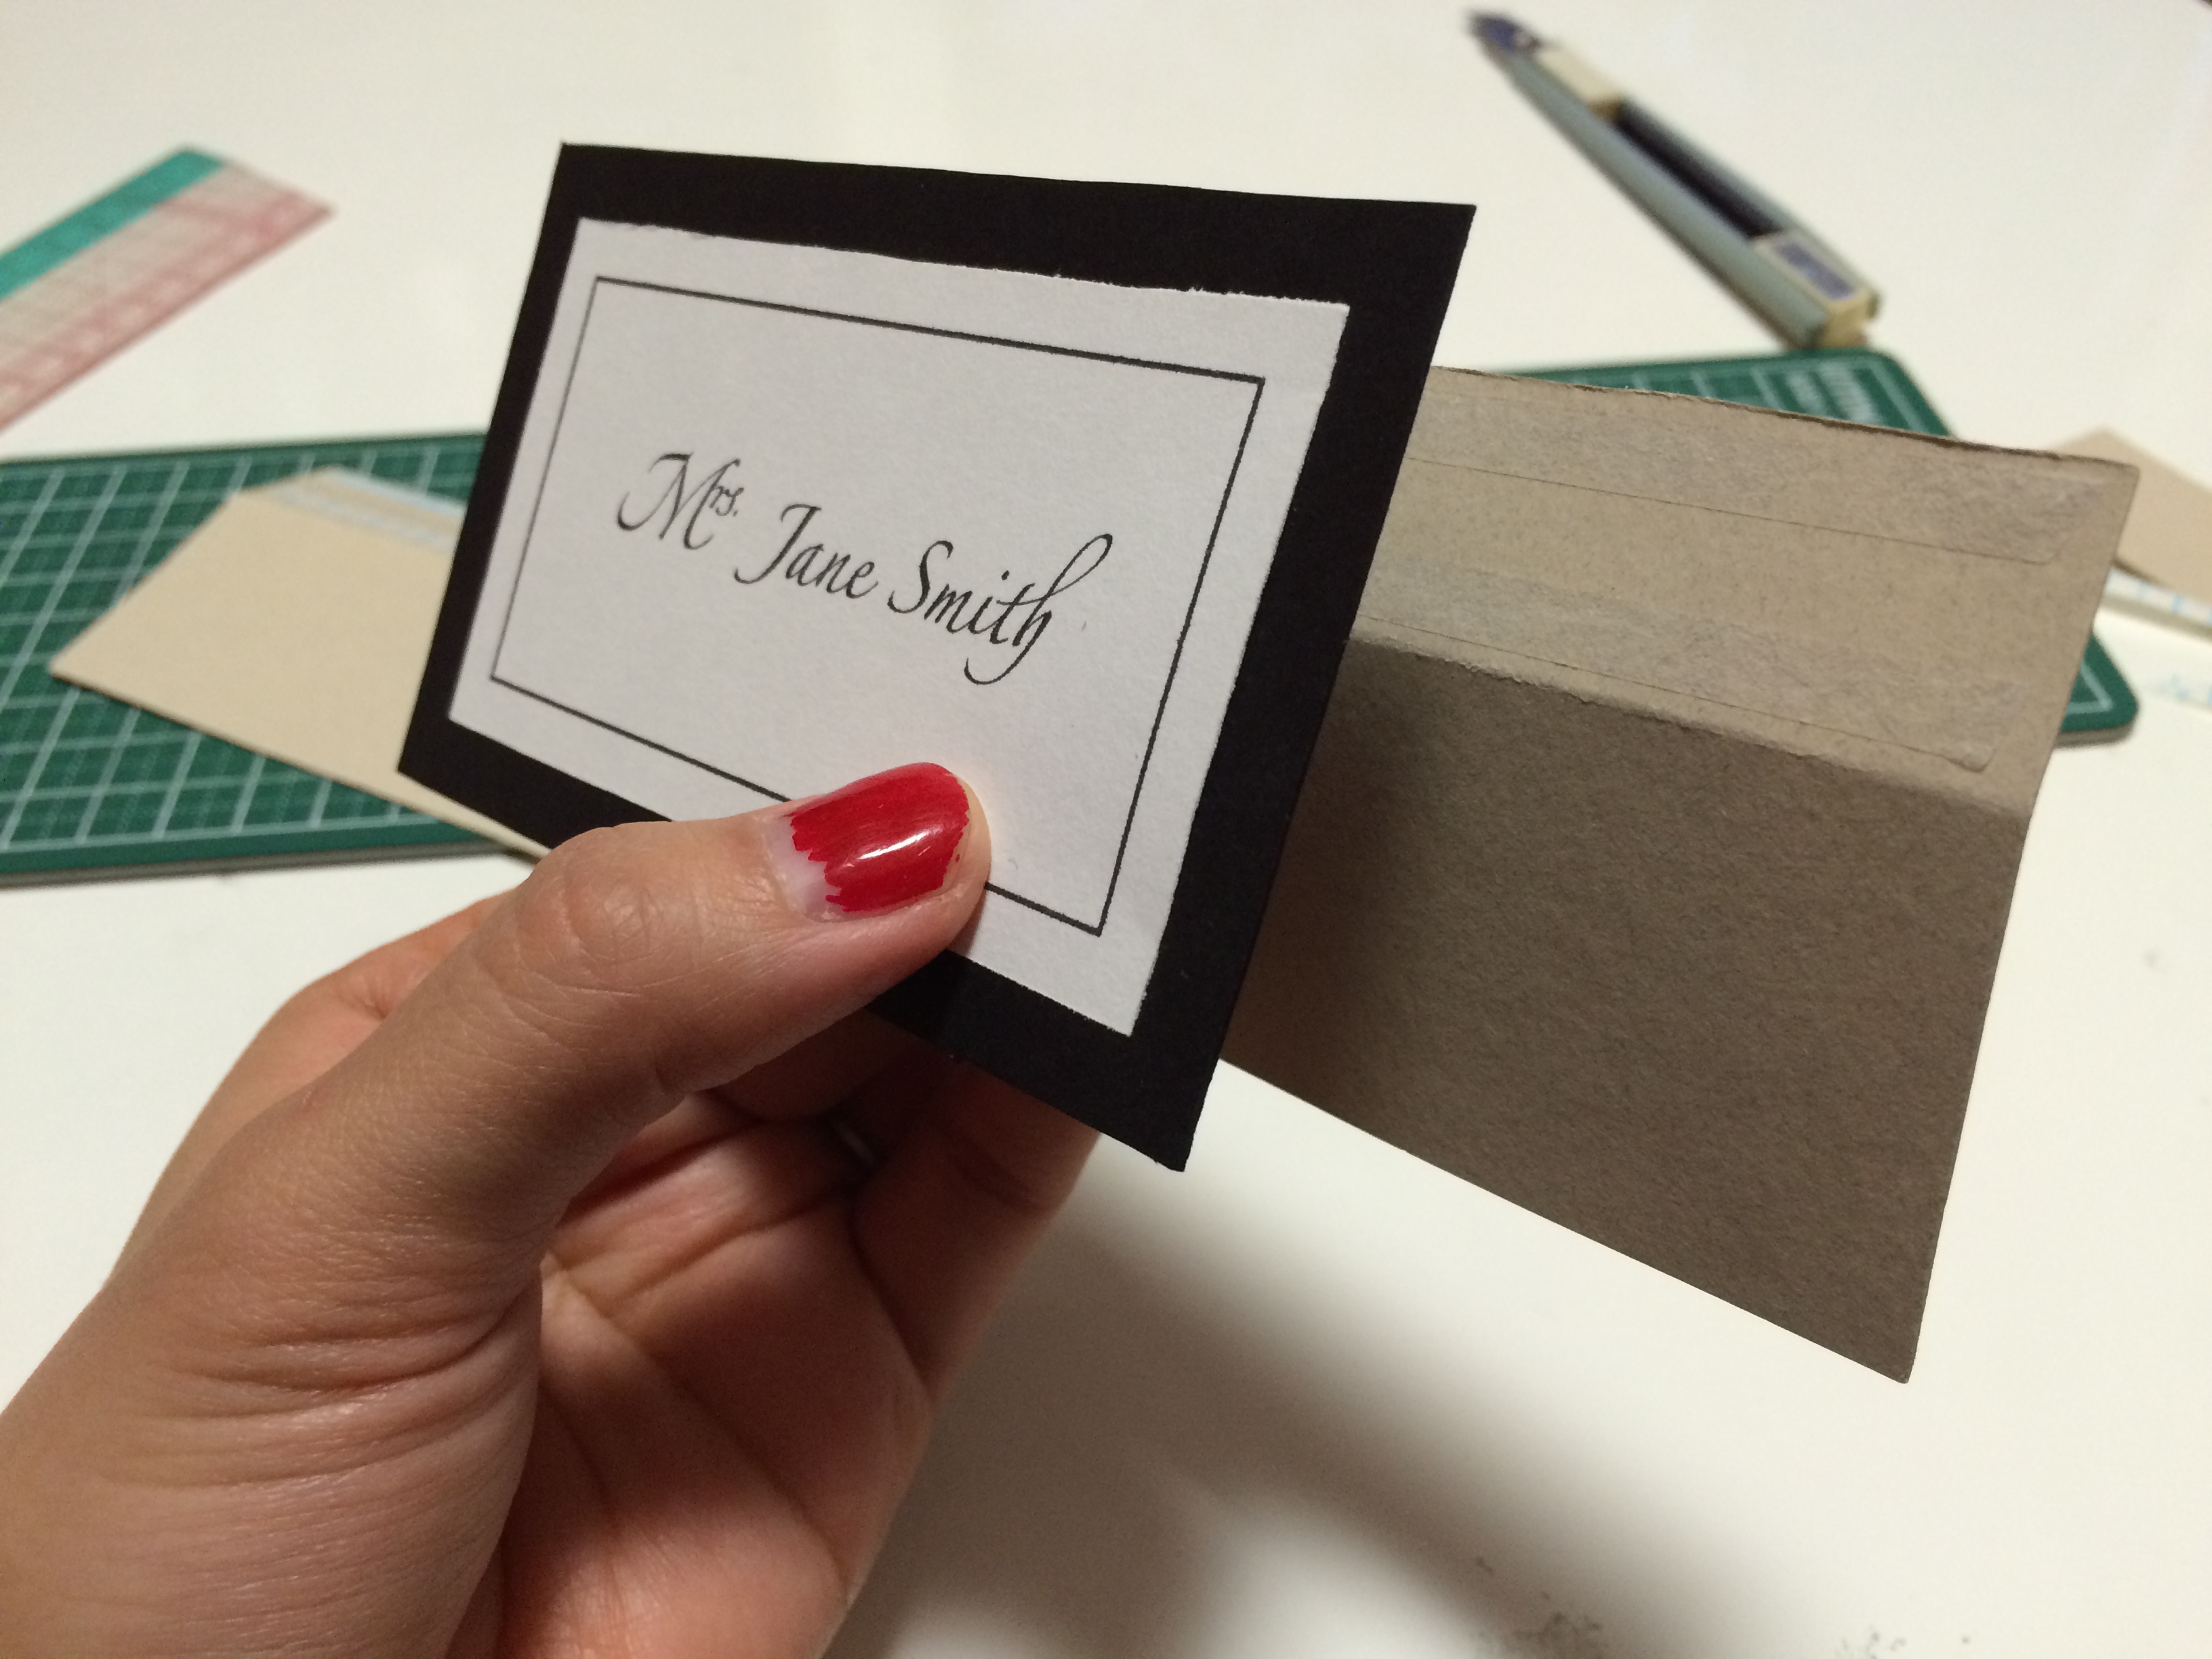
7. apply double stick tape to the thinner side of the score, again with the cut side facing down. / 山面になる側の細い部分に両面テープを貼る。
8. attach the backing to the front card, making sure that the name card is facing right-side up, and aligning the taped end to the top back side of the name card. / 裏カードを表カードと合体する。その際に、表カードのネーム面を手前に向け、裏カードのテープ面が表カードの裏の上端に合わさるように貼ります。
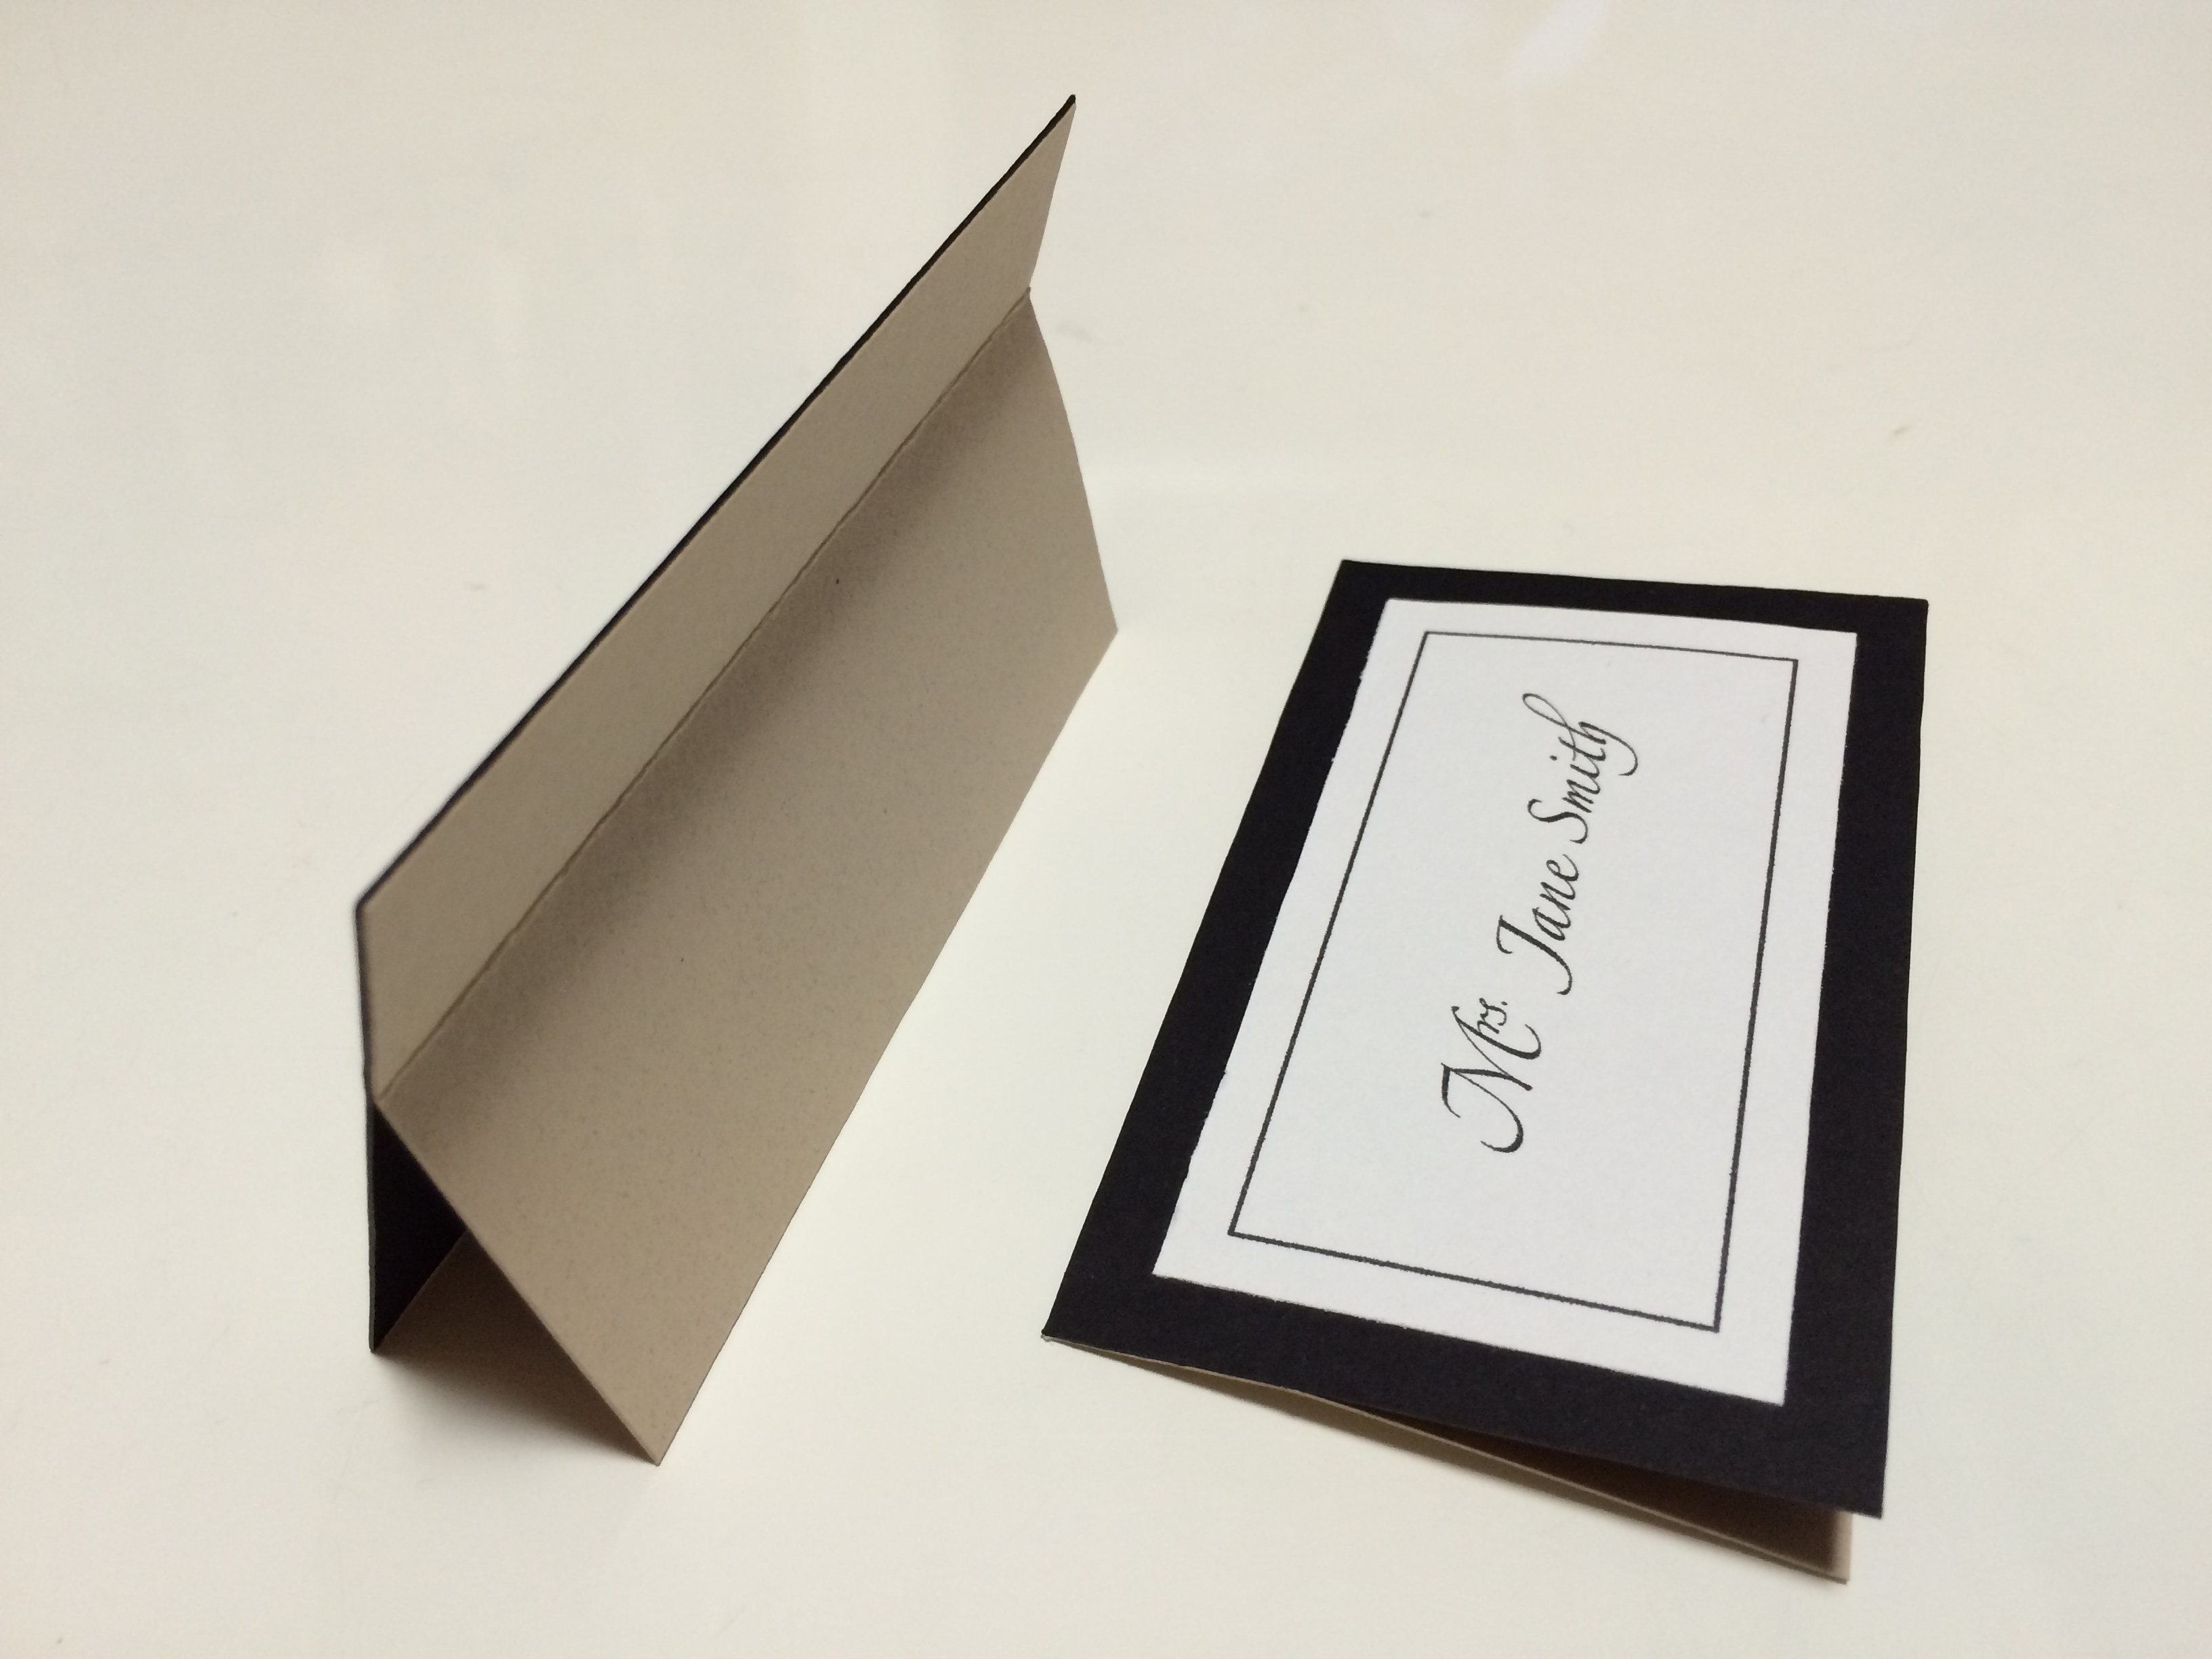
FINISHED! / 出来上がり!
this name card is great because it is easily flattened to lessen the load to take to your wedding reception! / この席札は、平にしやすい上、最低限の場所をとるので披露宴の荷物を詰めやすくします!
[side note / ちなみに] regarding my printer & paper for d.i.y. wedding paper items
d.i.y.ウェディングペーパーアイテムで使用しているプリンターと紙について | my printer / プリンター |
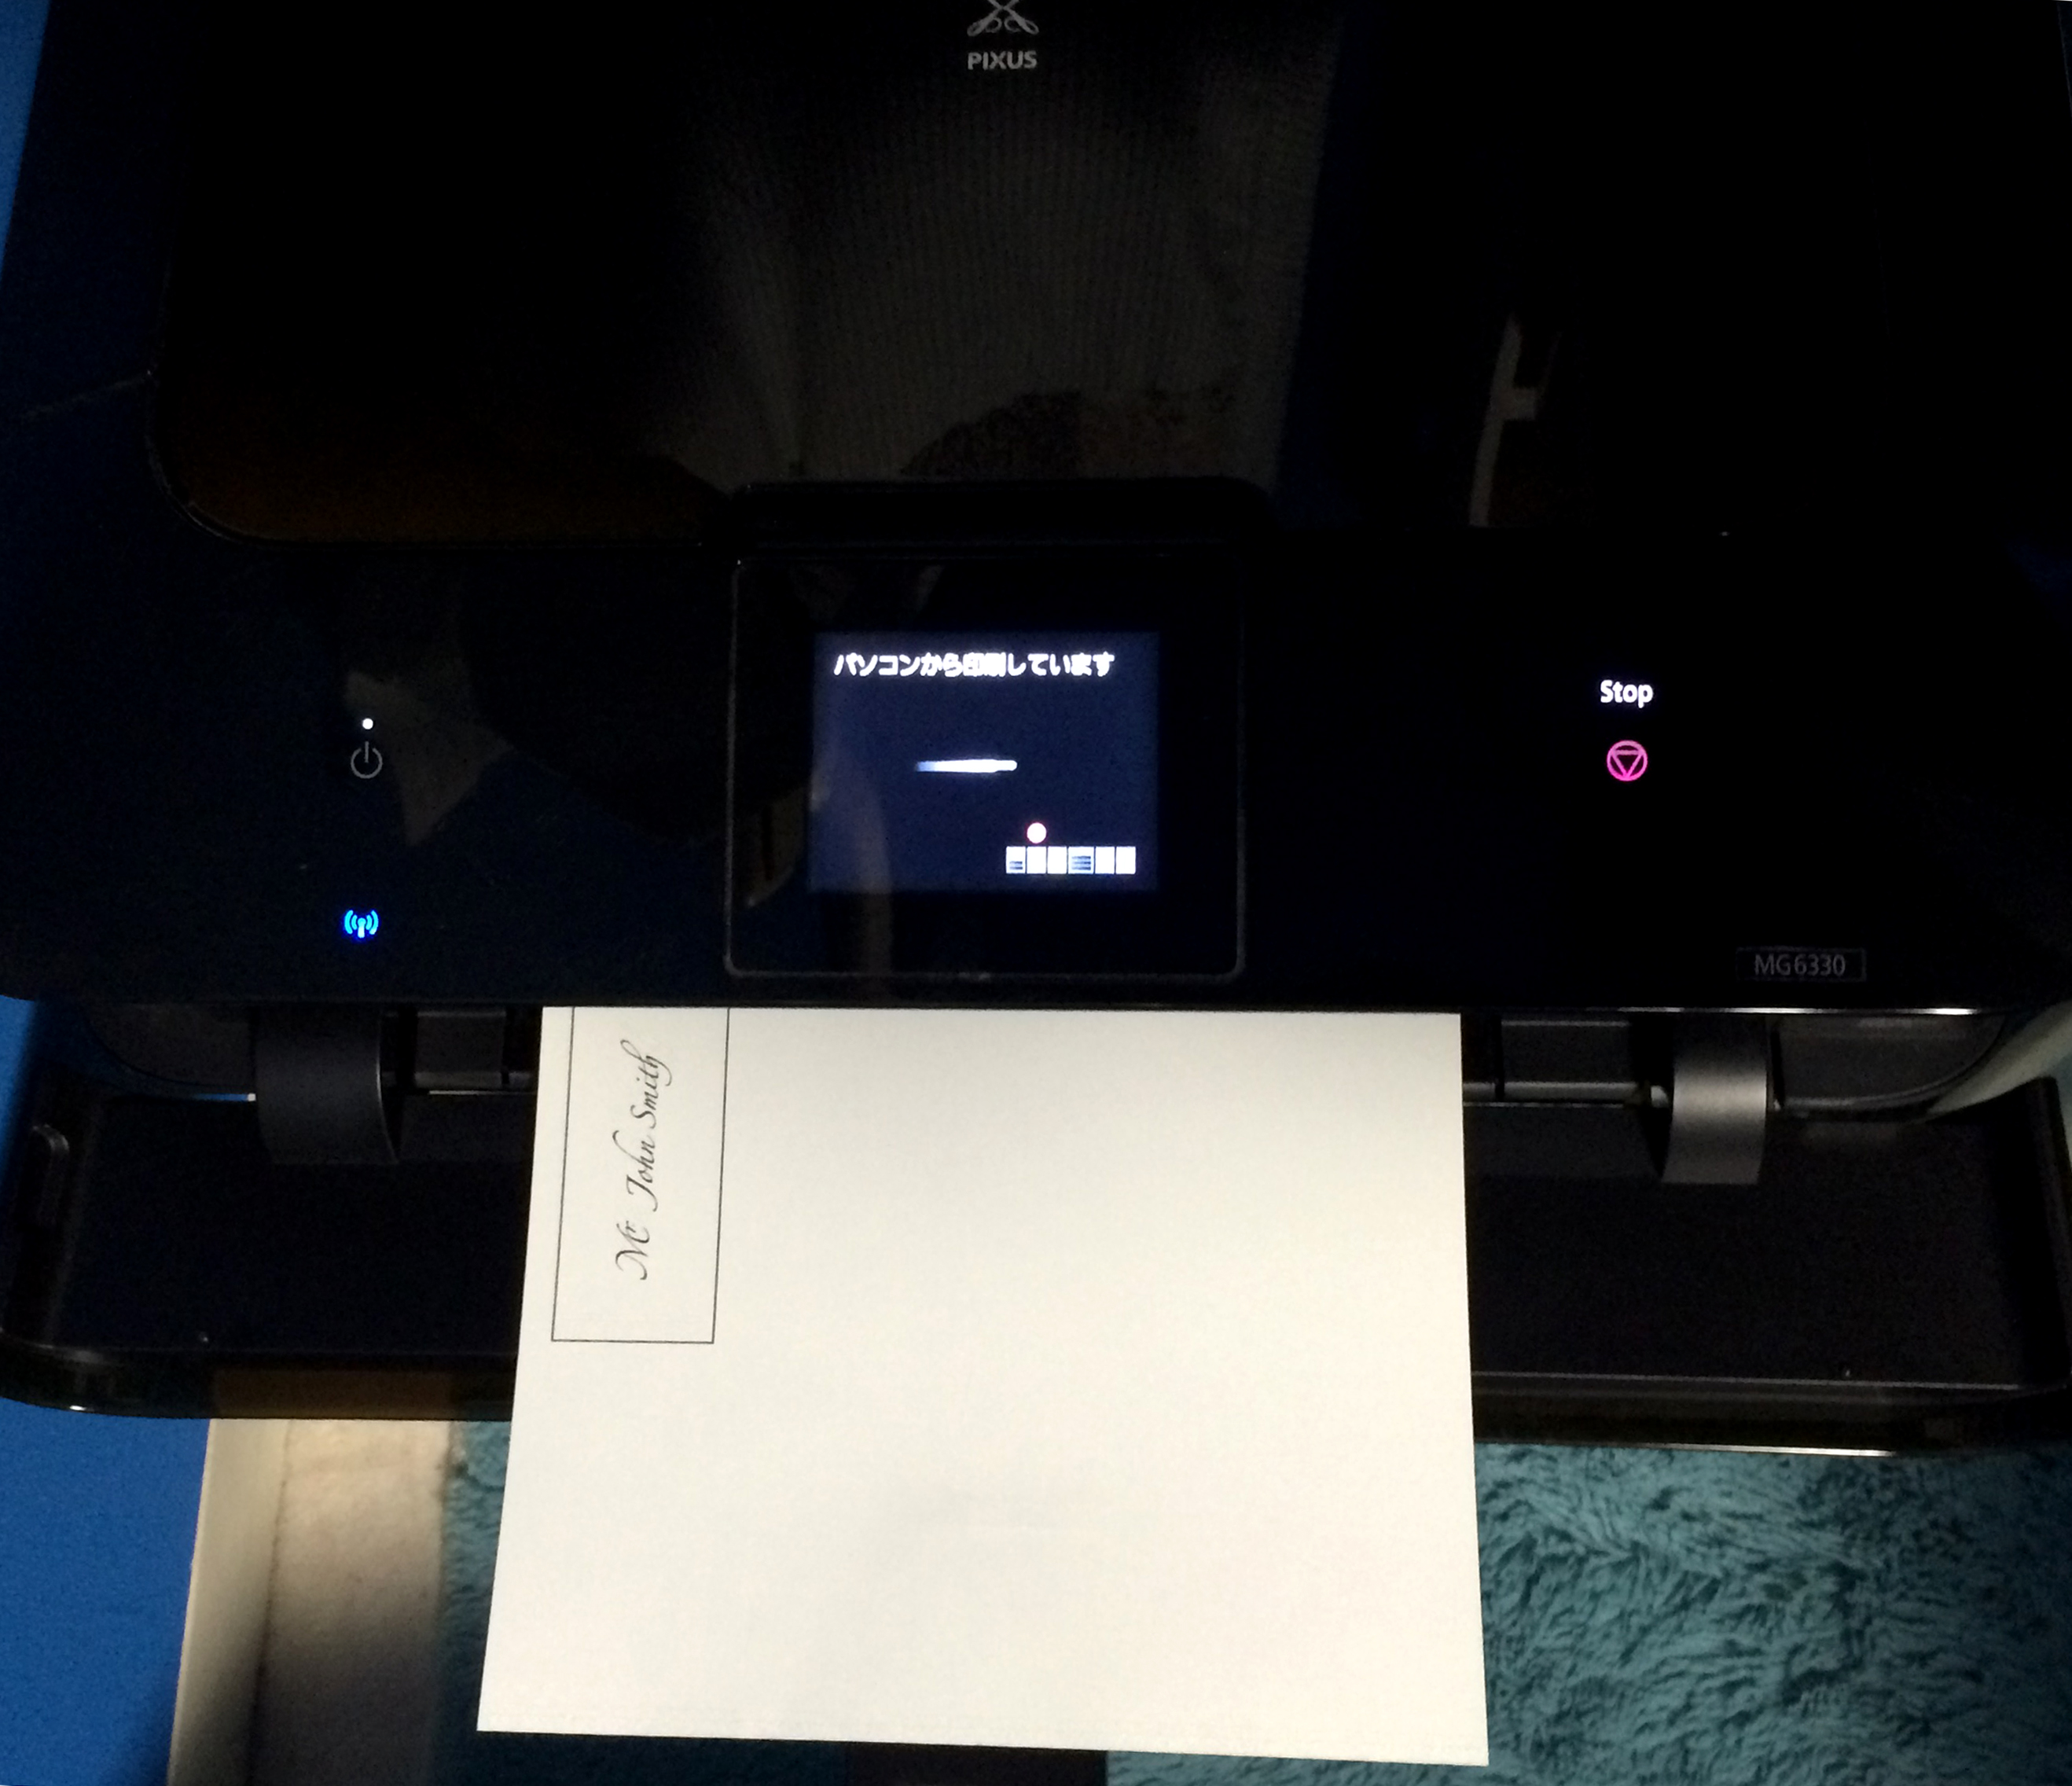
CANON PIXUS MG7530
an amazing purchase!! it prints both fine or fast, adjusts to many paper types, can print via wifi and from smart phones, and the quality is just great! for weddings, it’s best to print with a “fine printing” setting. it will look absolutely professional! / 重宝しています!ファインとスピーディで印刷設定を変えられ、様々な紙面に印刷できる上、wifiでスマホからも印刷できます。そして、何よりもクオリティが最高です!結婚式のためでしたら、ファイン設定がオススメです。
| araveal / アラベール |
MY FAVORITE. i recommend it to all my customers for it’s supple texture and matte look. since i take orders for making name placements, i have my own batch that i order from this online shop and my computer prints perfectly on it. / お客様にいつもオススメしている紙です。表面の凹凸がさりげなく、なめらかでマットに仕上がります。席札のご注文をいただいているので、takeopaperさんから発注して常備しています。自宅のプリンターでも綺麗に印刷されます。
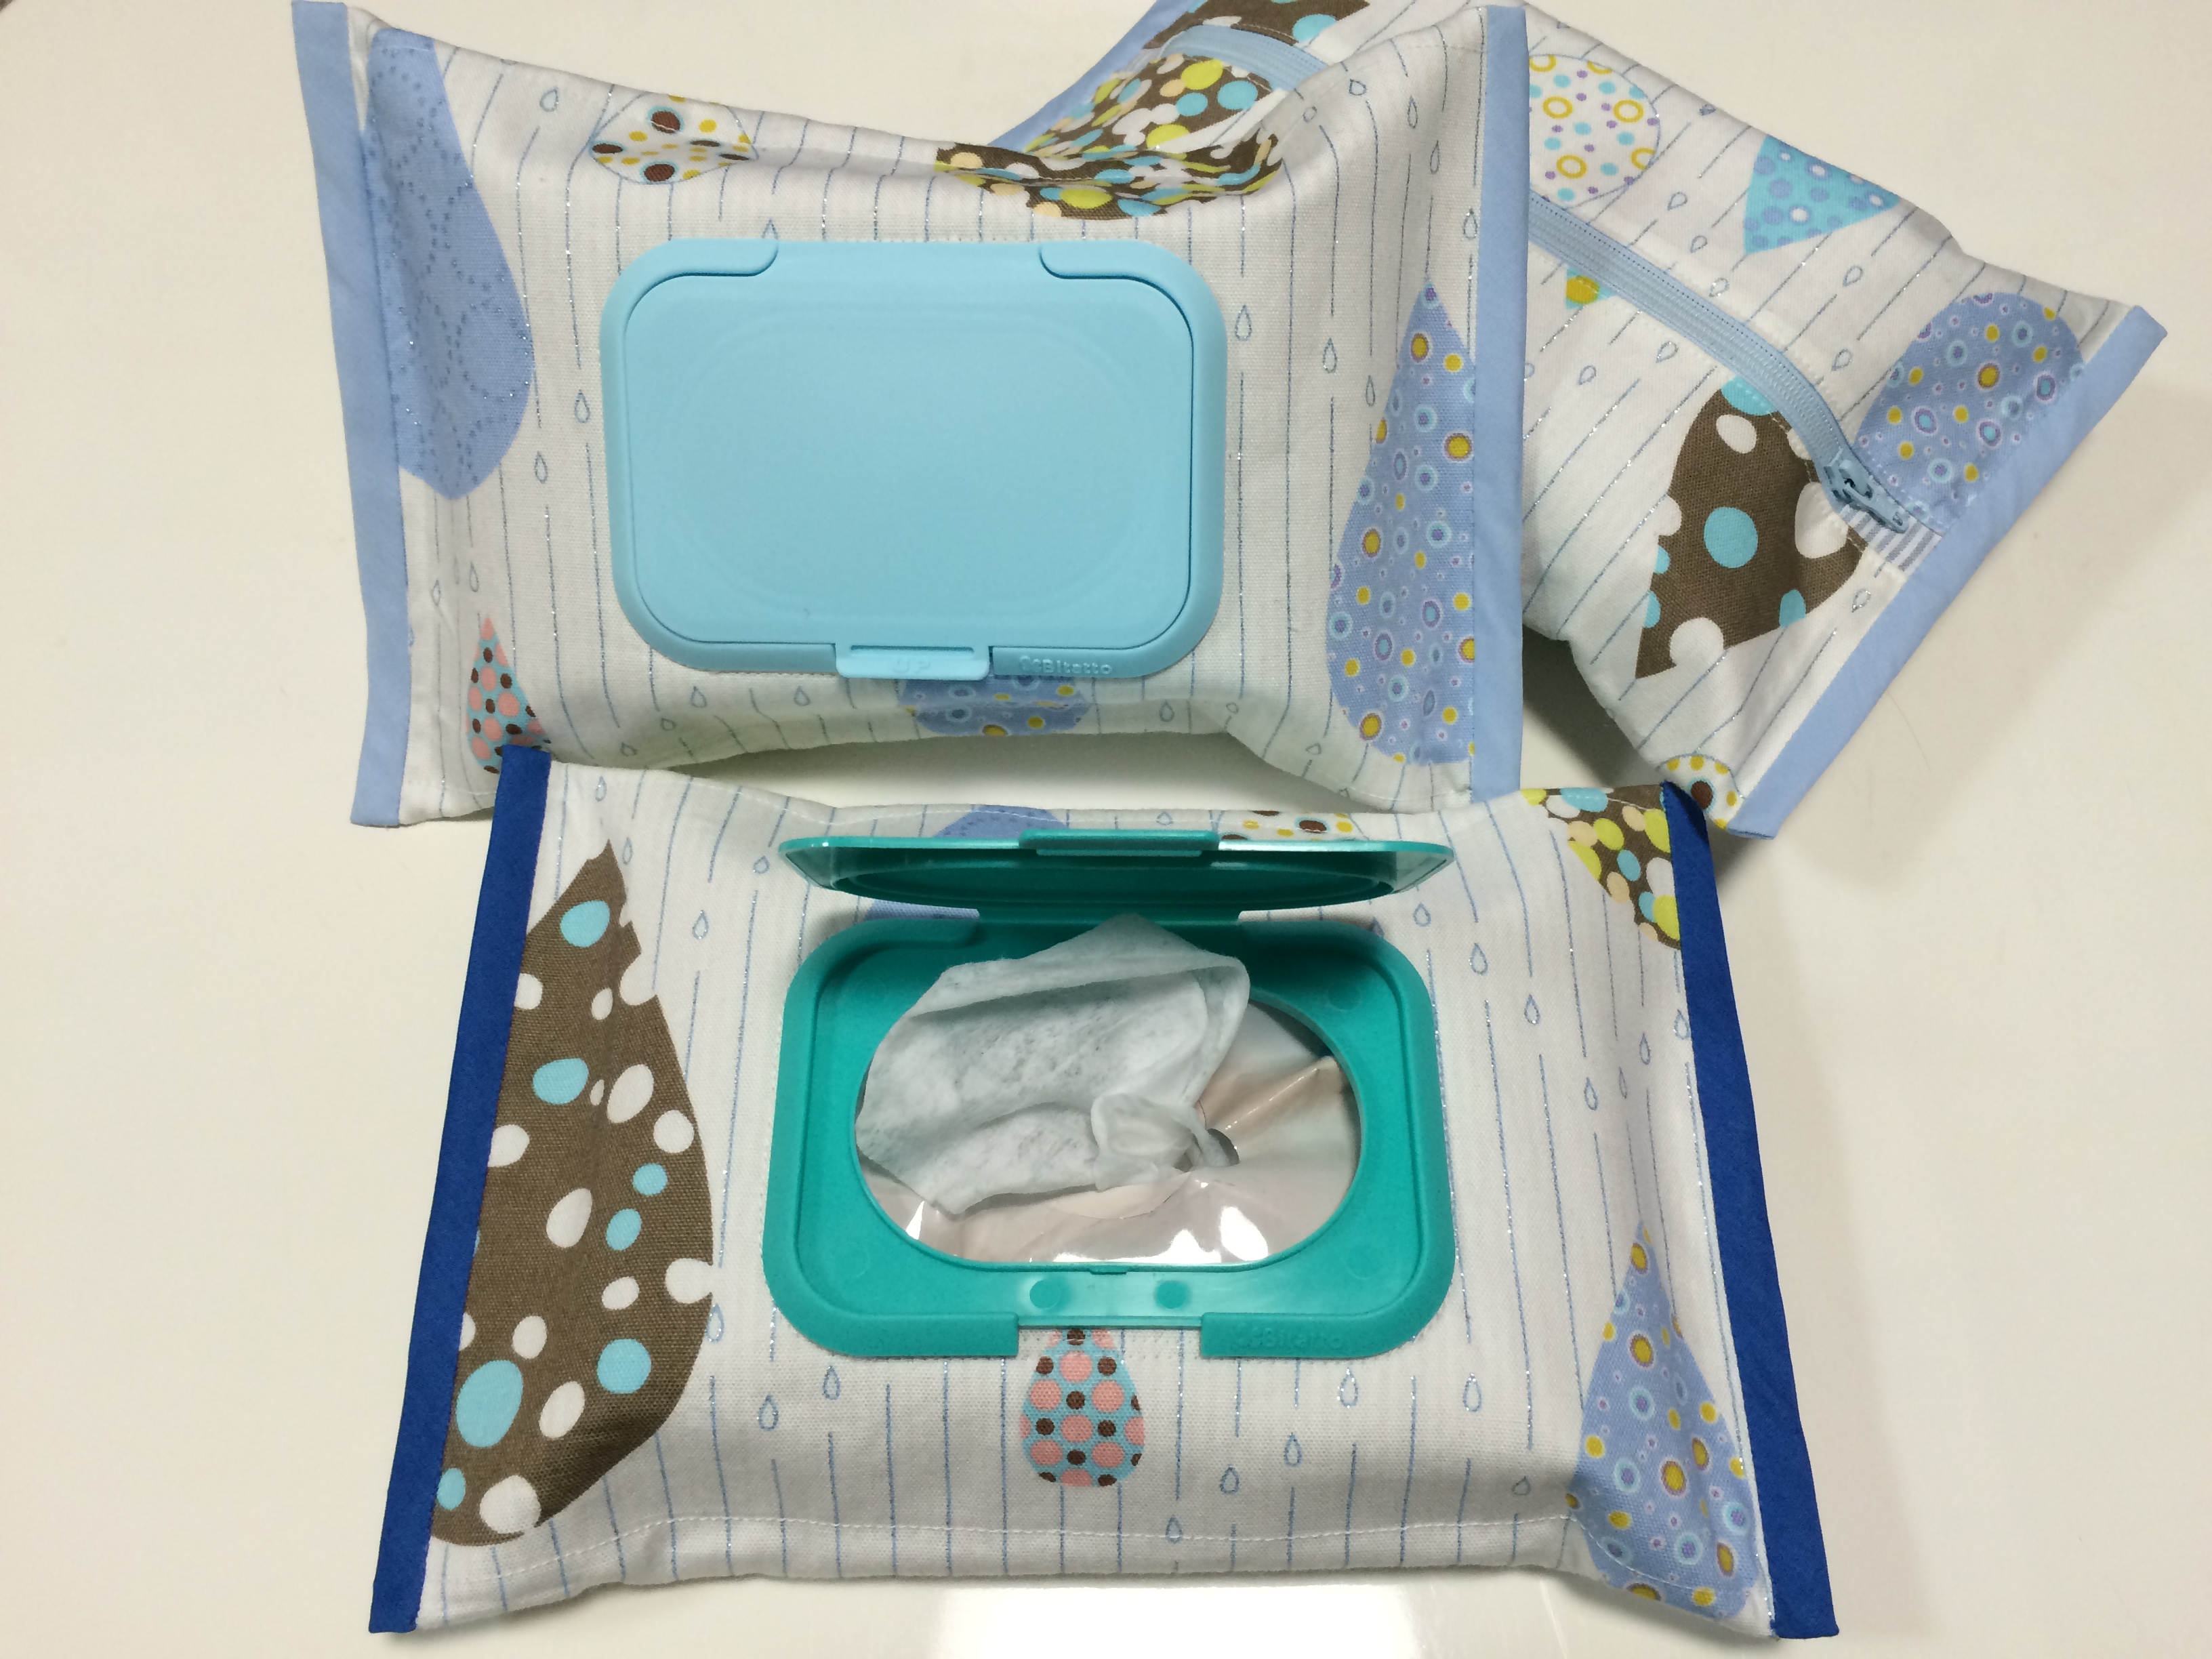
in december alone, i’ve had 3 friends and a cousin in law that had babies. with all the newborns, i was running out of baby gifts to send! last month, i was asked to make a diaper pouch/sheet with a detachable diaper wipe case. this is where i came up with the idea of giving diaper wipe cases! they’re quite useful and can be used for pets, hand wipes, and even around the house.
there were a couple of points that i based the design on. / デザインポイントは2点ありました。
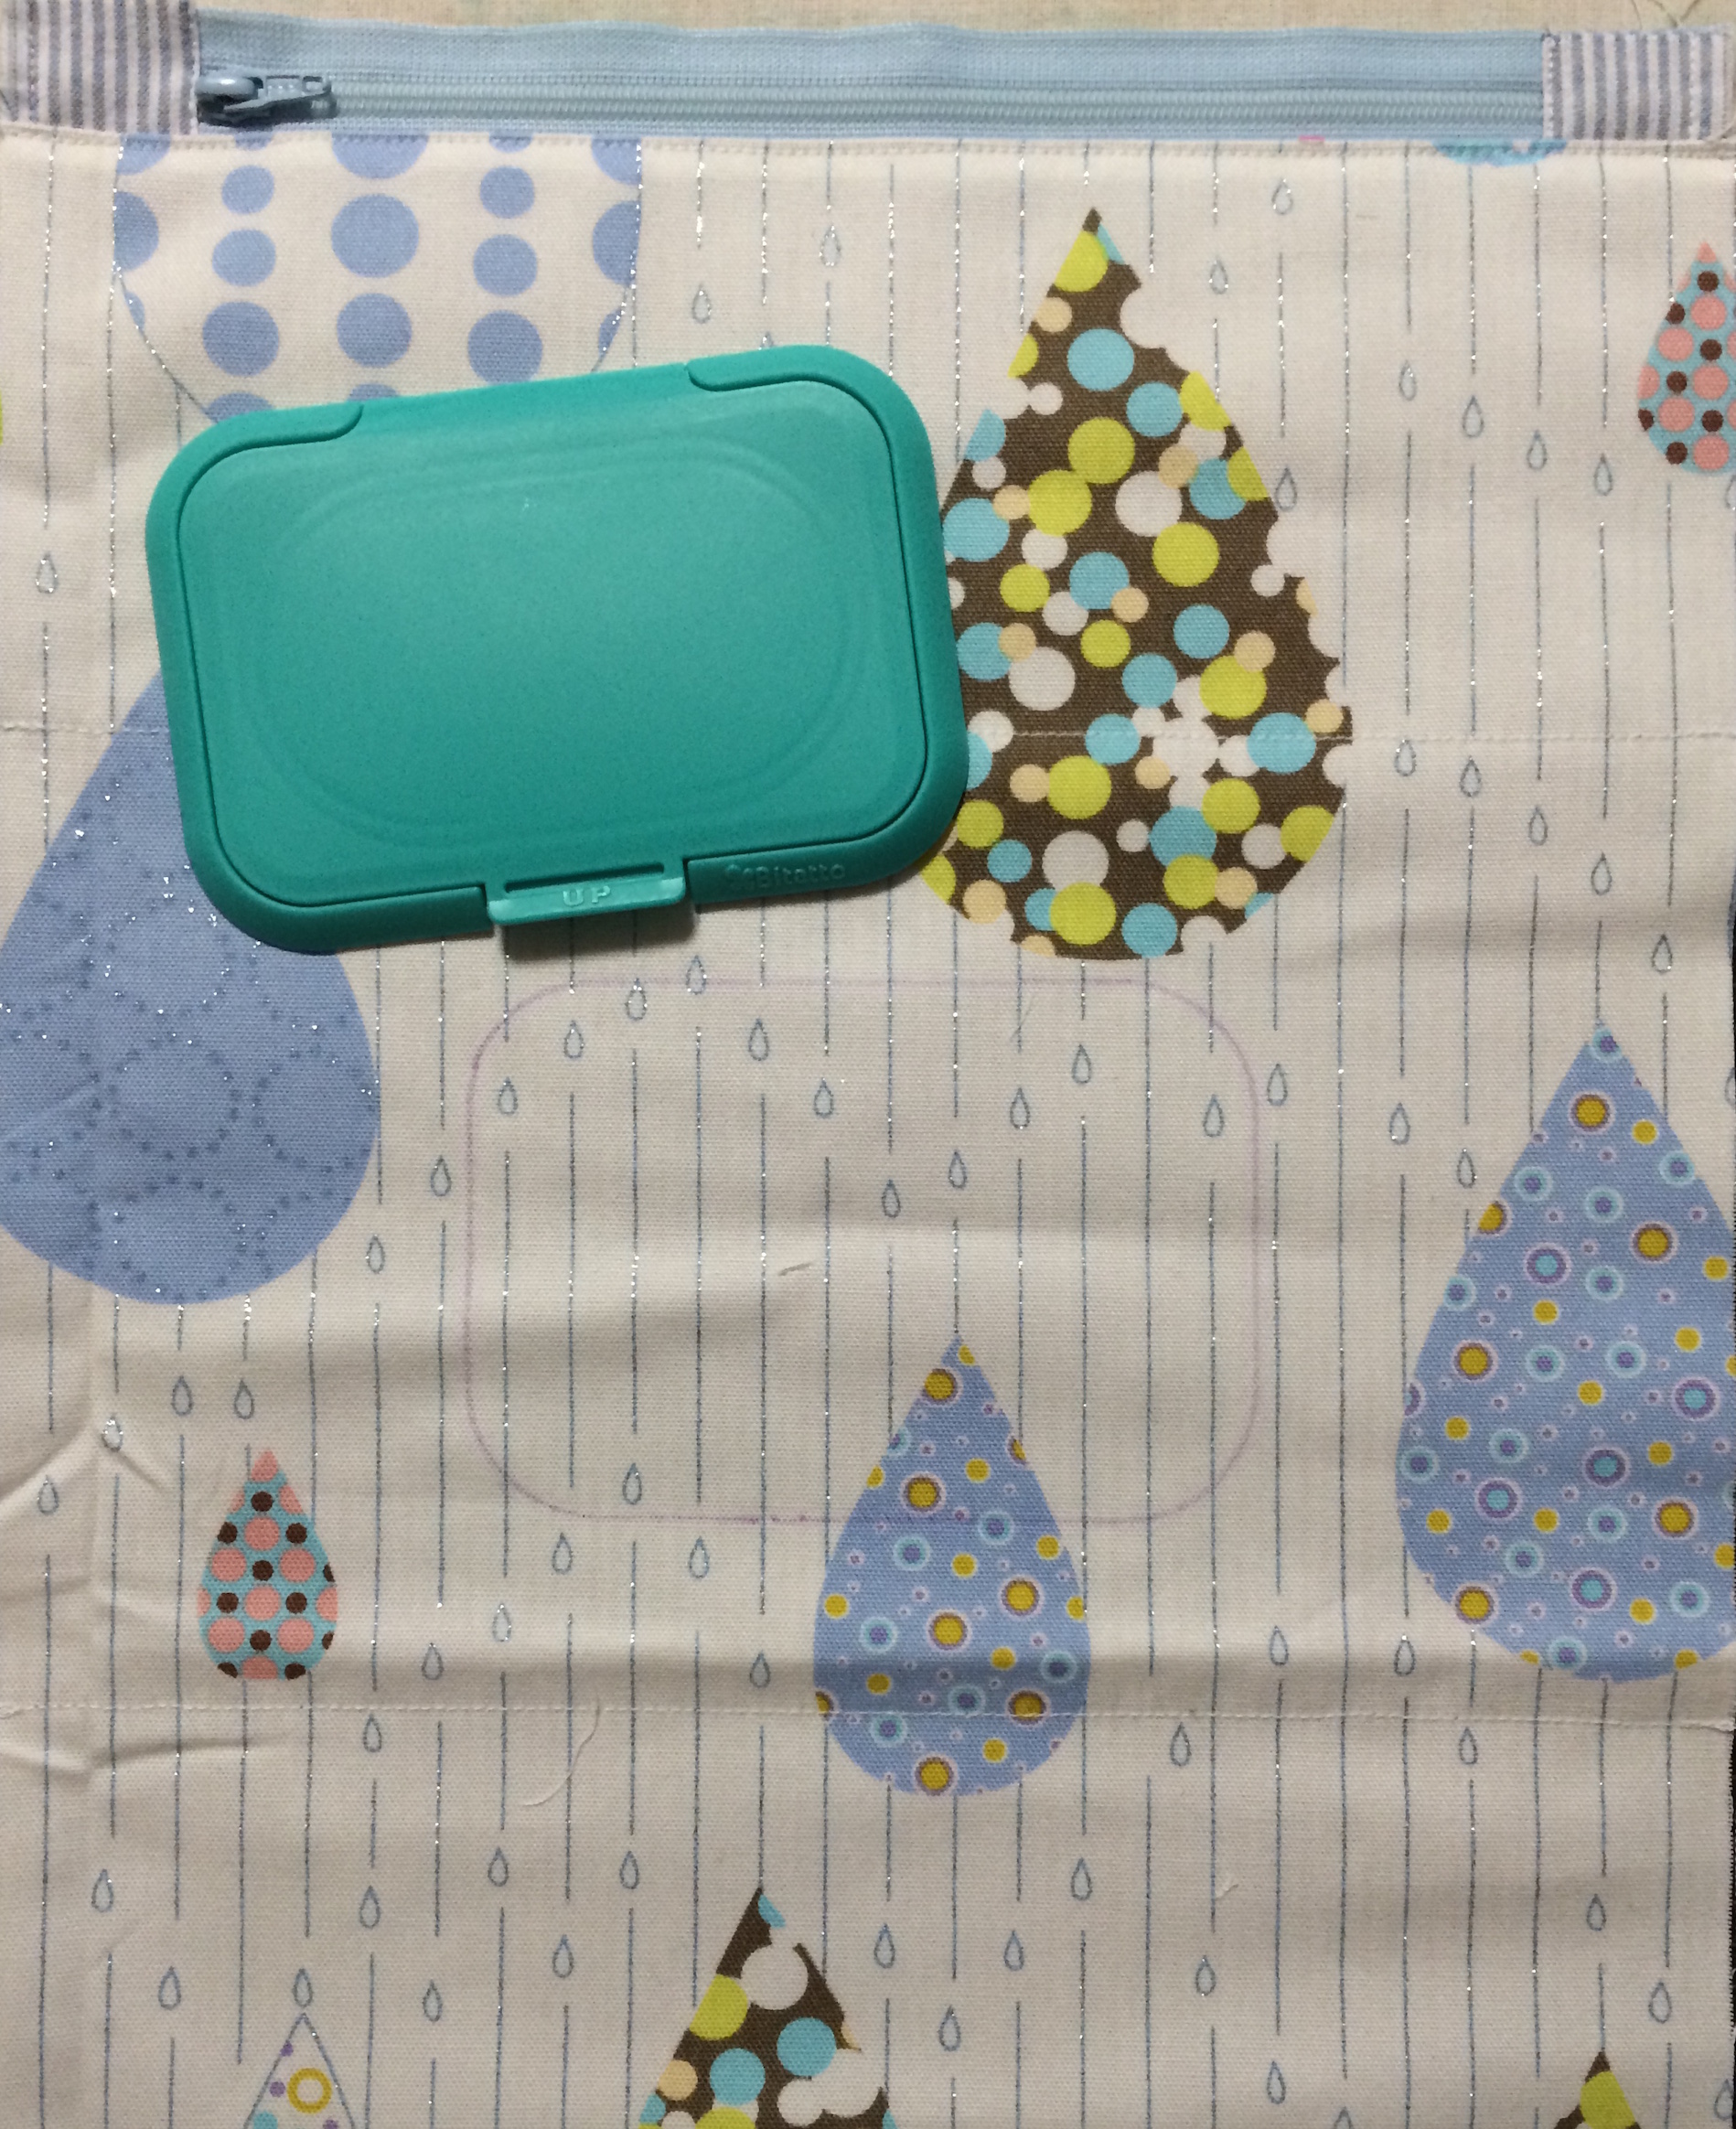
1. this bitatto removable, reusable plastic lid that keep wipes moist. bitatto attaches to smooth surfaces, like vinyl or the plastic bags that wipes come in. incorporating this type of surface became the main point. ビタットという、直接ウェットティッシュの袋などに取り付けられて、繰り返し使えるプラスチックの蓋を使用したいと思いました。ビニールやプラスチックの袋などのツルツルした表面に一番くっつくので、デザインにこのような表面を取り入れる事が必要でした。
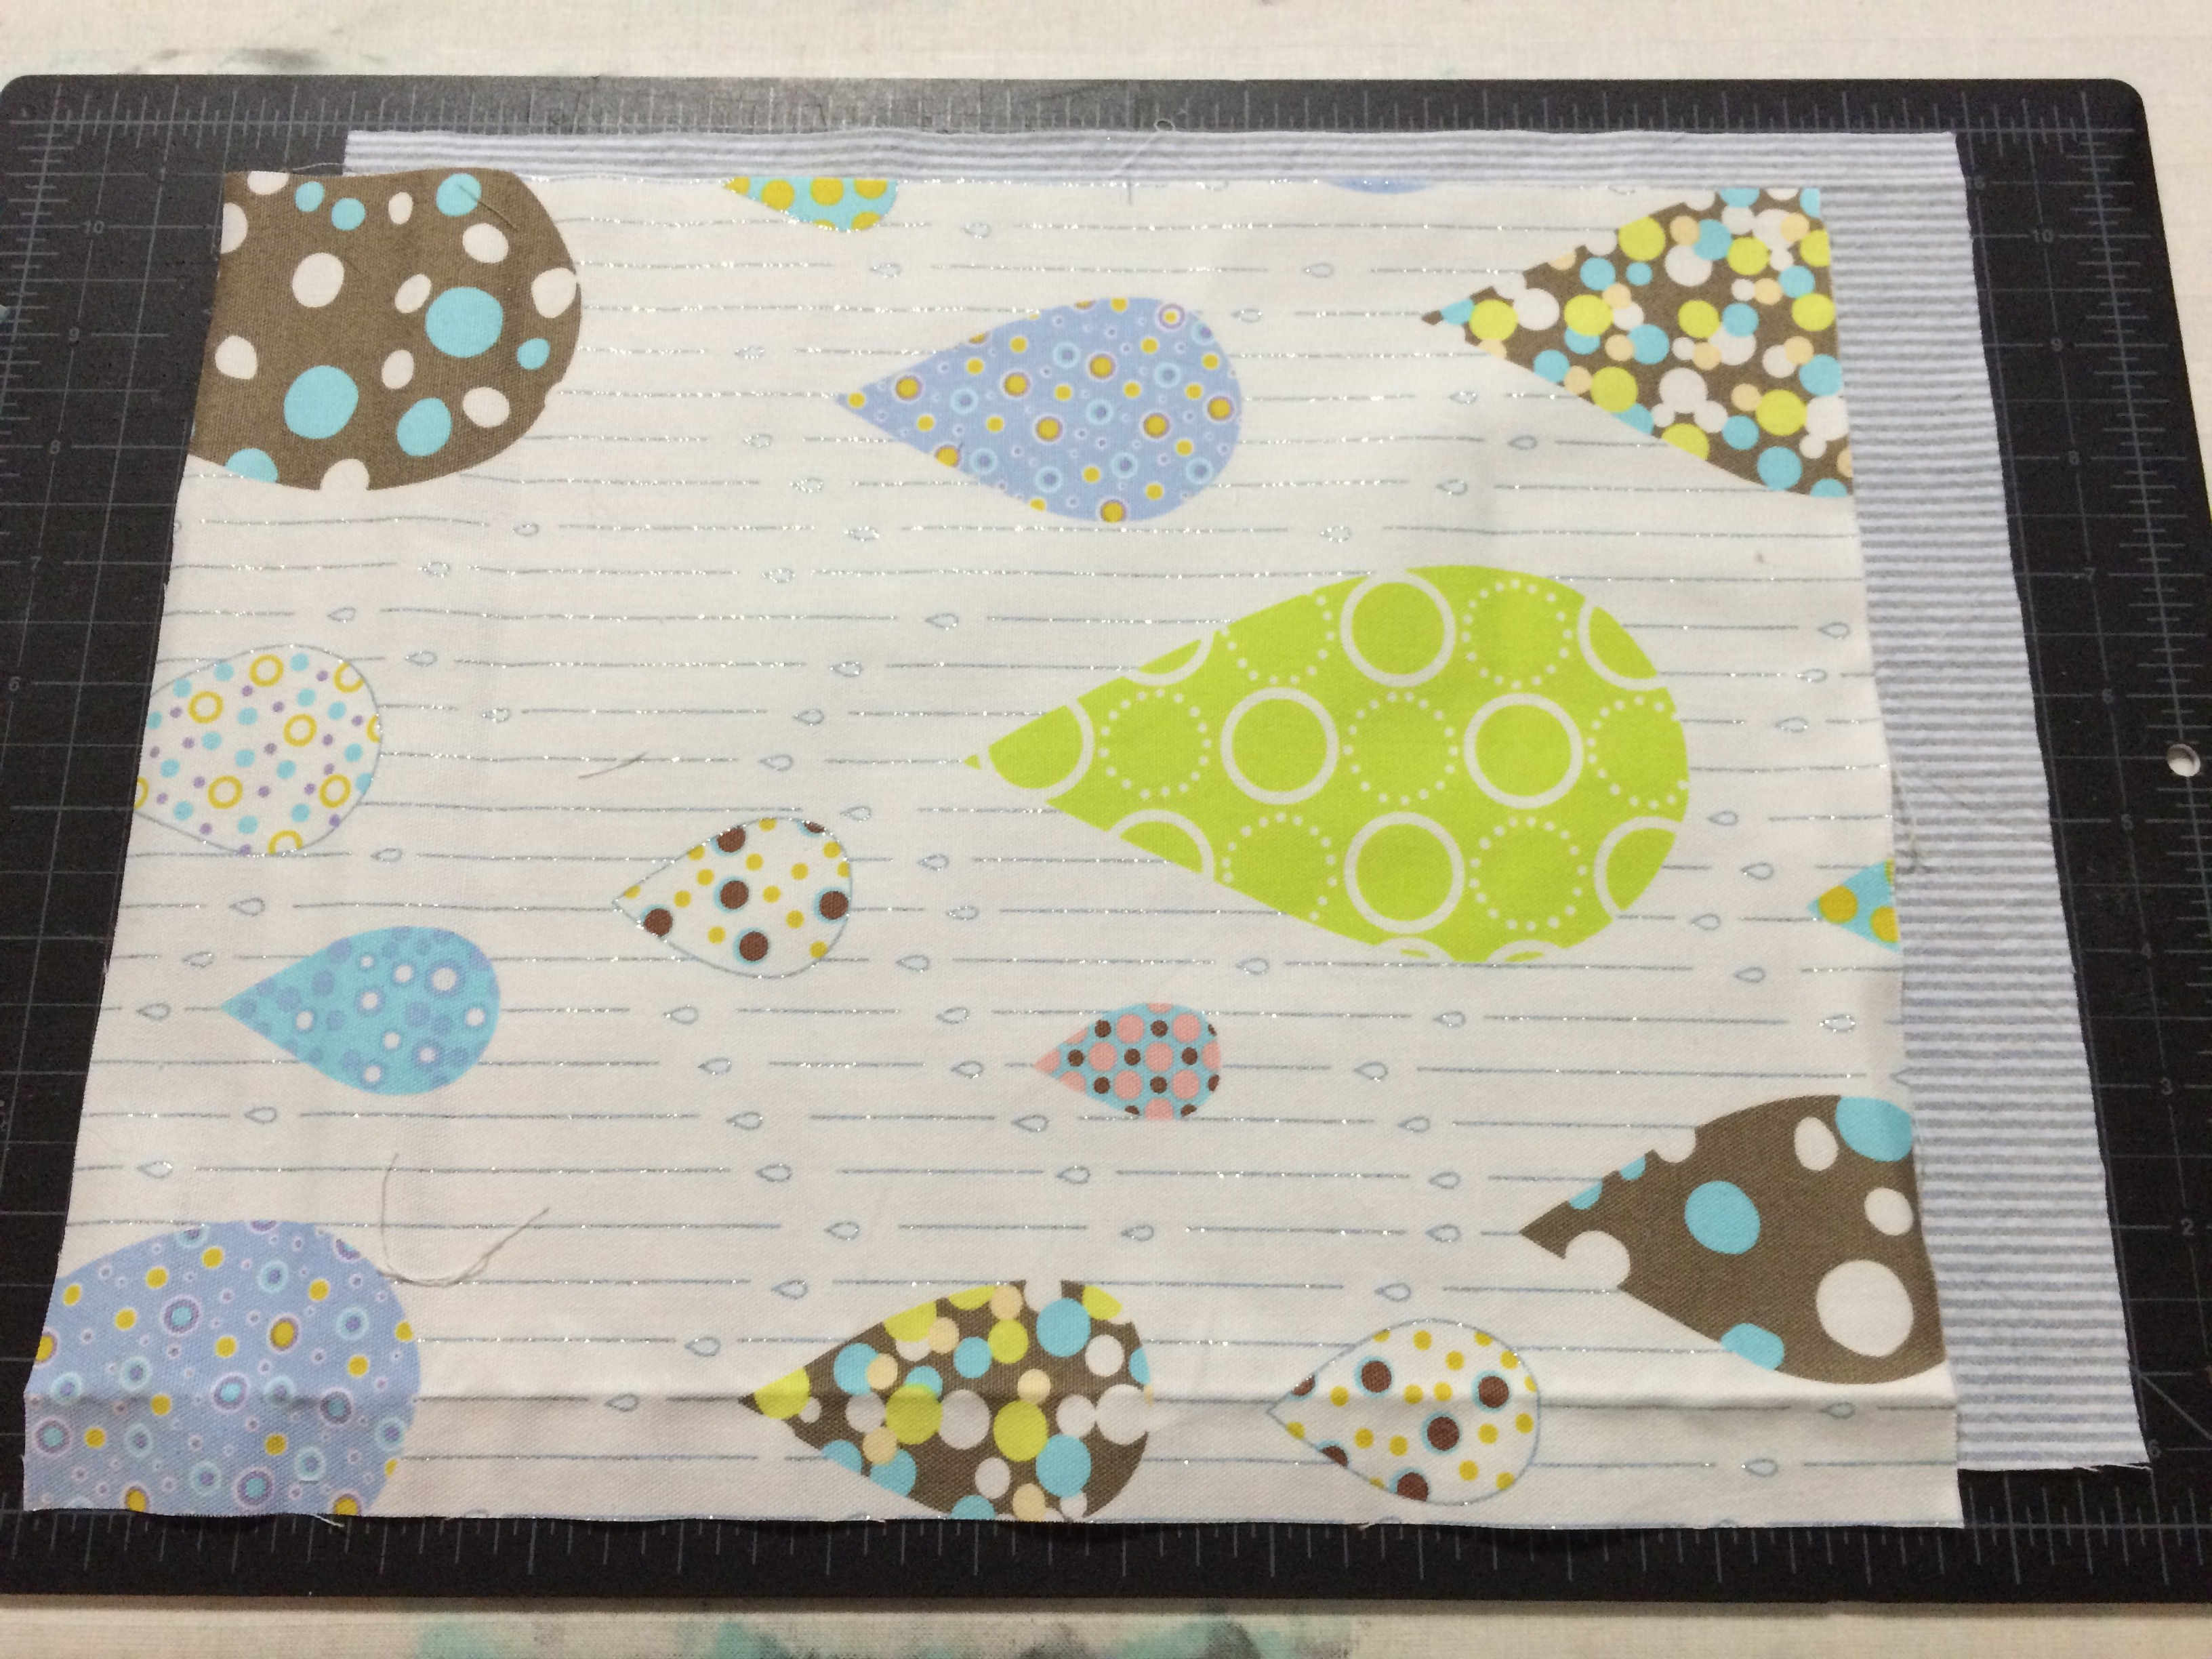
2. this fabric!! well i had saved this fabric for a rainy day, but color coordinating was fun!!
この生地!以前に一目惚れした生地を使う最高の機会でした!カラーコーディネートを考えるのも楽しかったです。
to add some contrast to the outer fabric, i chose a simple striped pattern for the inner layer. / 表の生地と変化をつけるため、シンプルなストライプの裏地を使用しました。
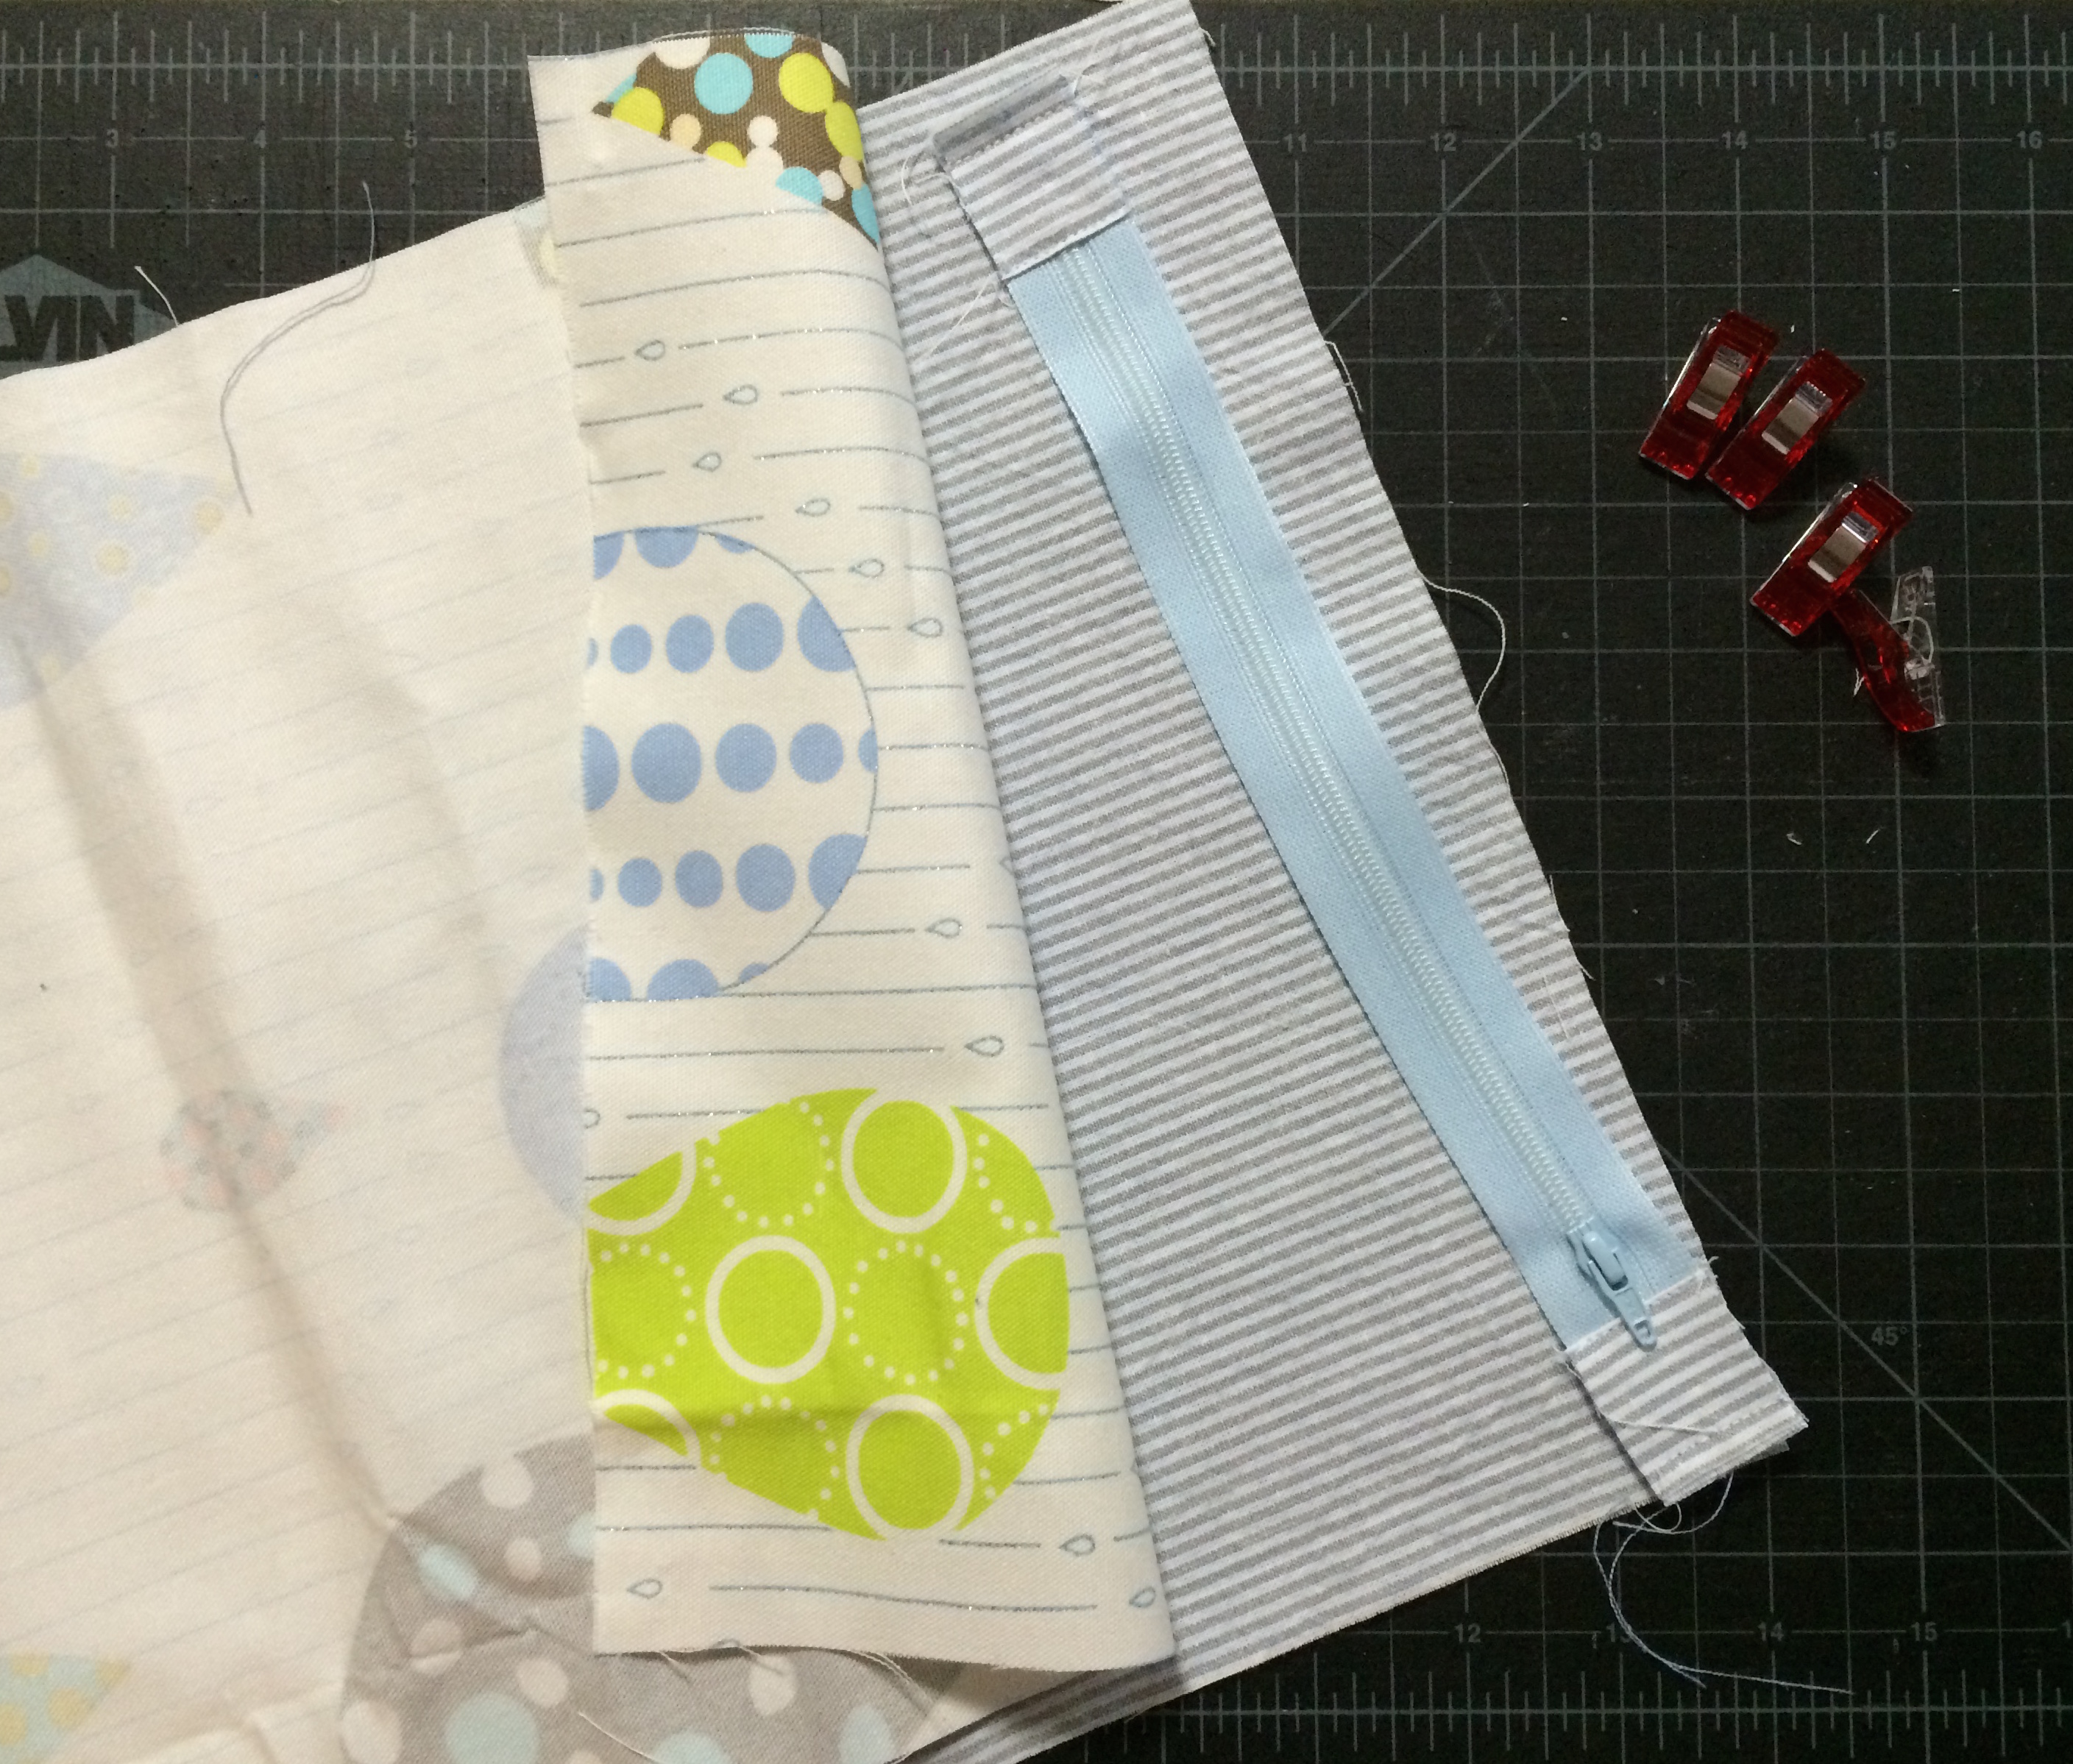
the zipper in the back makes for a clean and sturdy closure. / ファスナーで取り出しが楽でありながら、しっかり閉まります。
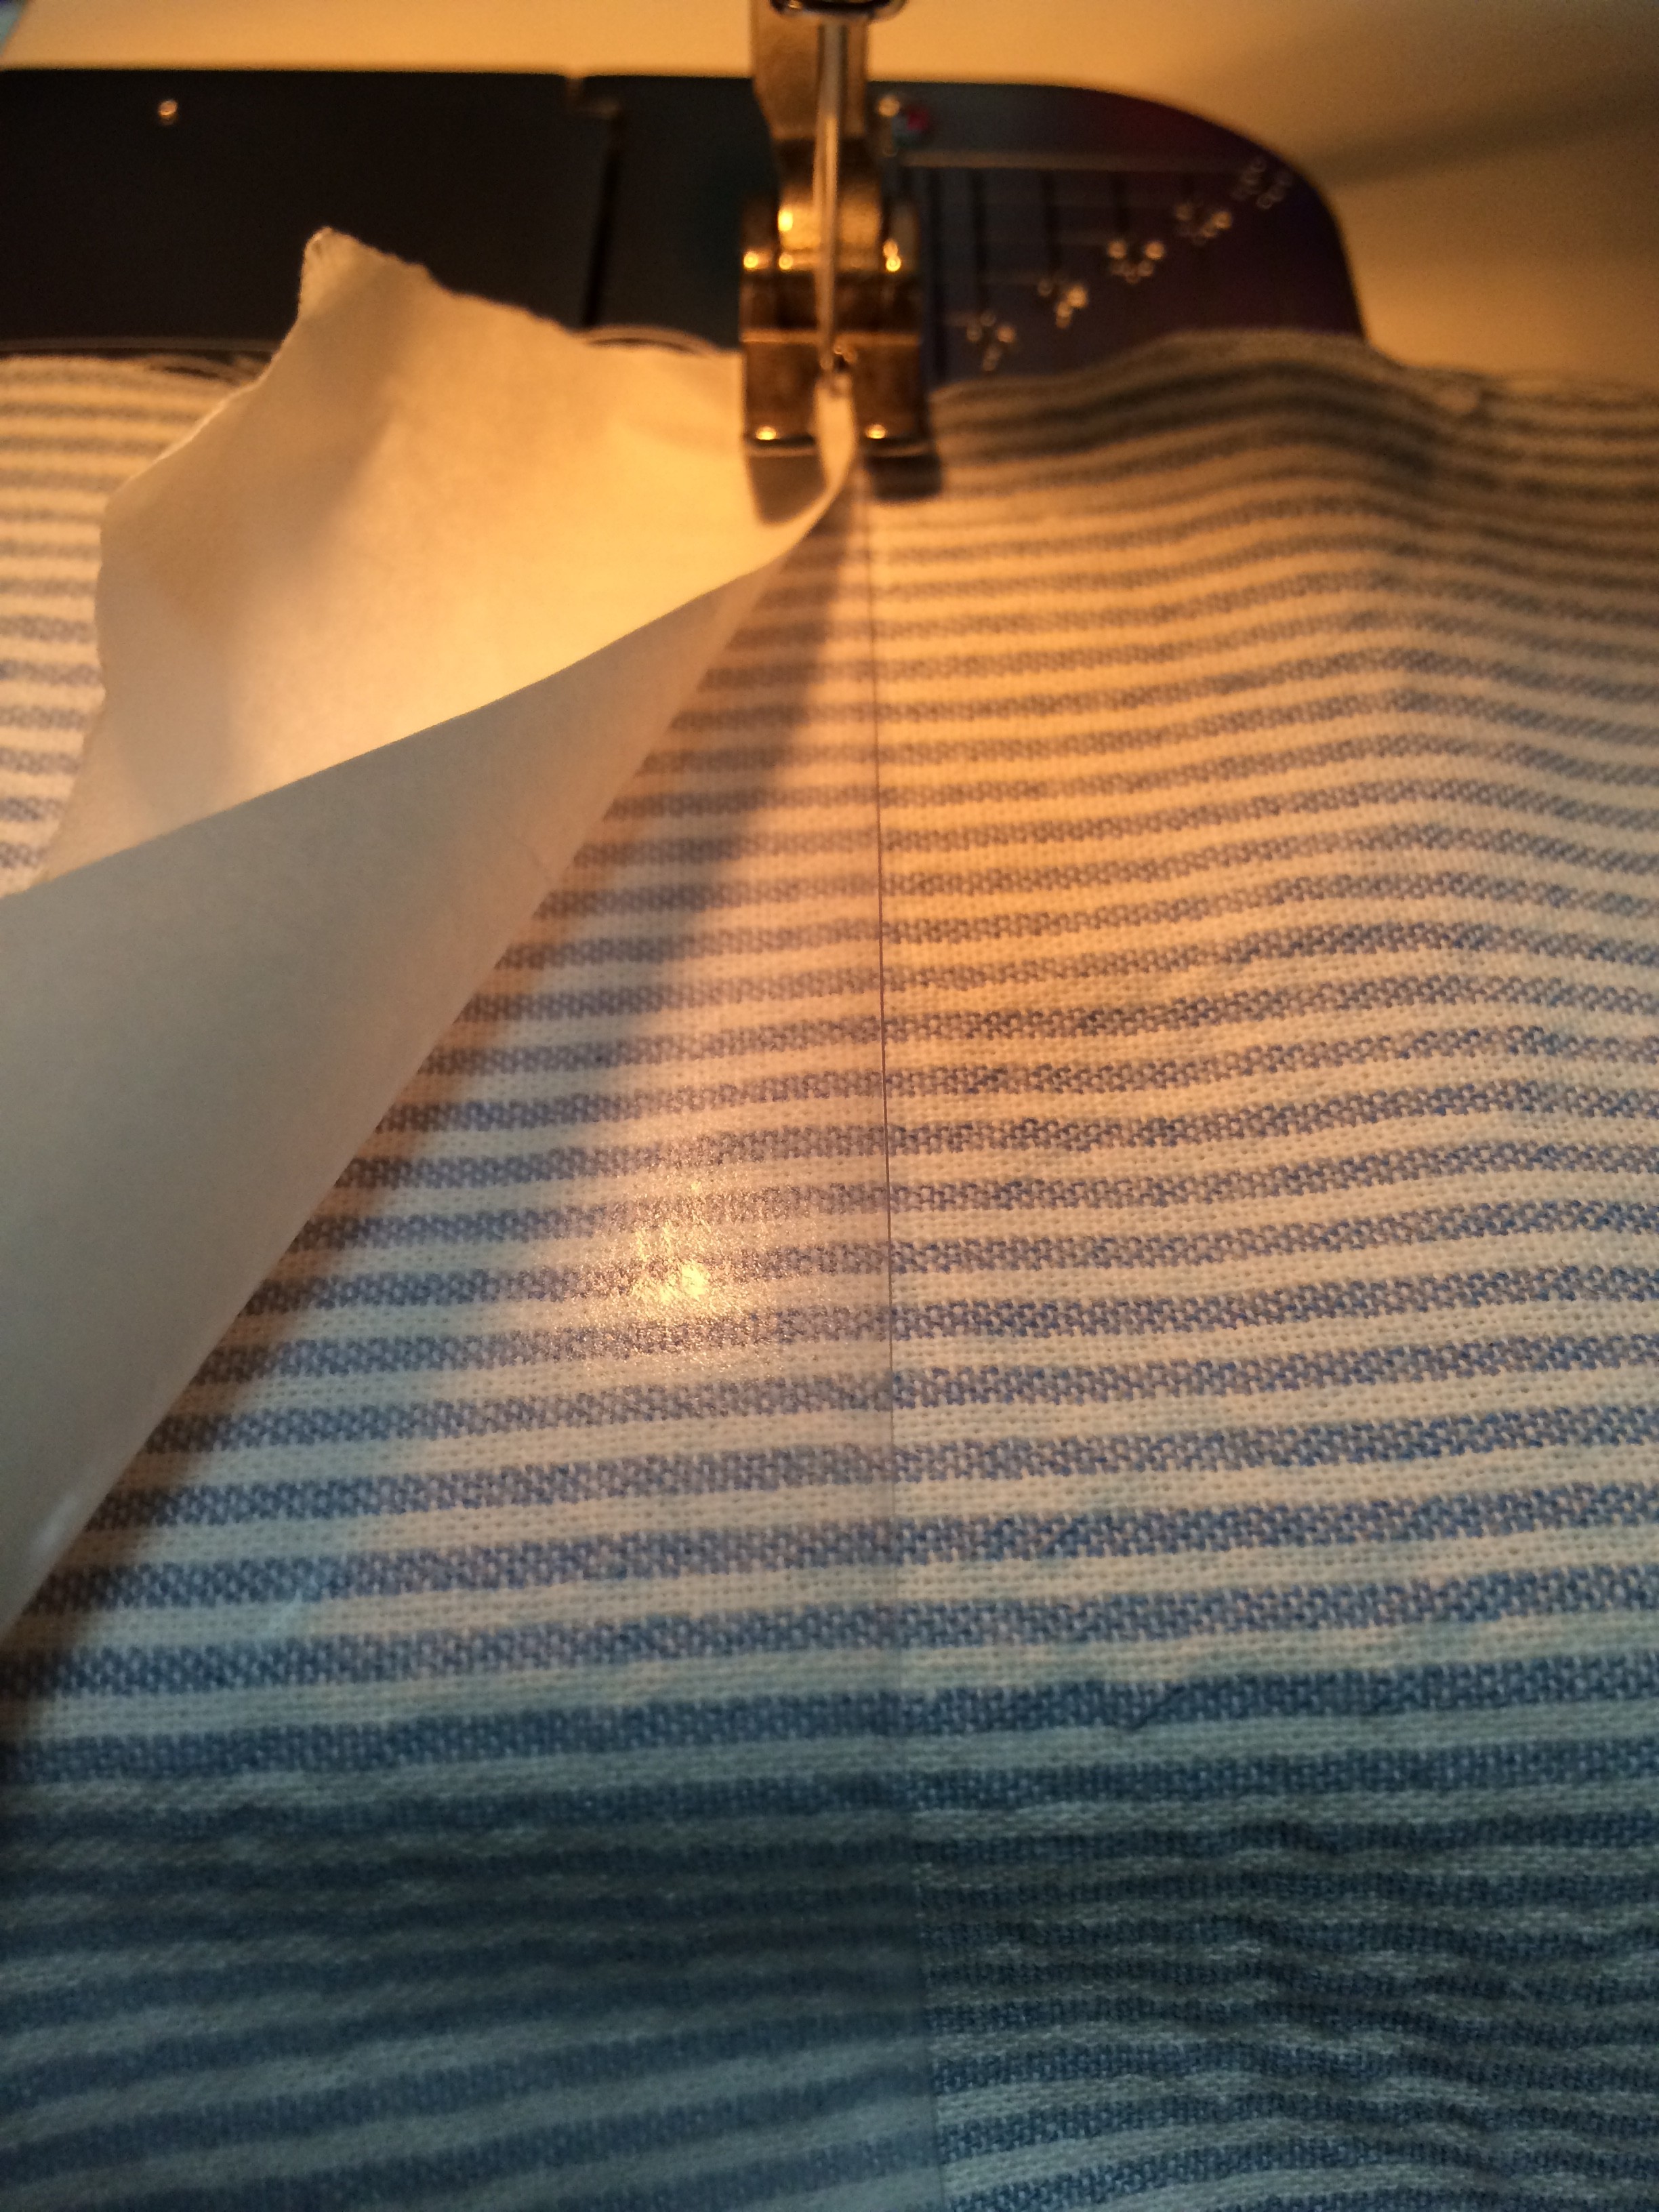
the main point. sewing on vinyl!! / メインのビニールを縫いつけました。
tracing the bitatto window. / ビタットの窓口をトレーシング。
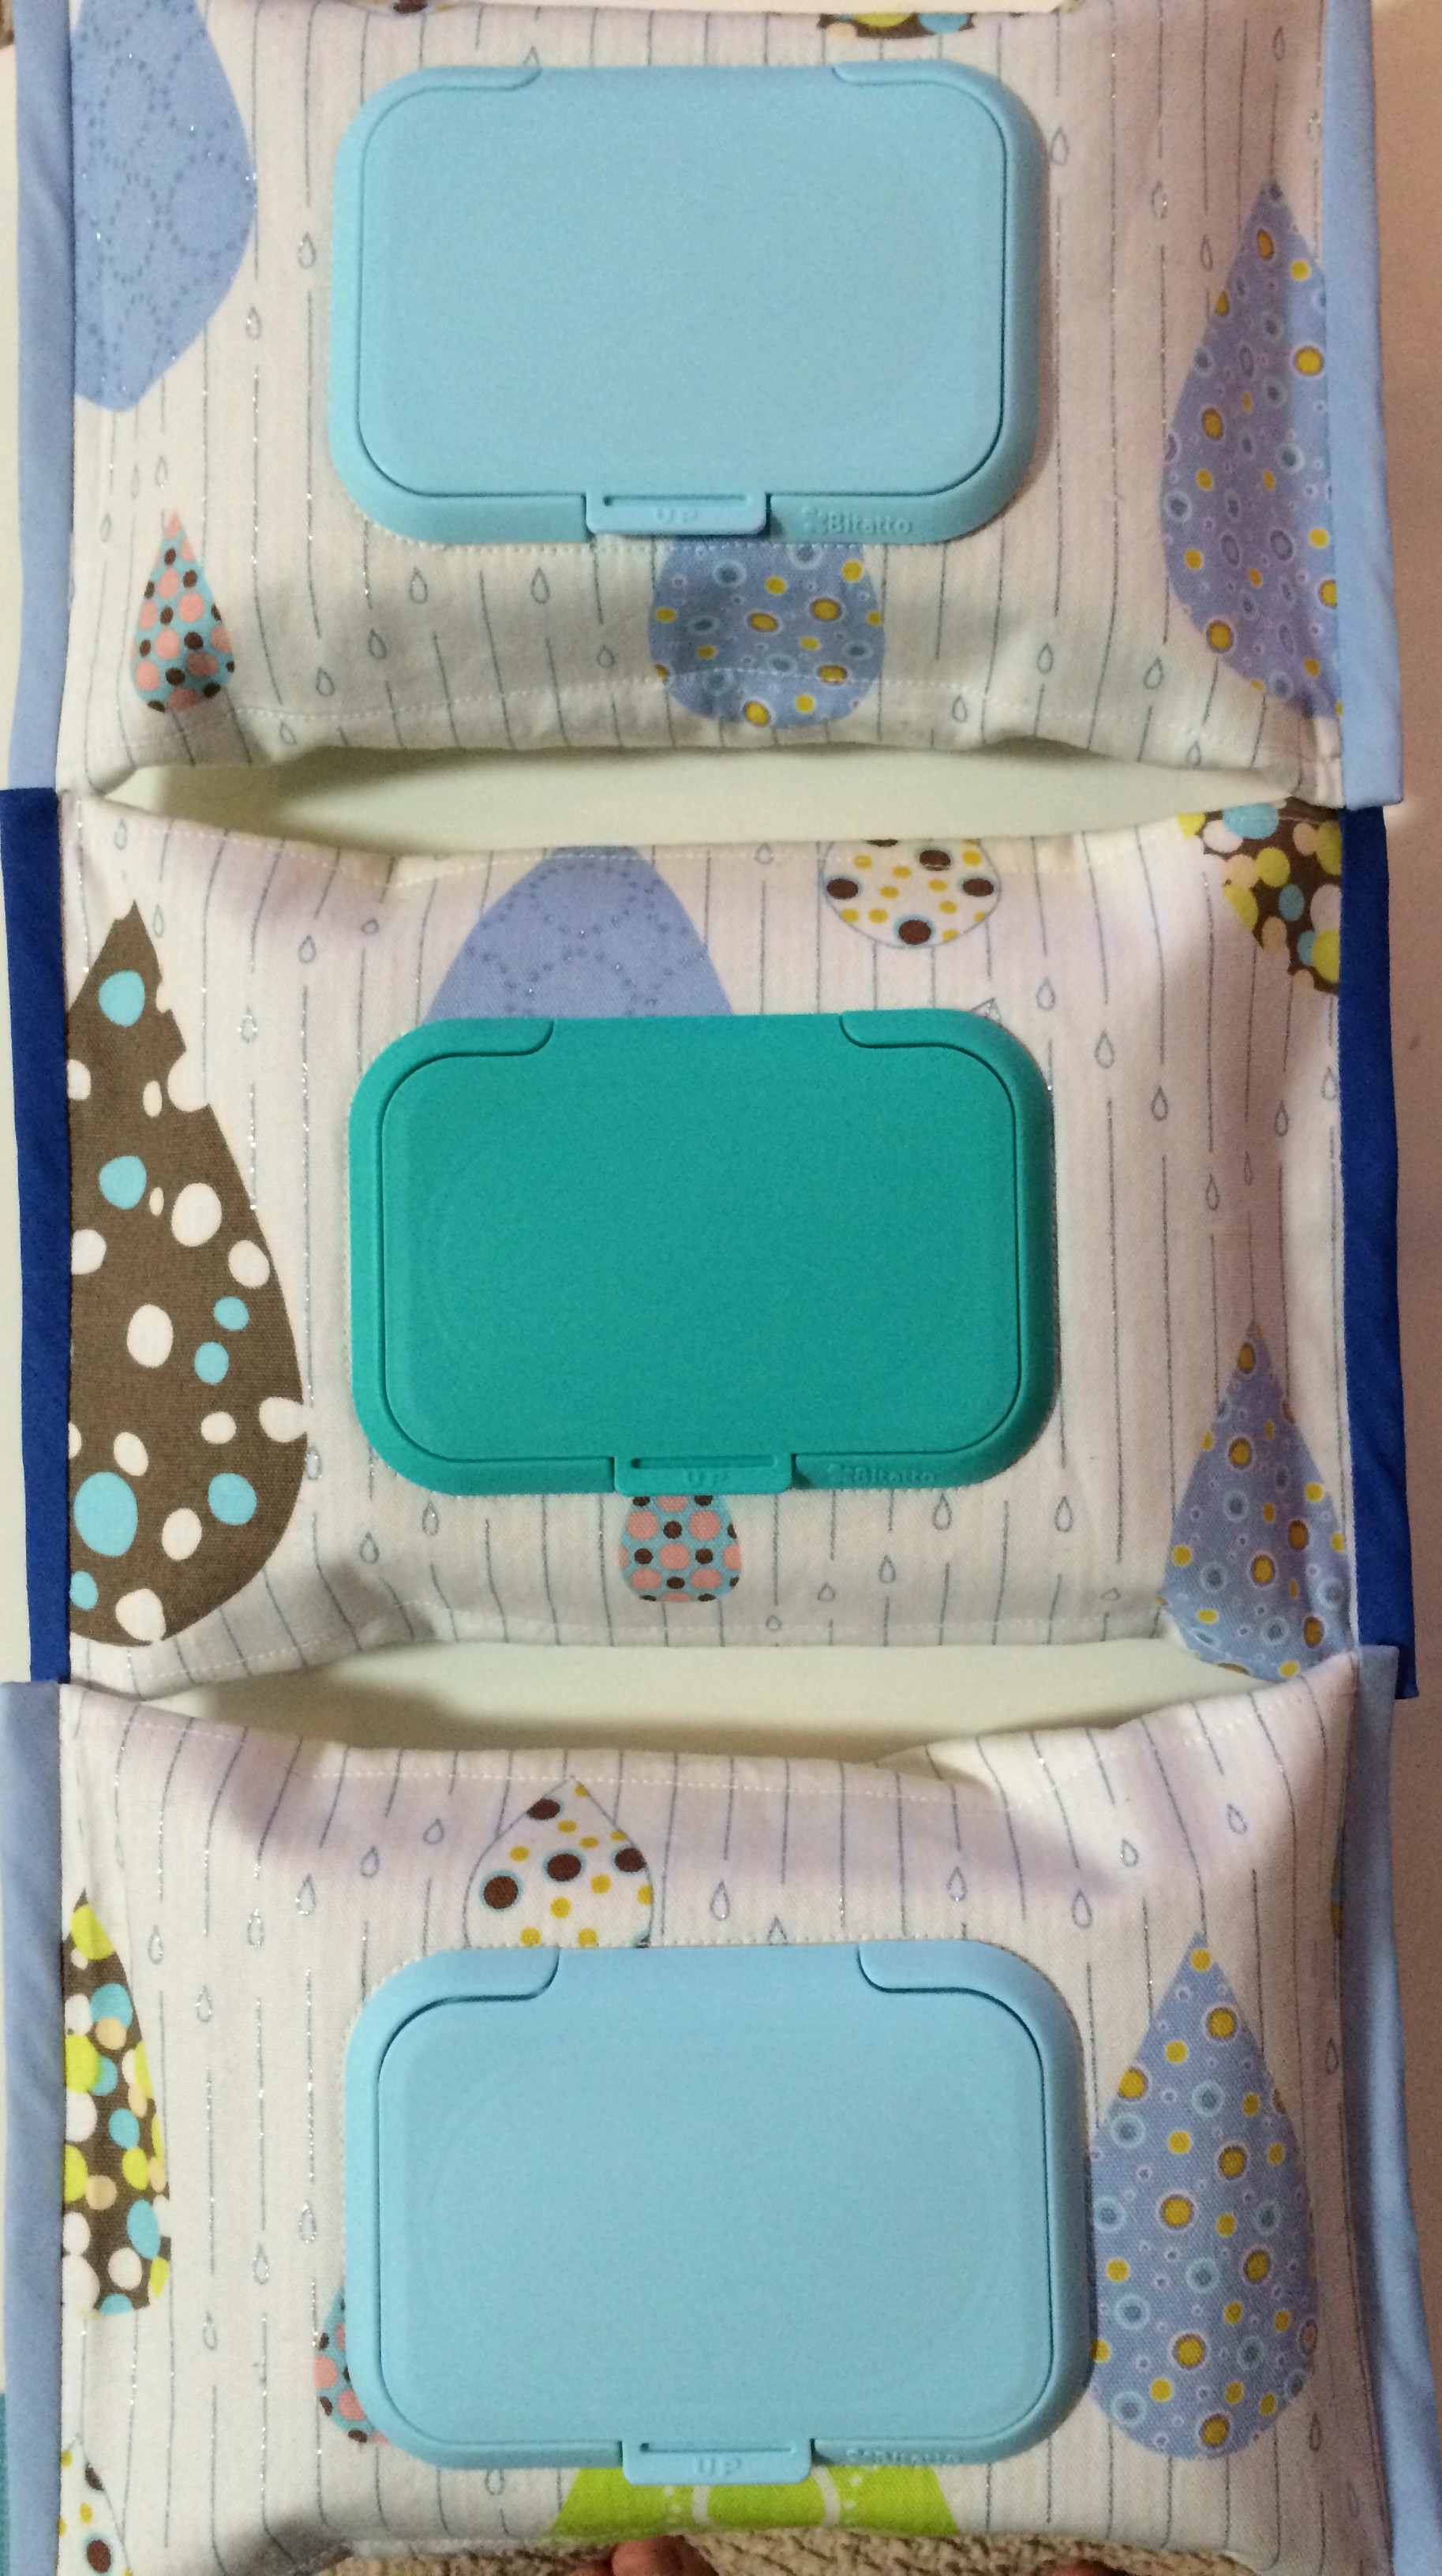
FINISHED! / 出来上がり!
*i am planning to sell these on one of my shops soon! / 近日中にショップにあげようと思います〜!
*after much thought, i won’t be selling these… i am happy to take commissioned orders, so please do not hesitate to contact me. / いろいろ検討しましたところ、販売はいたしません。オーダーは承っておりますので、お気軽にご連絡くださいませ。
**since the bitatto lid is attached to the case itself, unless to switch colors, the bitatto never needs to come off! / ビタットは、ケースに直接つけているので、特に取り外す必要がない為、より長く使い続けられます。
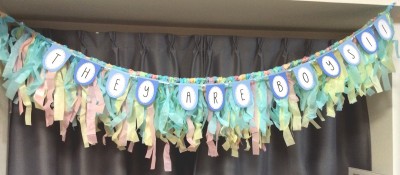
last month, i hosted a dual baby shower for two of my expecting friends. both of them are due around the same time, and both are boys! i was limited with set up time and decorations, so i made a volumy tassel garland that’s easy to put up and instantly brightens up any party space. i didn’t have time to take many photos but here’s what the garlands looked like.
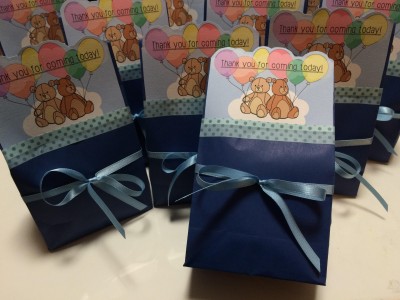
now onto the MAIN subject of this post. a simple and easy baby shower favor d.i.y.! i know i do a lot of “simple and easy”, but seriously not many of us have all the time in the world, and efficiency is key. as long as your heart goes into making these favors, your guests will truly appreciate the gesture!
what you need / 材料:
small paper gift bags / ギフト用紙袋
chocolates, candies, or other small wrapped snacks / 個別包装されたチョコレート、キャンディー、お菓子
washi tape / 和紙テープ
printed (or written) thank you message / 手描き、もしくは印刷されたサンキューメッセージ
scissors / ハサミ
ribbon / リボン
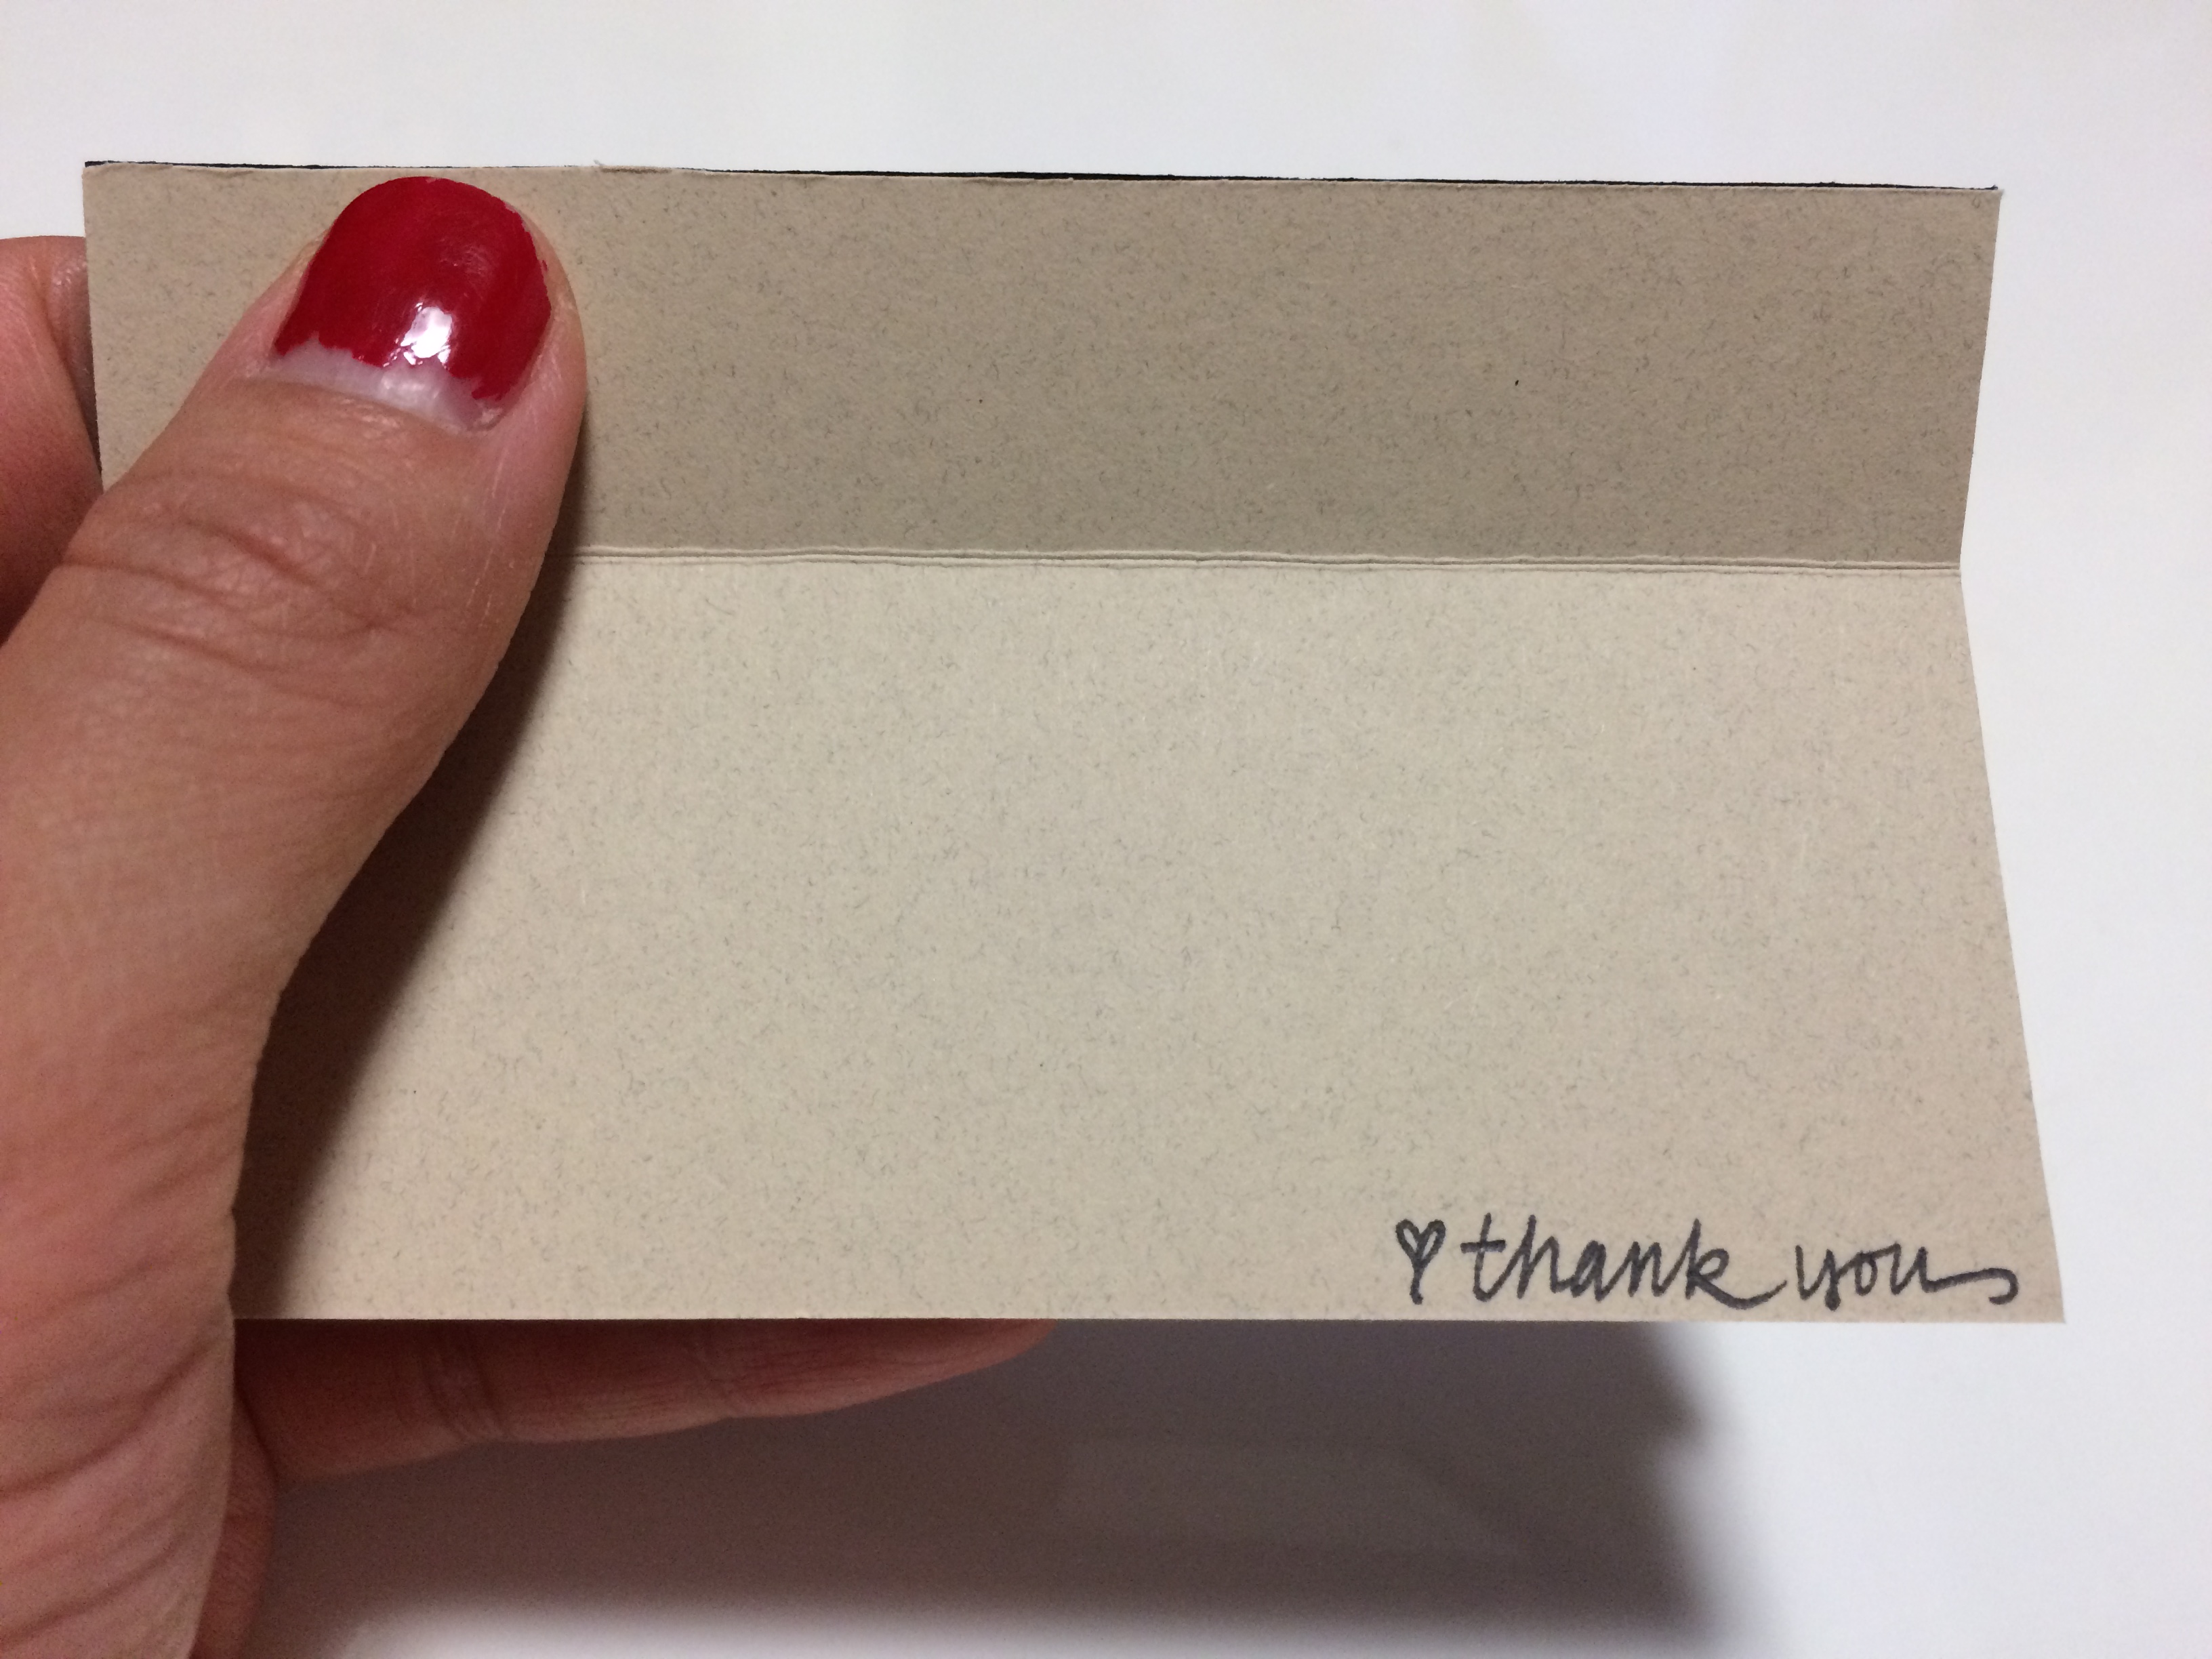
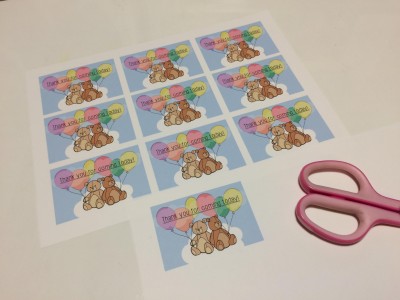
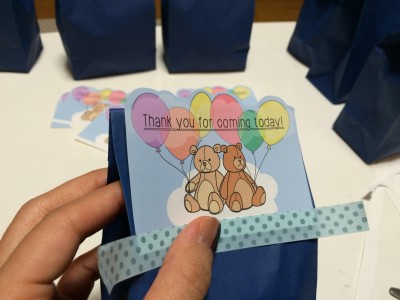
1. print and/or handwrite/draw a thank you message to match the width of gift bag. / 印刷もしくは手書き/描きのサンキューメッセージタグを作る。幅はギフトバッグに合わせて。
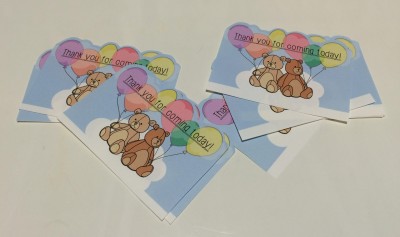
2. cut out thank you message tag. i left some white space at the bottom where the tape will go, but this is optional. for some extra fun details, cut top edges in a curved, scalloped, or zig-zag pattern! /
メッセージタグを切り抜く。下端の白紙部分はテープを貼るのり代として残しました。面白みを出すのに、タグの上端は、カーブやスカラップ、ジグザグで切り抜くと良いです⭐︎
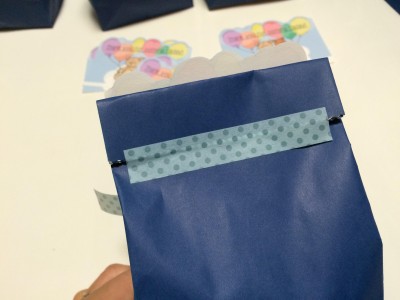
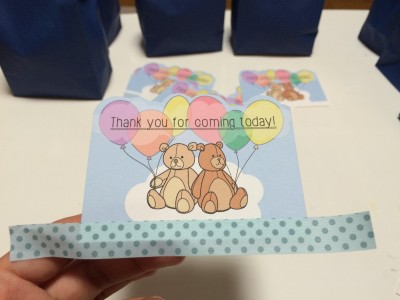
3. fill gift bag with candies and snacks and tape closed. / ギフトバッグにお菓子を詰めて、テープで閉じる。
4. tape washi-tape to the bottom edge of tag. make sure to leave about 1/3 inch of the tape from the bottom edge of the tag to attach to the gift bag. / メッセージタグの下端に和紙テープを貼る。ギフトバッグに貼り付ける分量を半分残す。
5. tape tag to gift bag. let the detailed top edge stick above the gift bag. / メッセージタグをギフトバッグに貼り付ける。先ほど不規則に切った上端は、紙袋の上から出るように配置してね♥
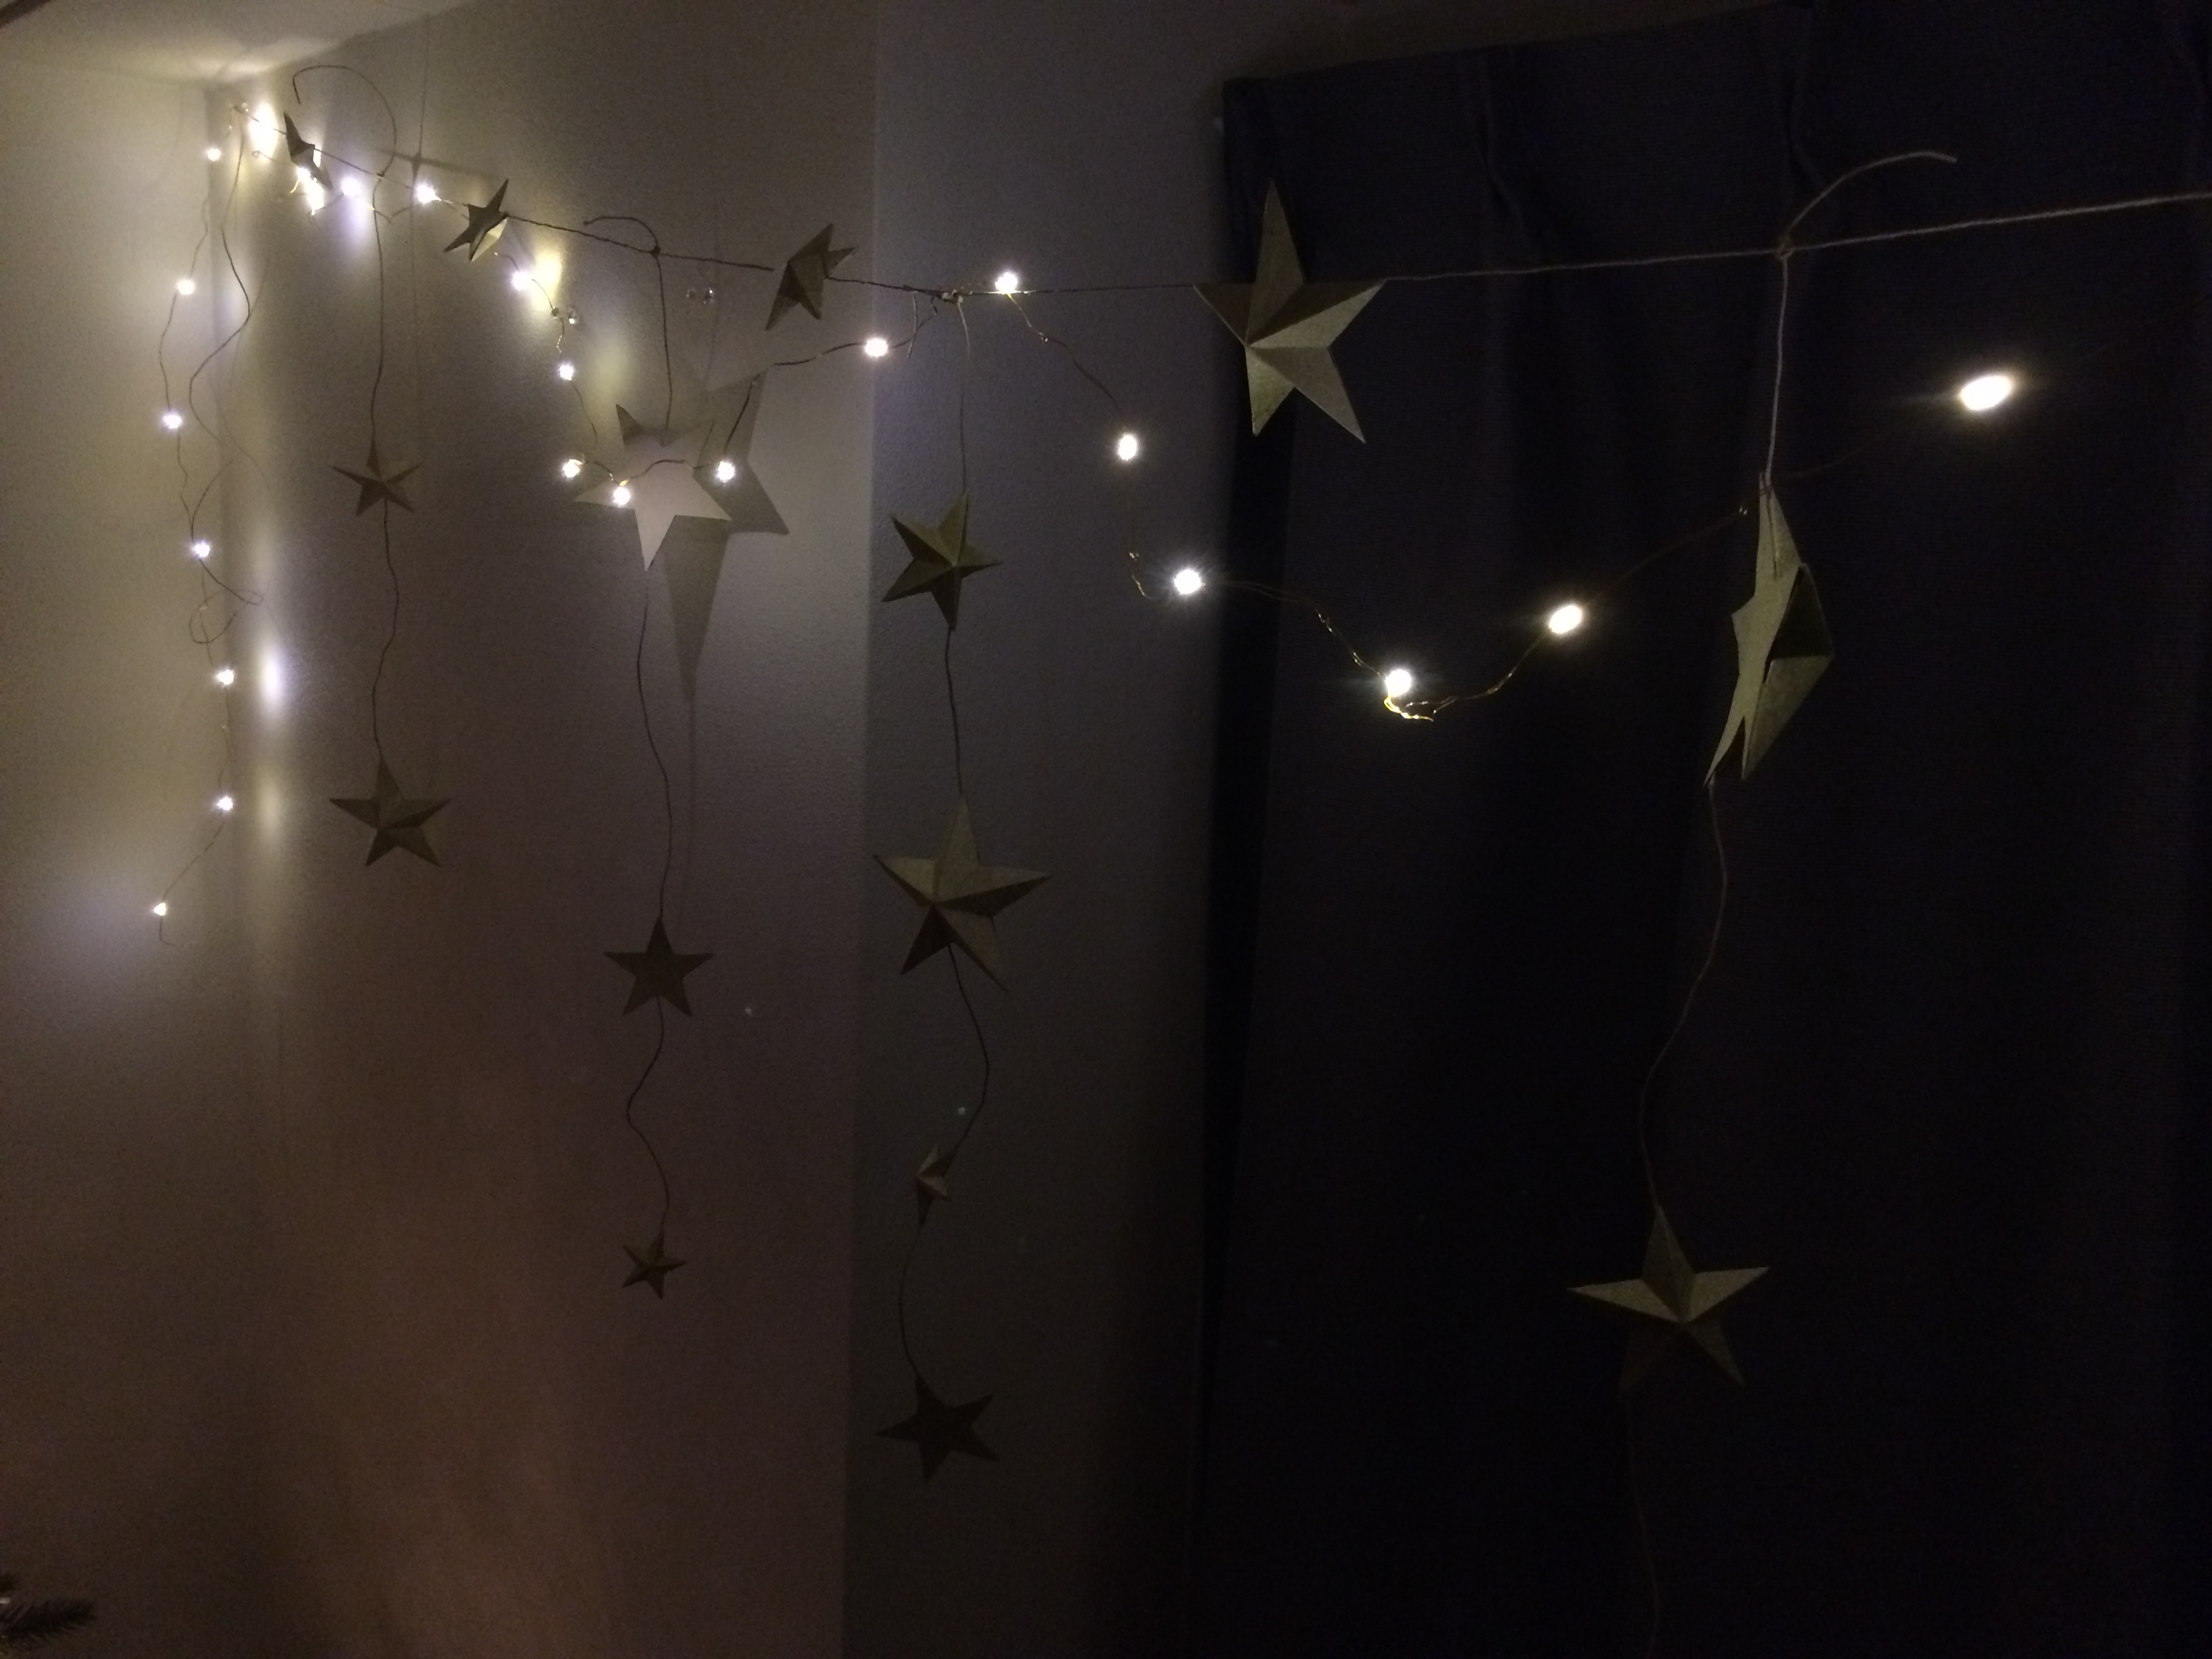
right smack dab in the middle of the holiday season, bustling around for presents, preparing the house for the freezing winter months and the streams of expected guests, i of course had to think up another diy decoration project (well it was more because i had come across these dreamy fairy lights that i’ve been looking for all year) and thanks to my overly ambitious creative mind, i always lose a lot of sleep … but the results are worth it.
クリスマスシーズン真っ只中の今、家族のプレゼント探しから、大掃除、クリスマスパーティの準備などなど、やる事が途絶えない師走のこの時期に、新しいDIYを思いついてしまいました。実を言うと、インスピレーション源は一年中探していたフェアリーライトを niko and… で見つけた事です。睡眠時間削ってでもどうしても作りたかったスターガーランドが完成しました。
what you need / 材料:
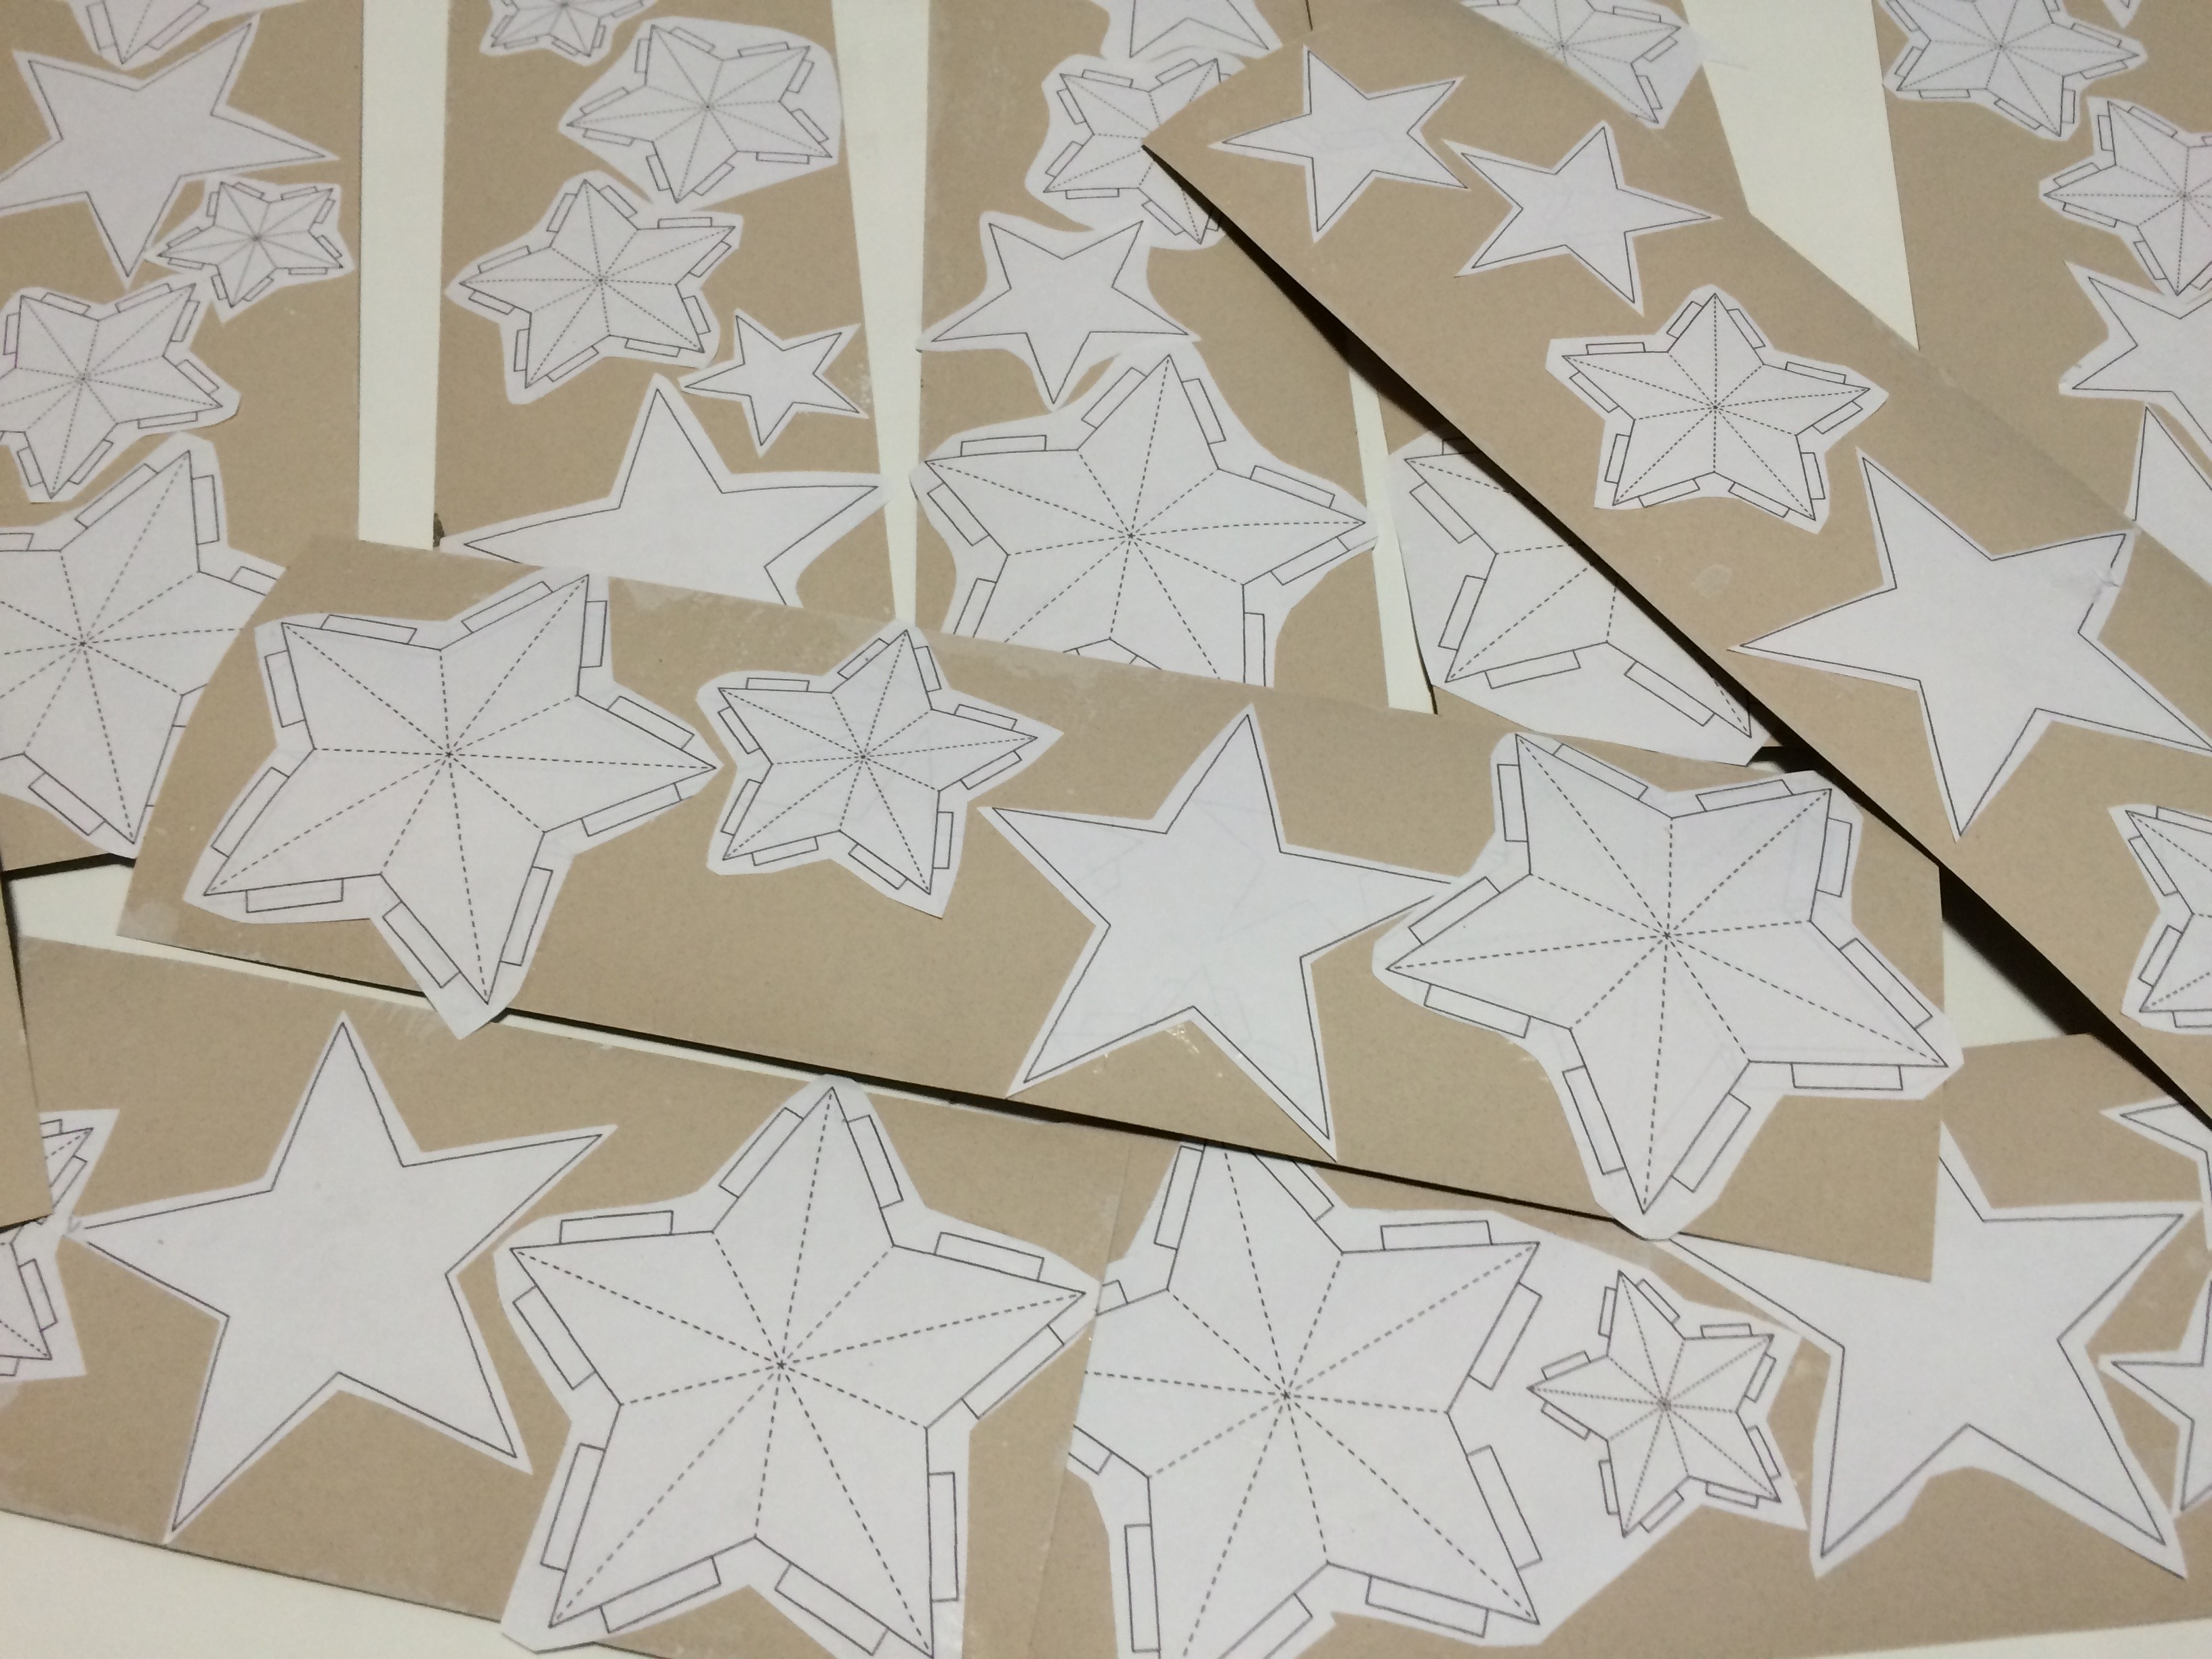
1 A4 size card stock (for 6 stars) / A4サイズ厚紙や画用紙1枚(星6枚)
white acrylic paint / 白いアクリル絵の具
sponge for painting / スポンジ
gold spray paint / ゴールドスプレーカラー
printed template (1 sheet=6 stars) / 型紙のプリント(1枚=星6個) CLICK HERE FOR FREE TEMPLATE / 無料型紙は、こちらをクリック
all purpose glue / 糊
scissors / ハサミ
needle or pointed tool / 目打ち
ruler / 定規
cutter / カッター
cord / 紙紐
tape / テープ
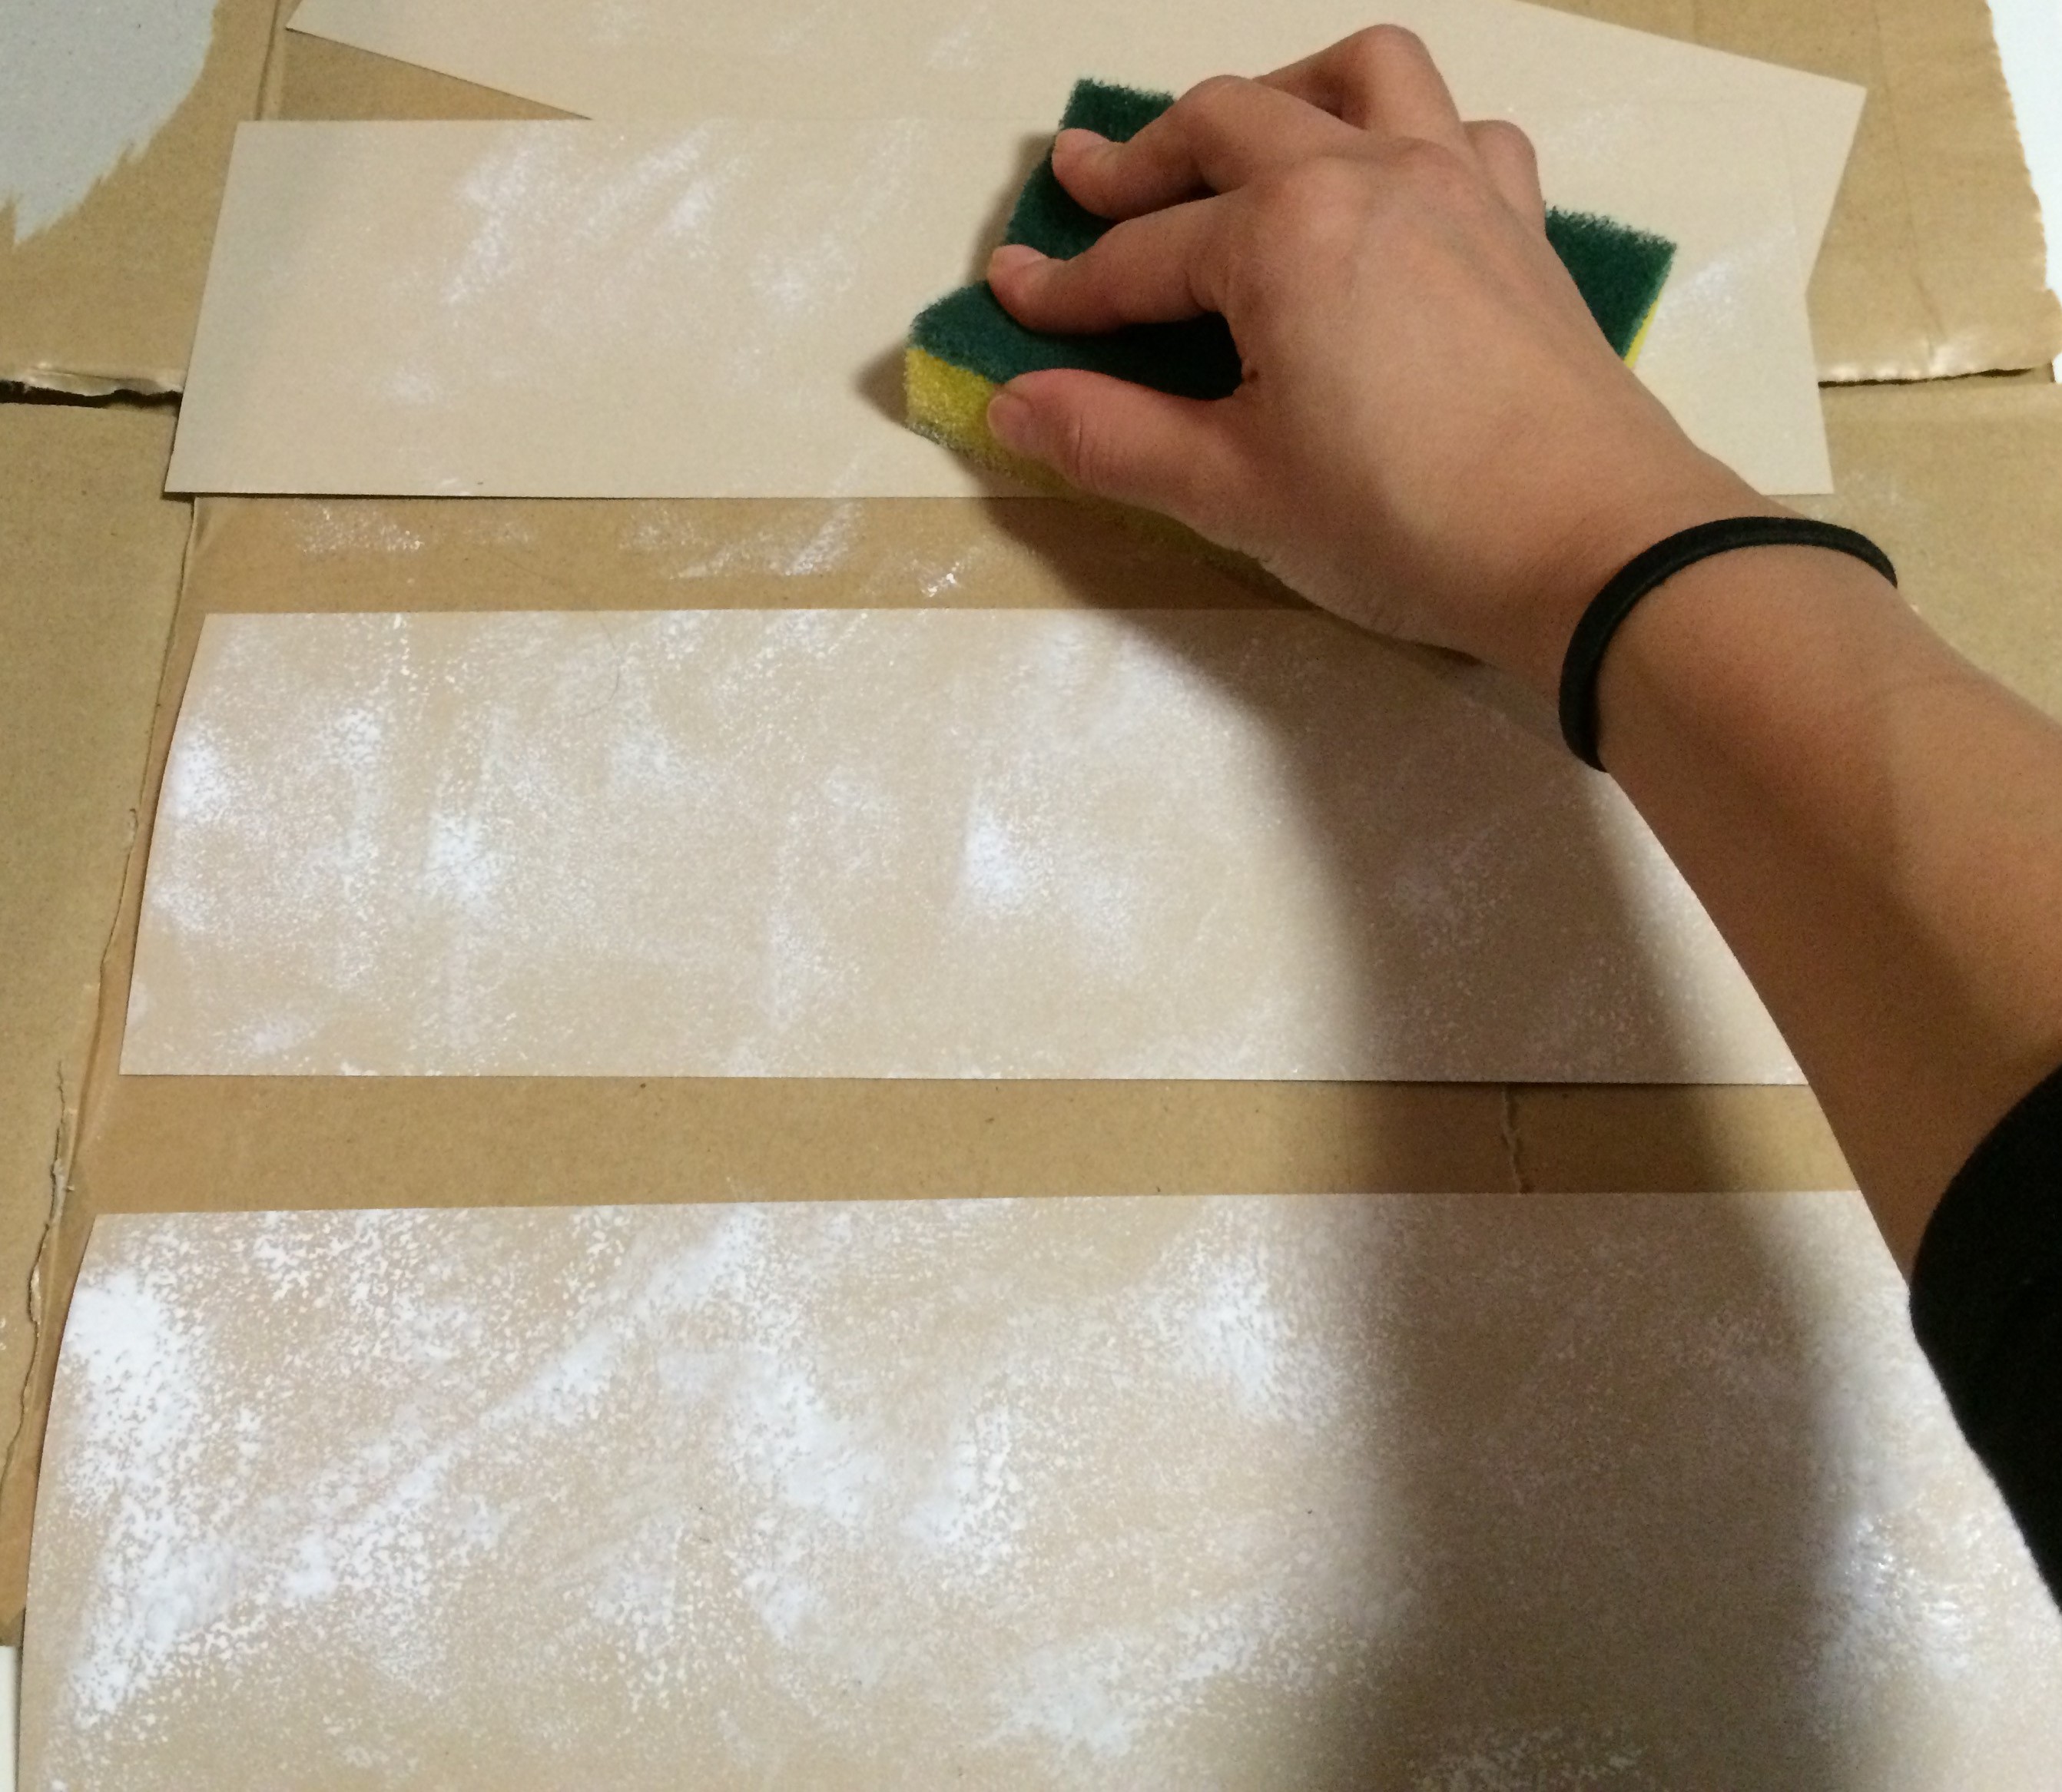
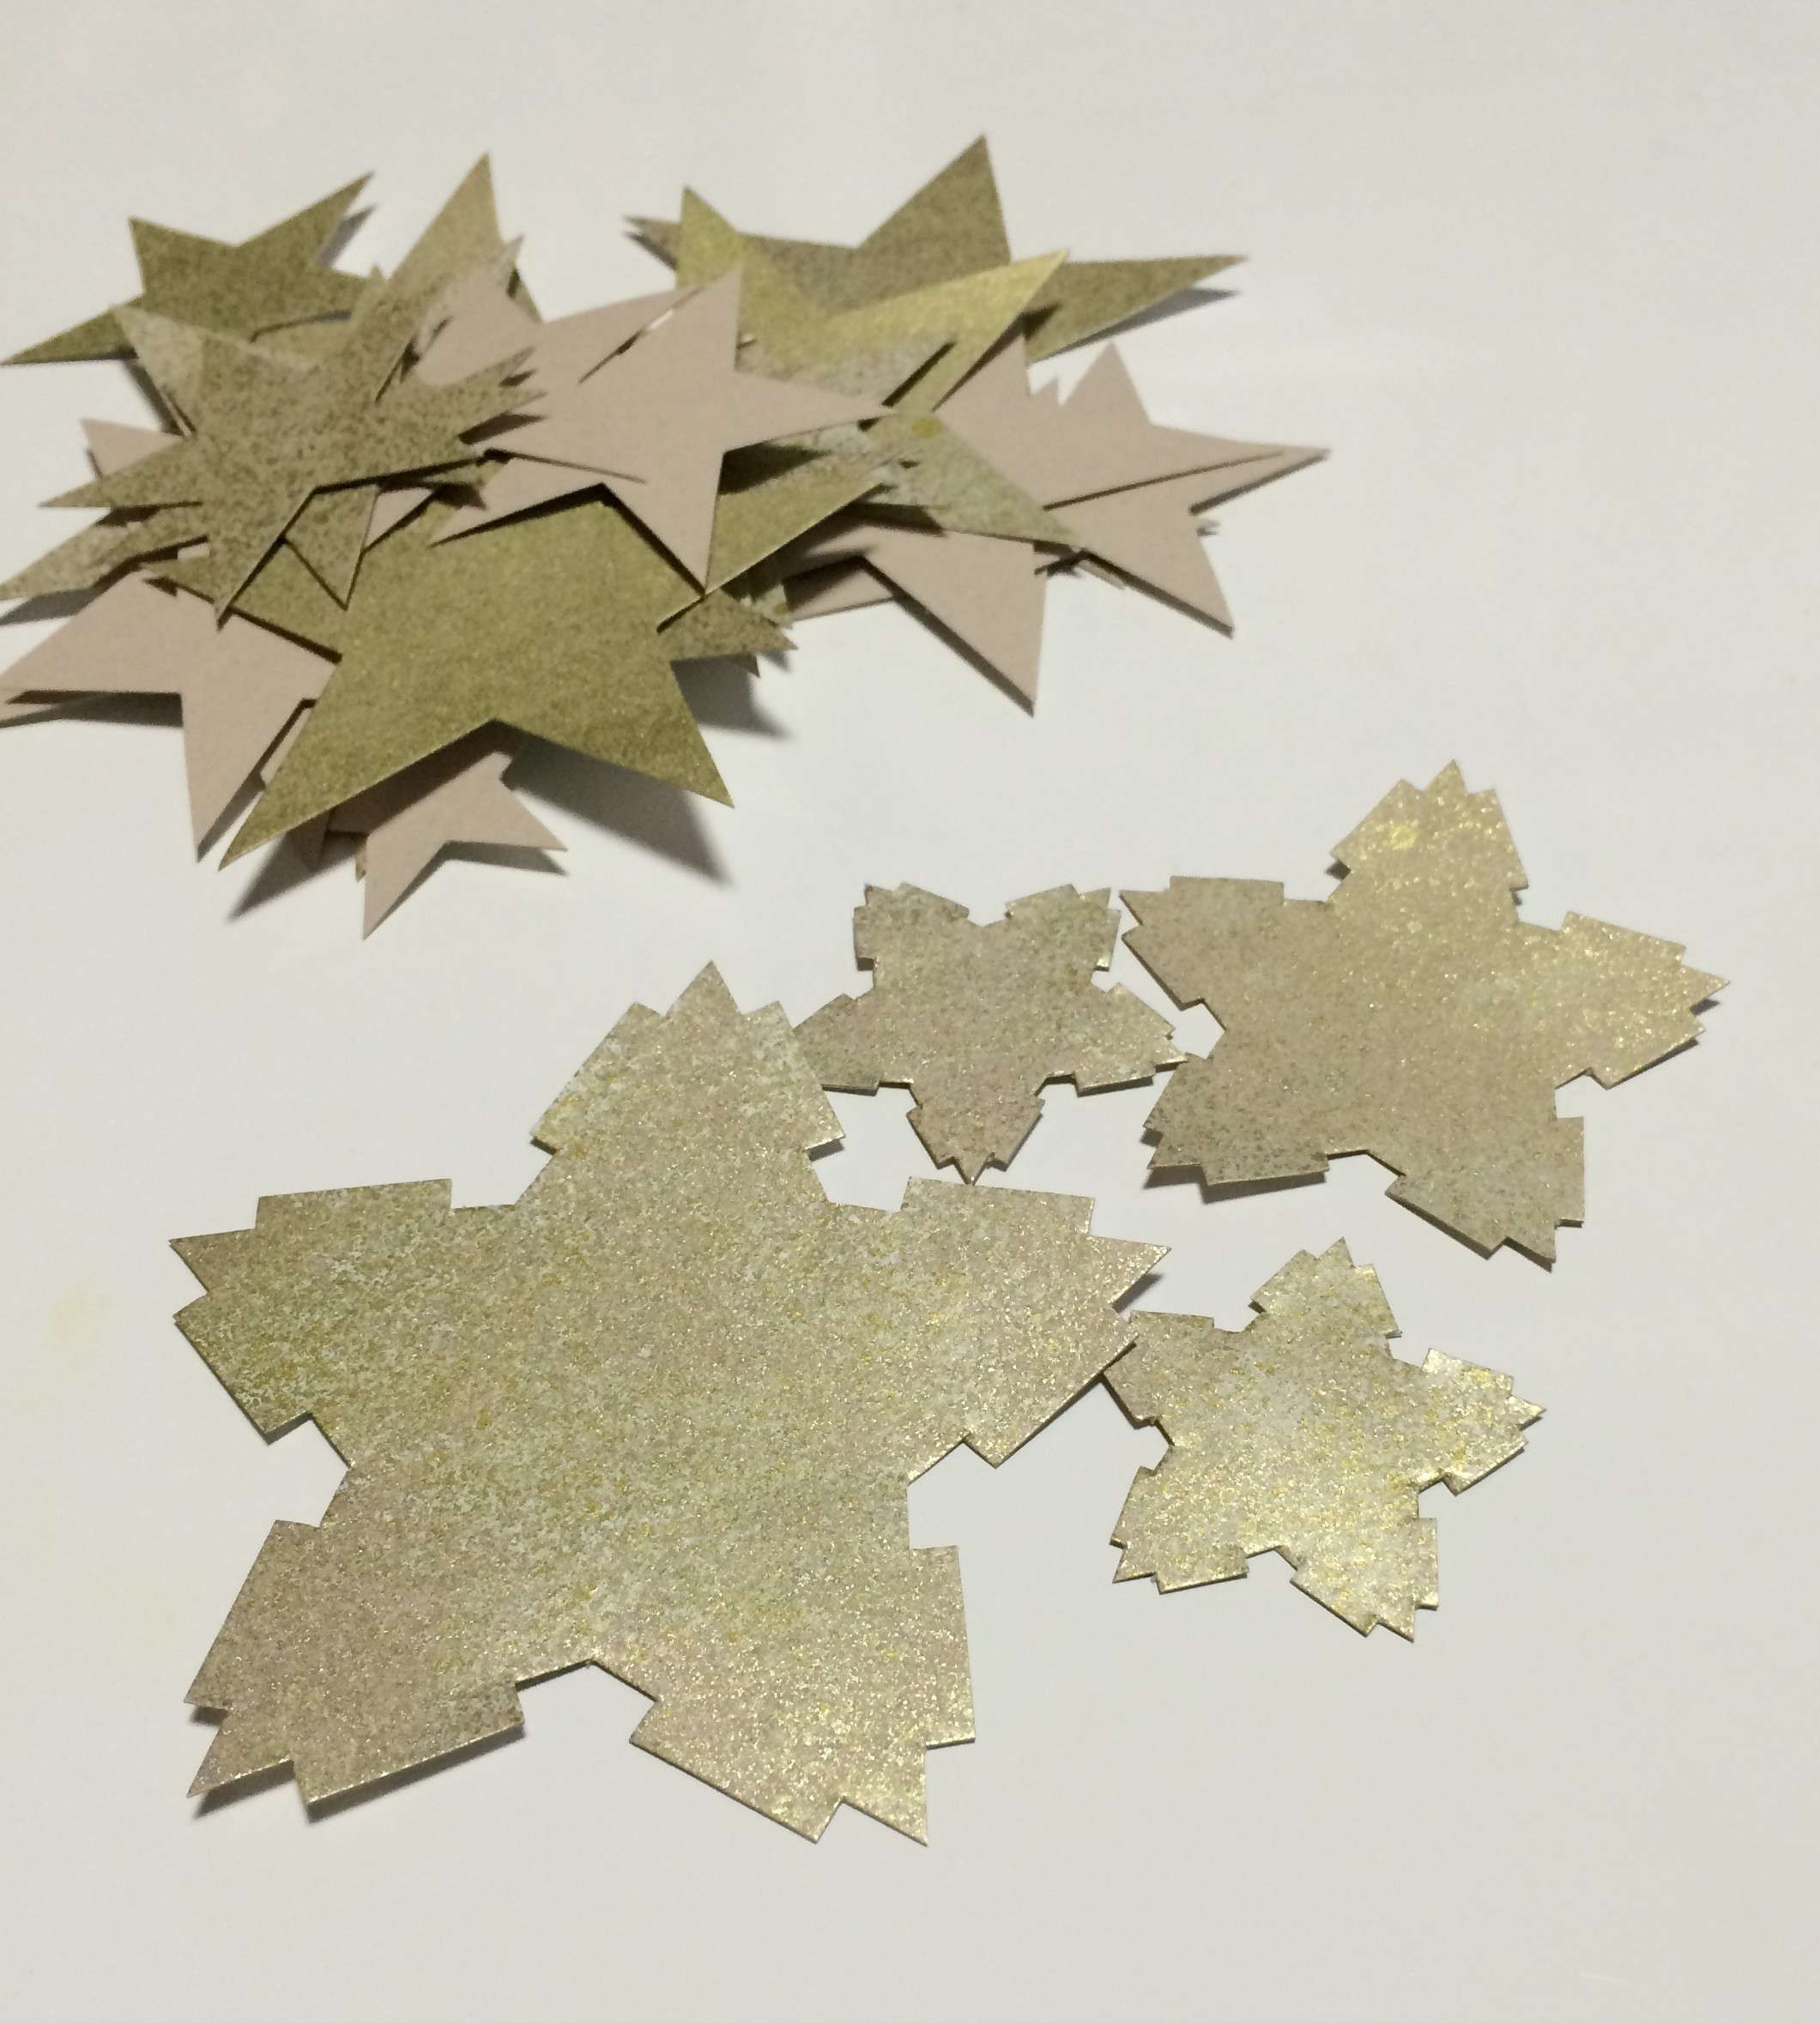
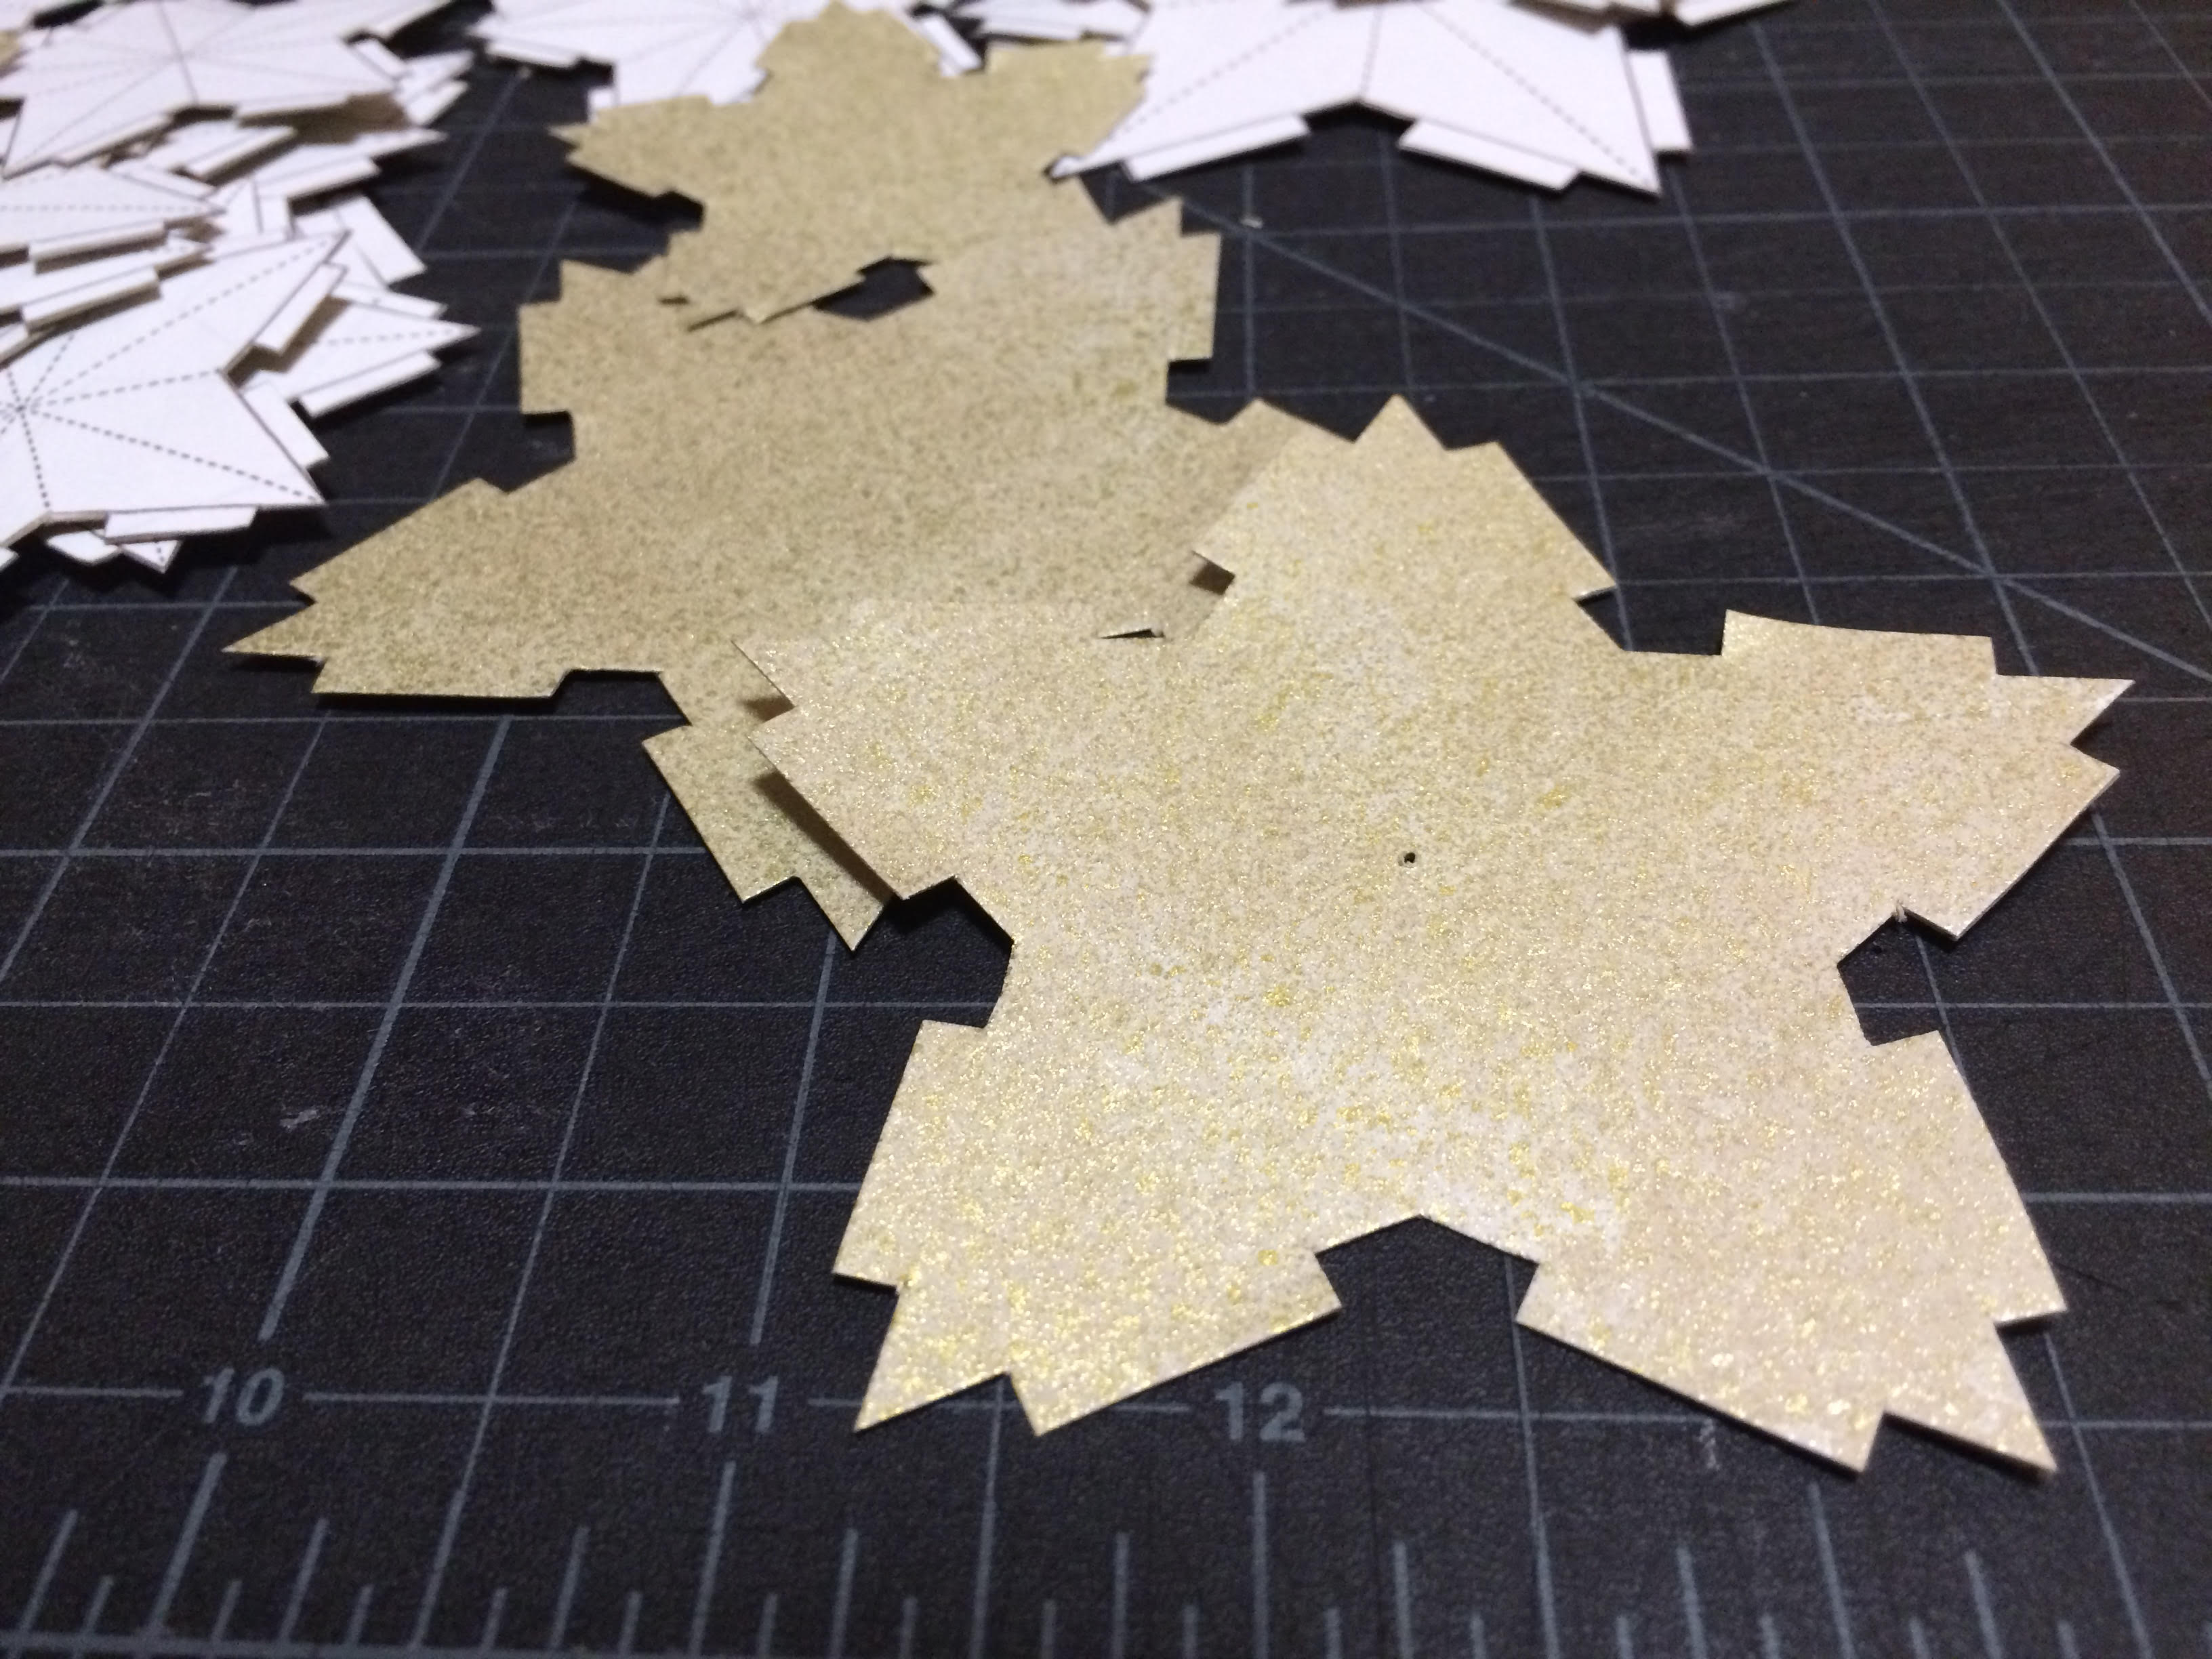
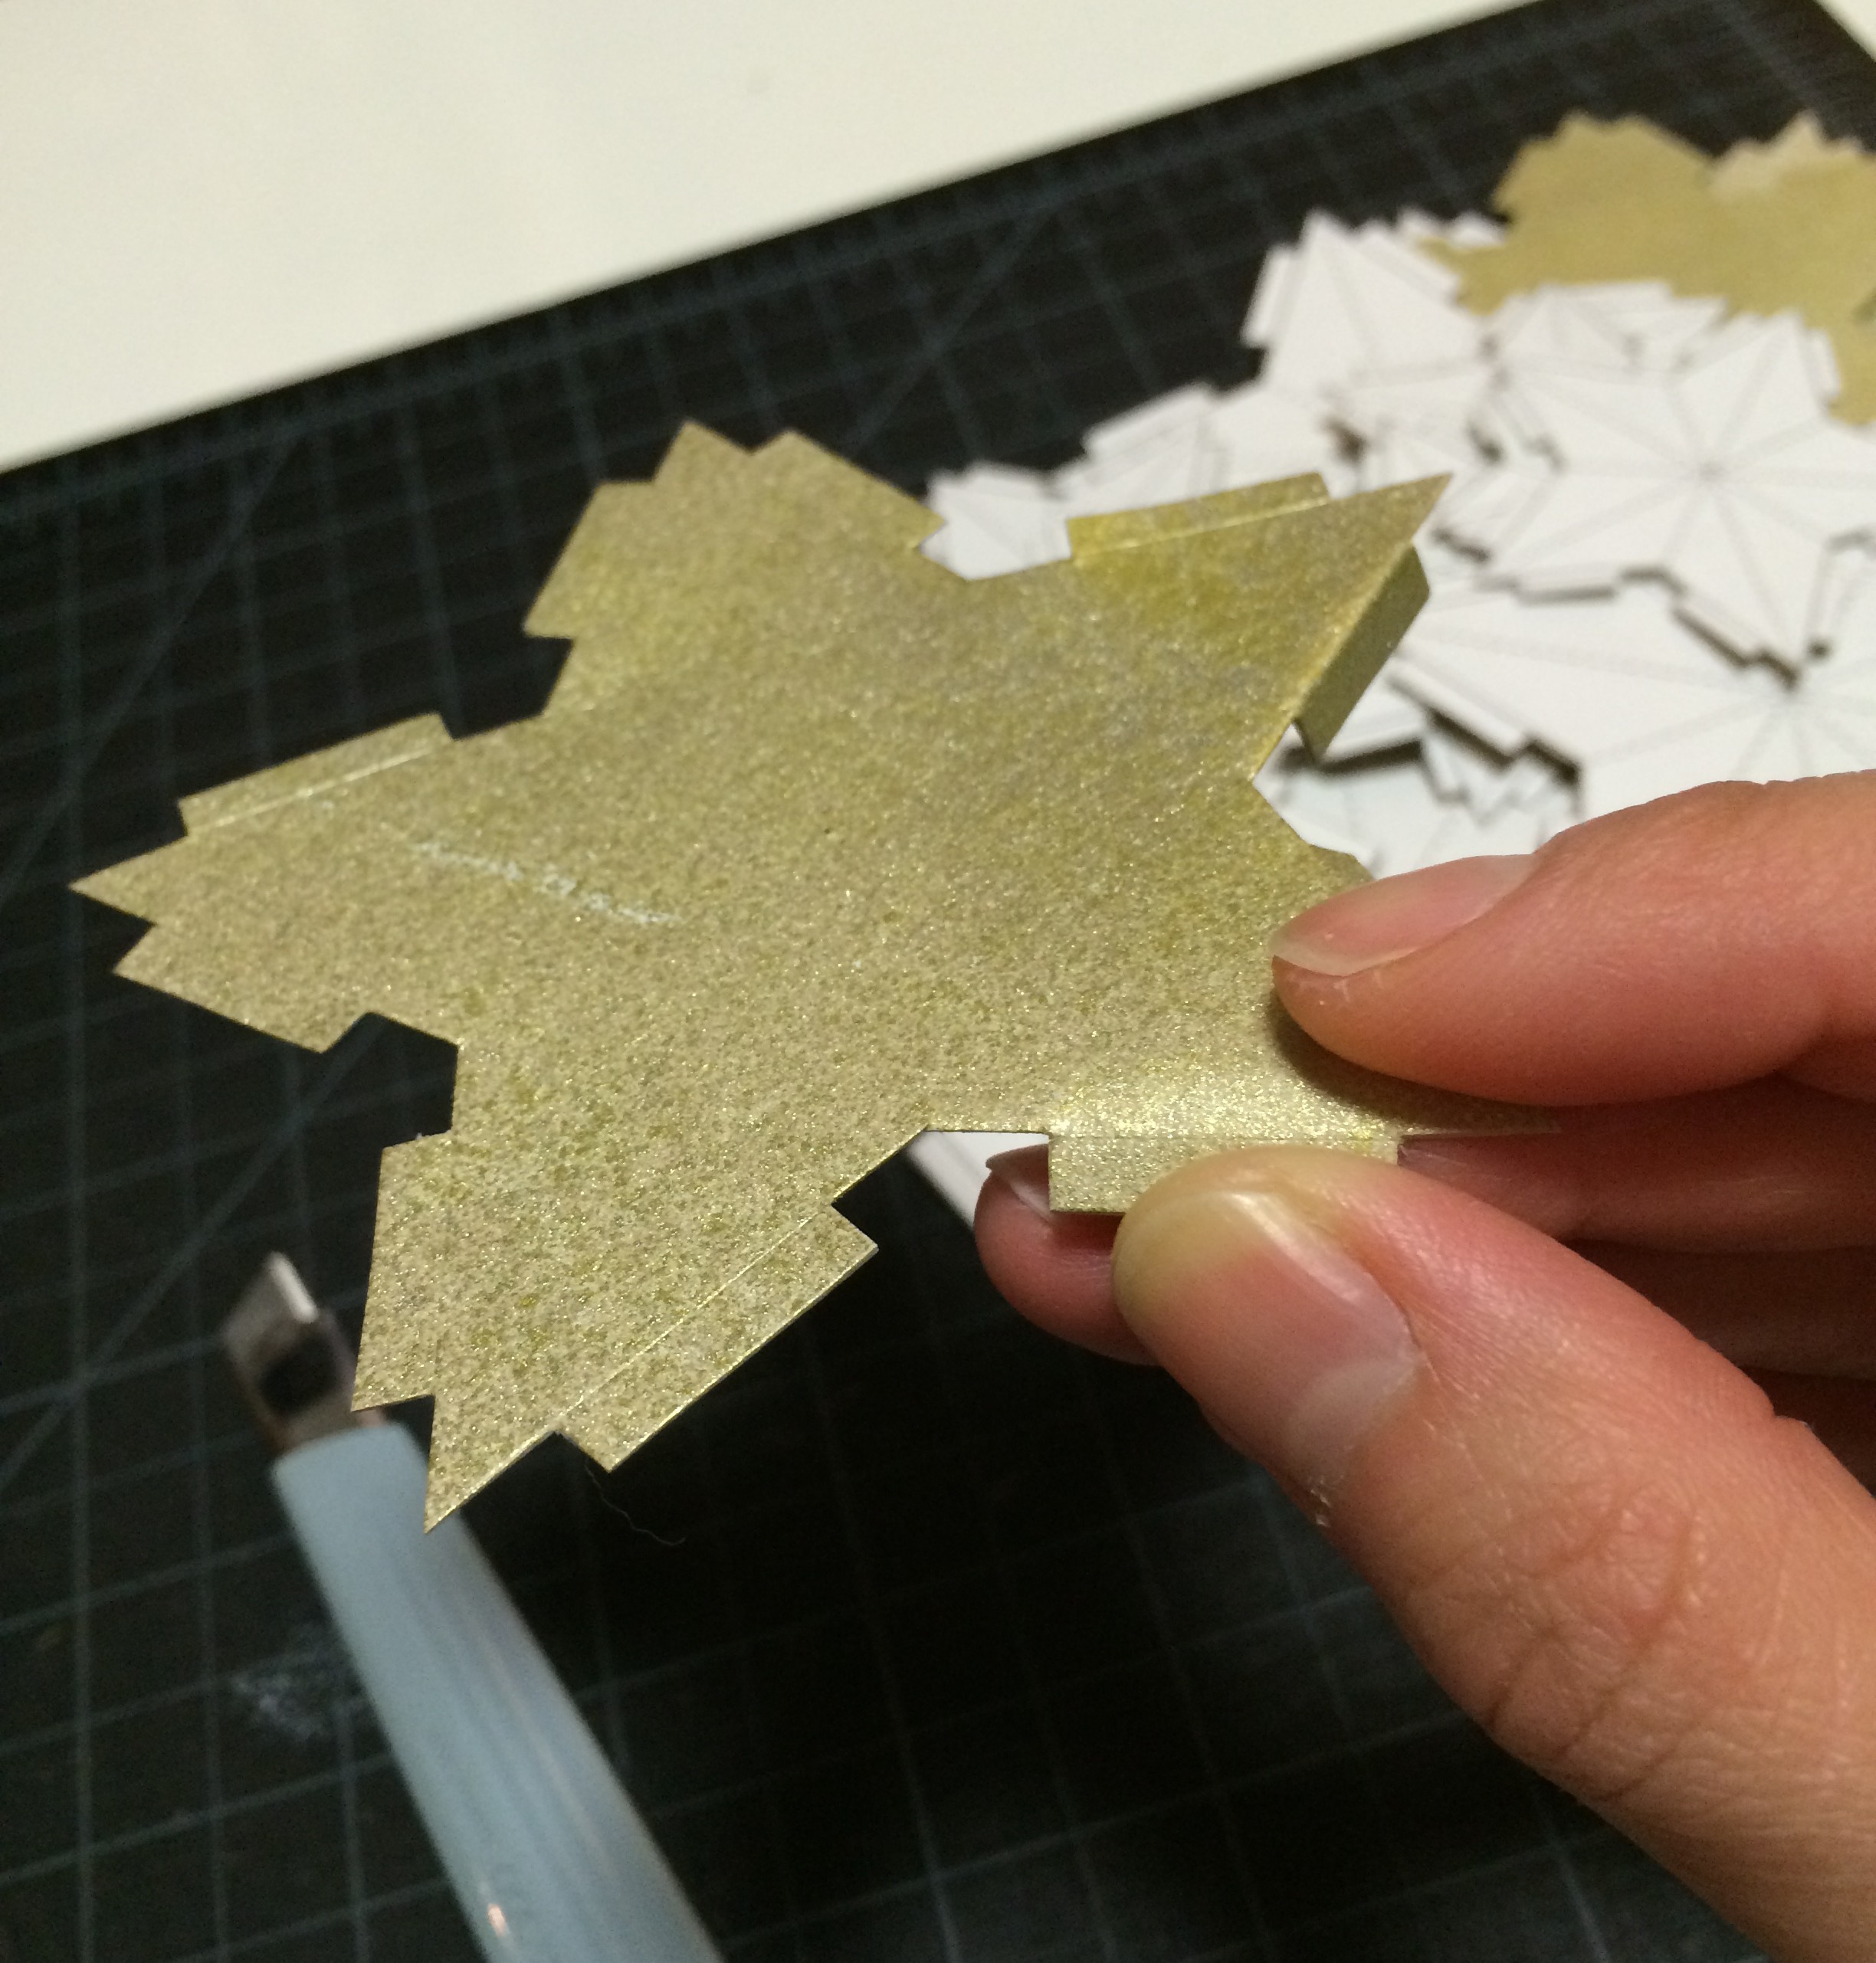
1. use a sponge to paint card stock. this adds a marble-type of effect for the first layer! then spray a thin layer of gold paint. (i used strips of leftover cardstock.) / スポンジでアクリルペイントを厚紙に叩くように塗る。マーブル調になります。次にゴールドのスプレーカラーを薄く塗る。(私は余り物の厚紙を使用しているので紙サイズが異なります。)
2. after at least 24 hours of drying the paints, the sheets are ready! i purposely left a couple of sheets uncolored. / 24時間ほどペイントを乾かしたら、紙の準備が終わります!あえて数枚ペイントをしないでいます。
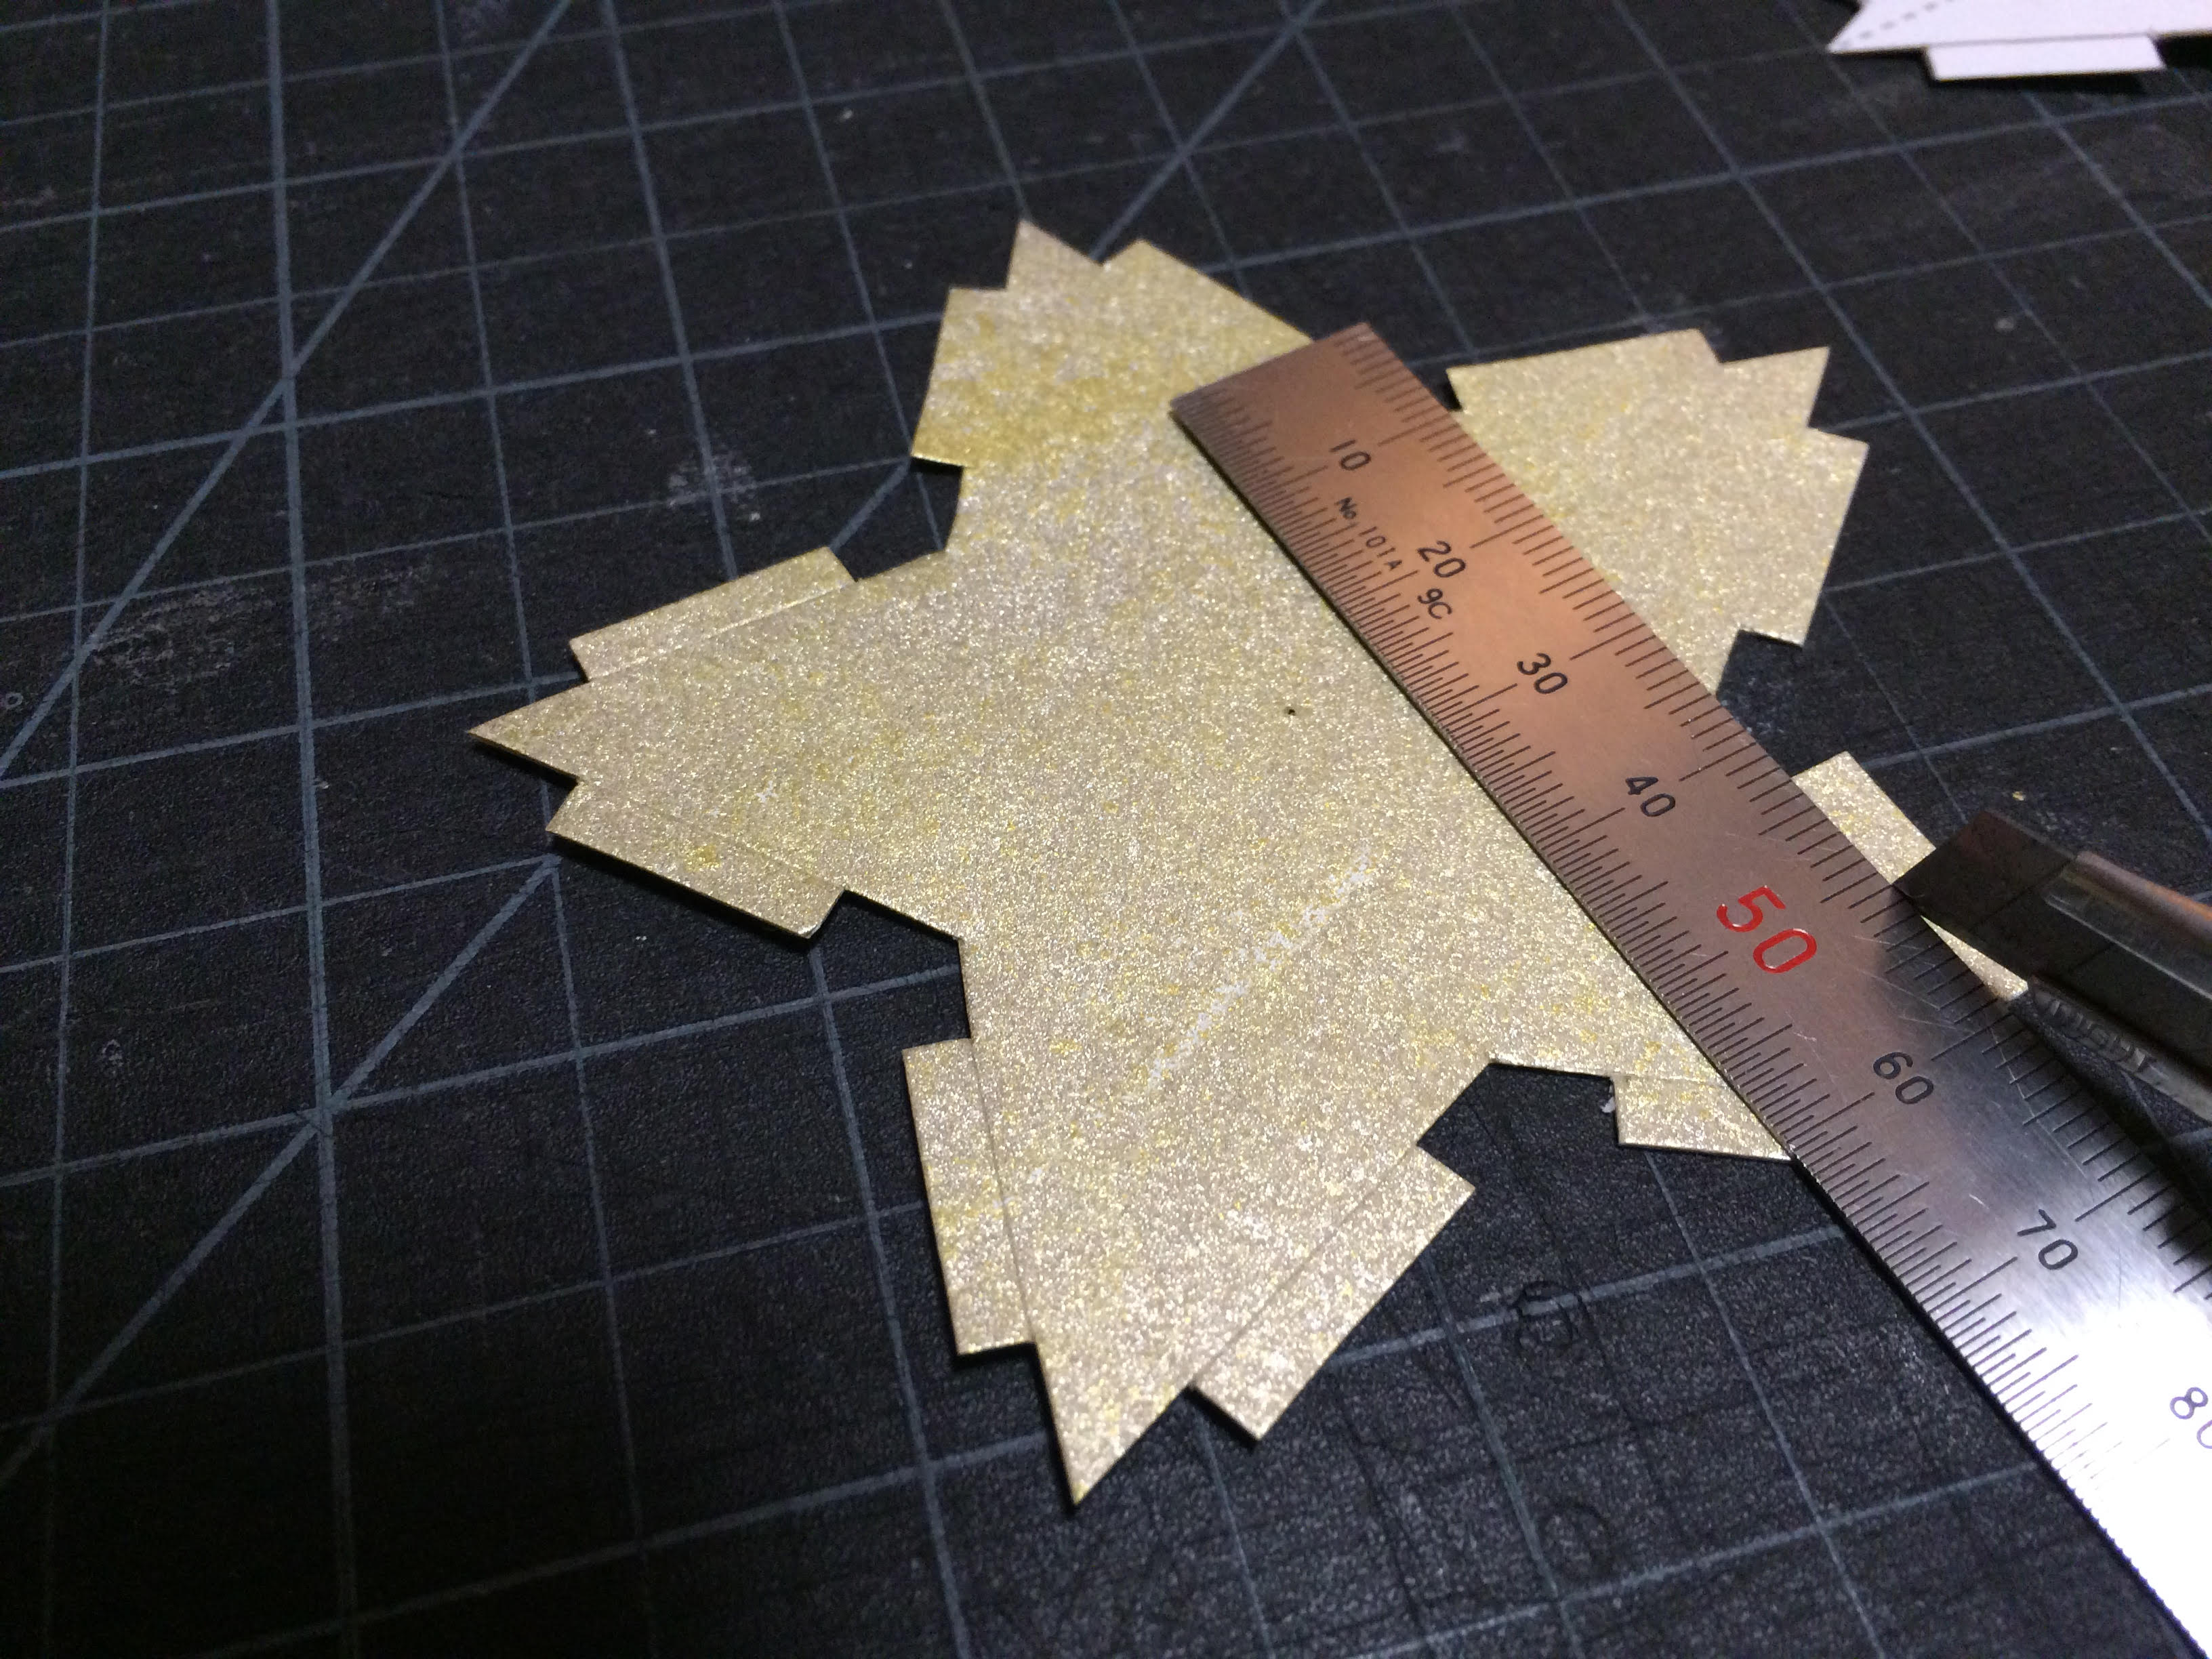
3. glue the template to the back of the prepared card stock. make sure to glue the entire surface of each star. since i had irregular sized strips i roughly cut the individual stars out. / 型紙のプリントを厚紙の裏に糊で貼る。しっかり星の中全体を糊付けする事がポイントです。私は余り物の紙を使っていたので、先に型紙を荒く切り分けてから貼りました。
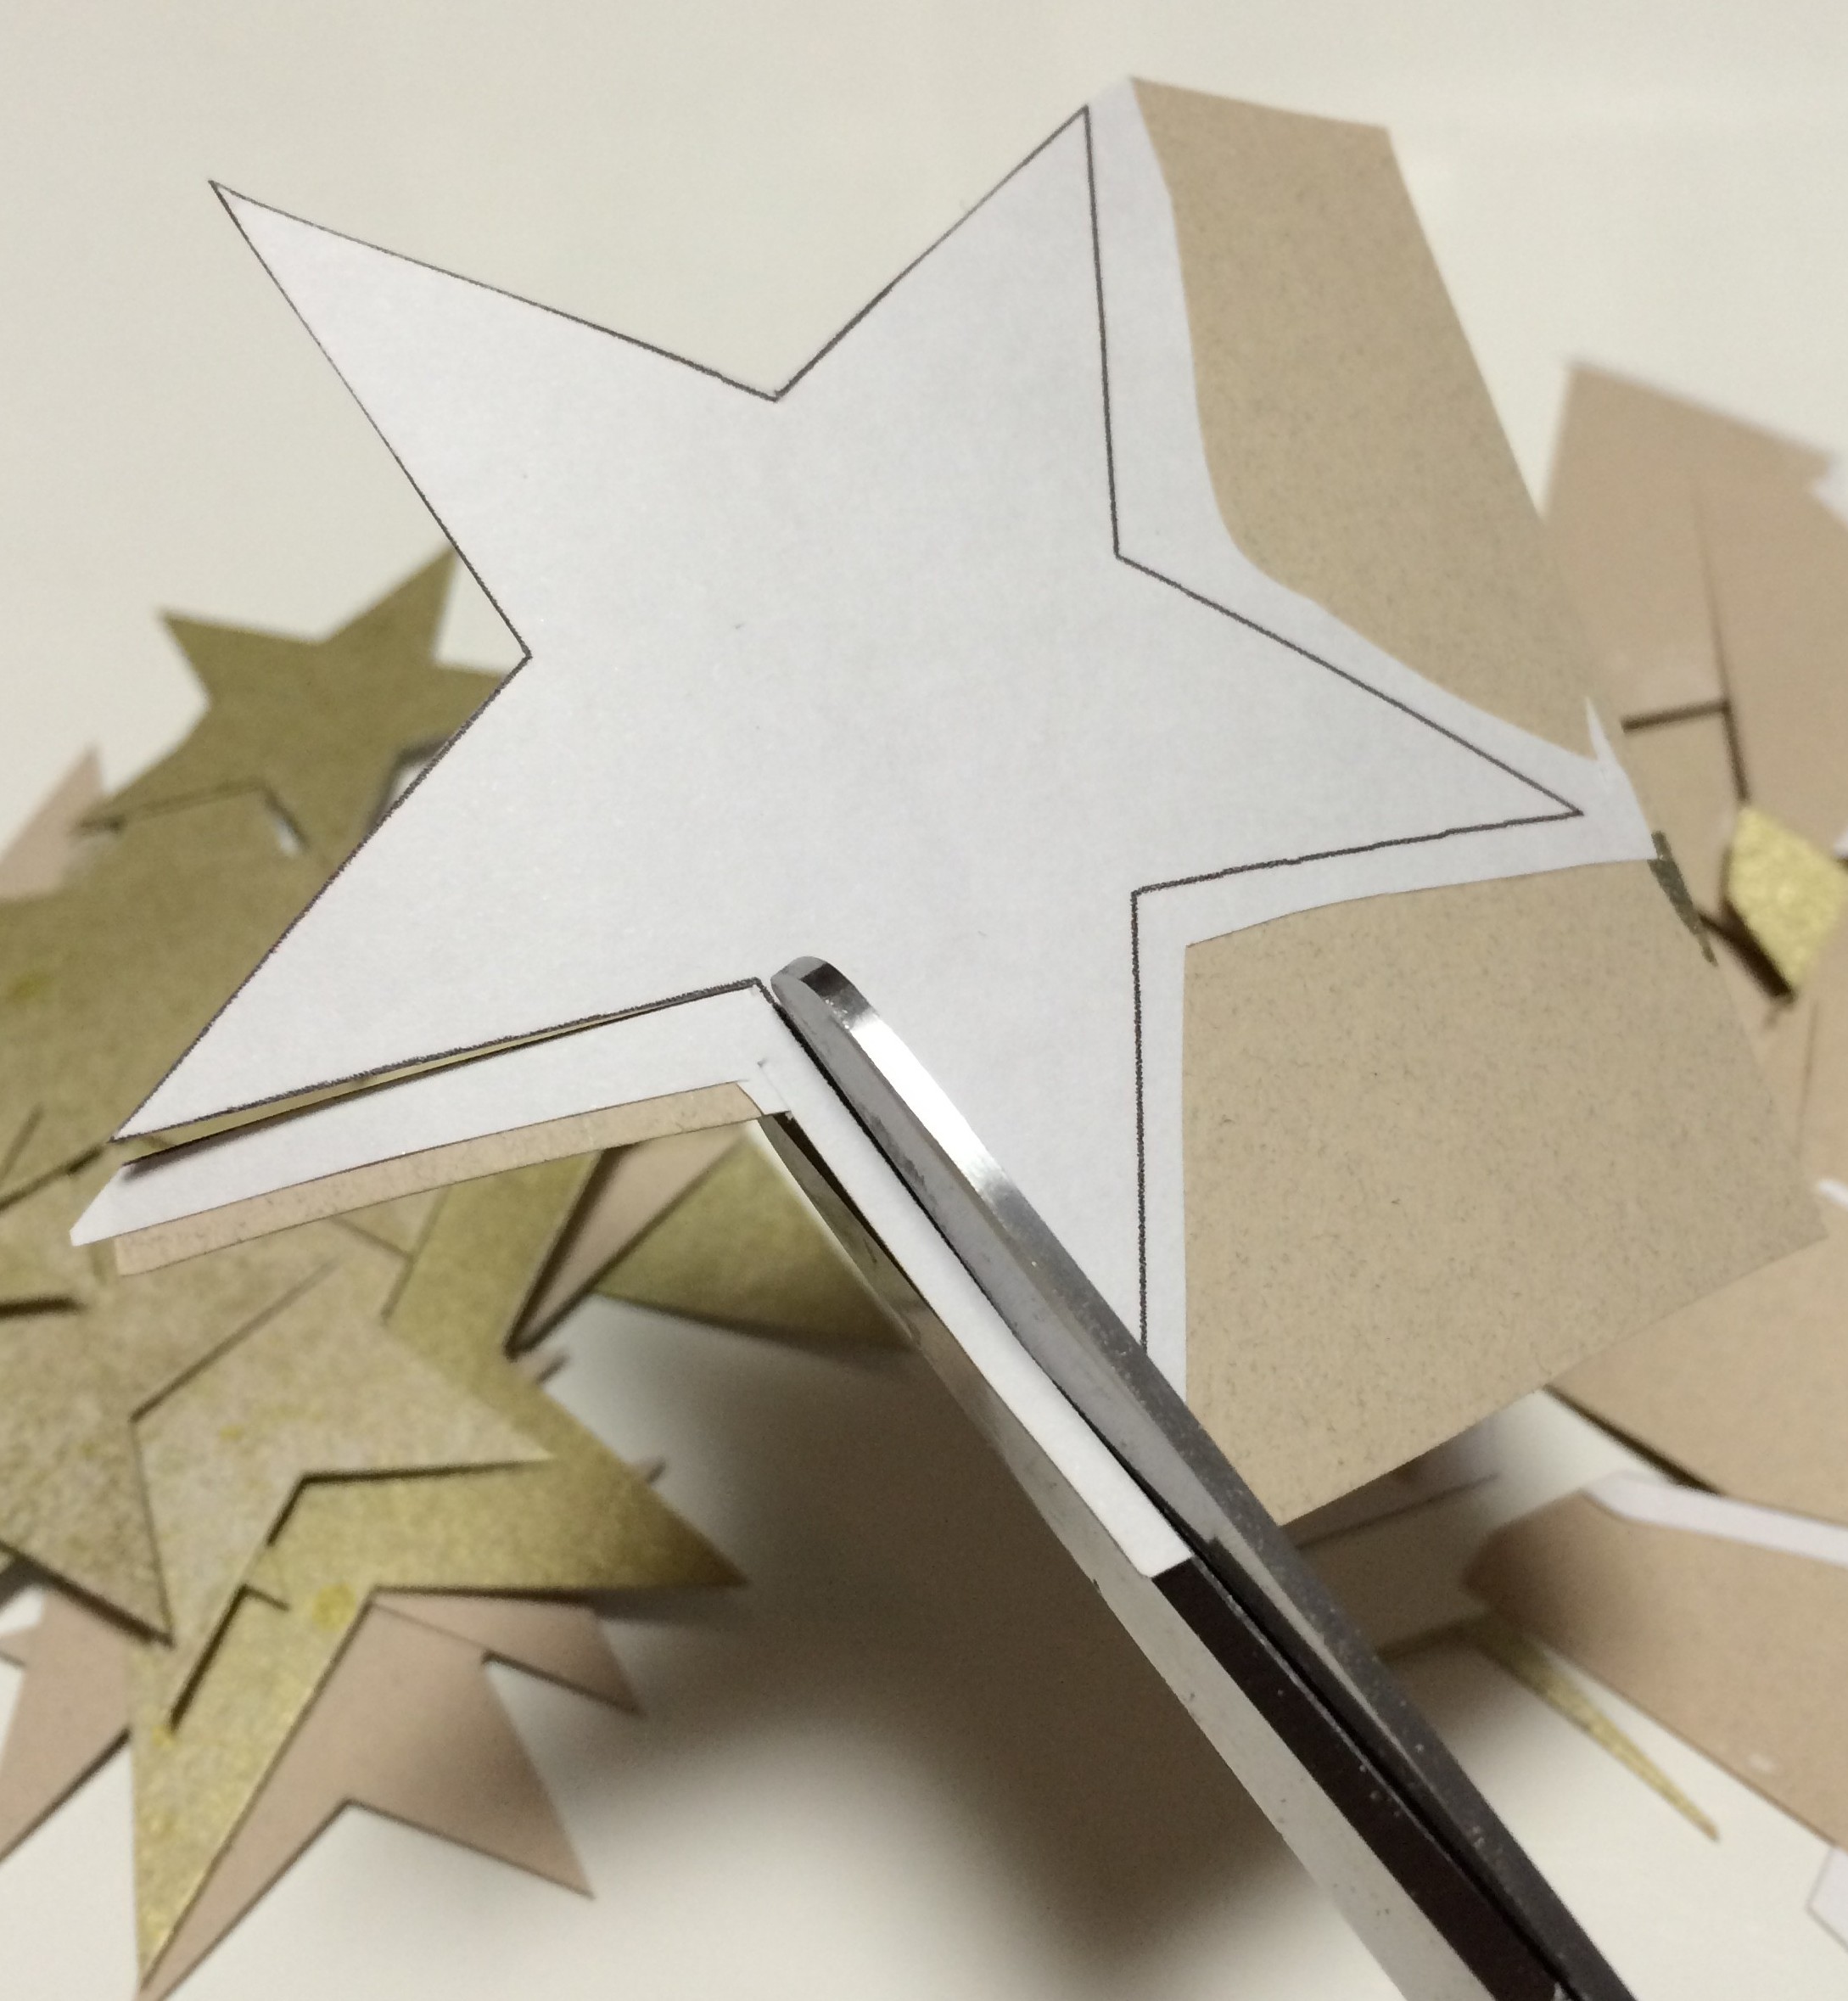
4. cut the individual stars along the outside lines. / 外側の線に沿って星を一つずつ切り抜く。
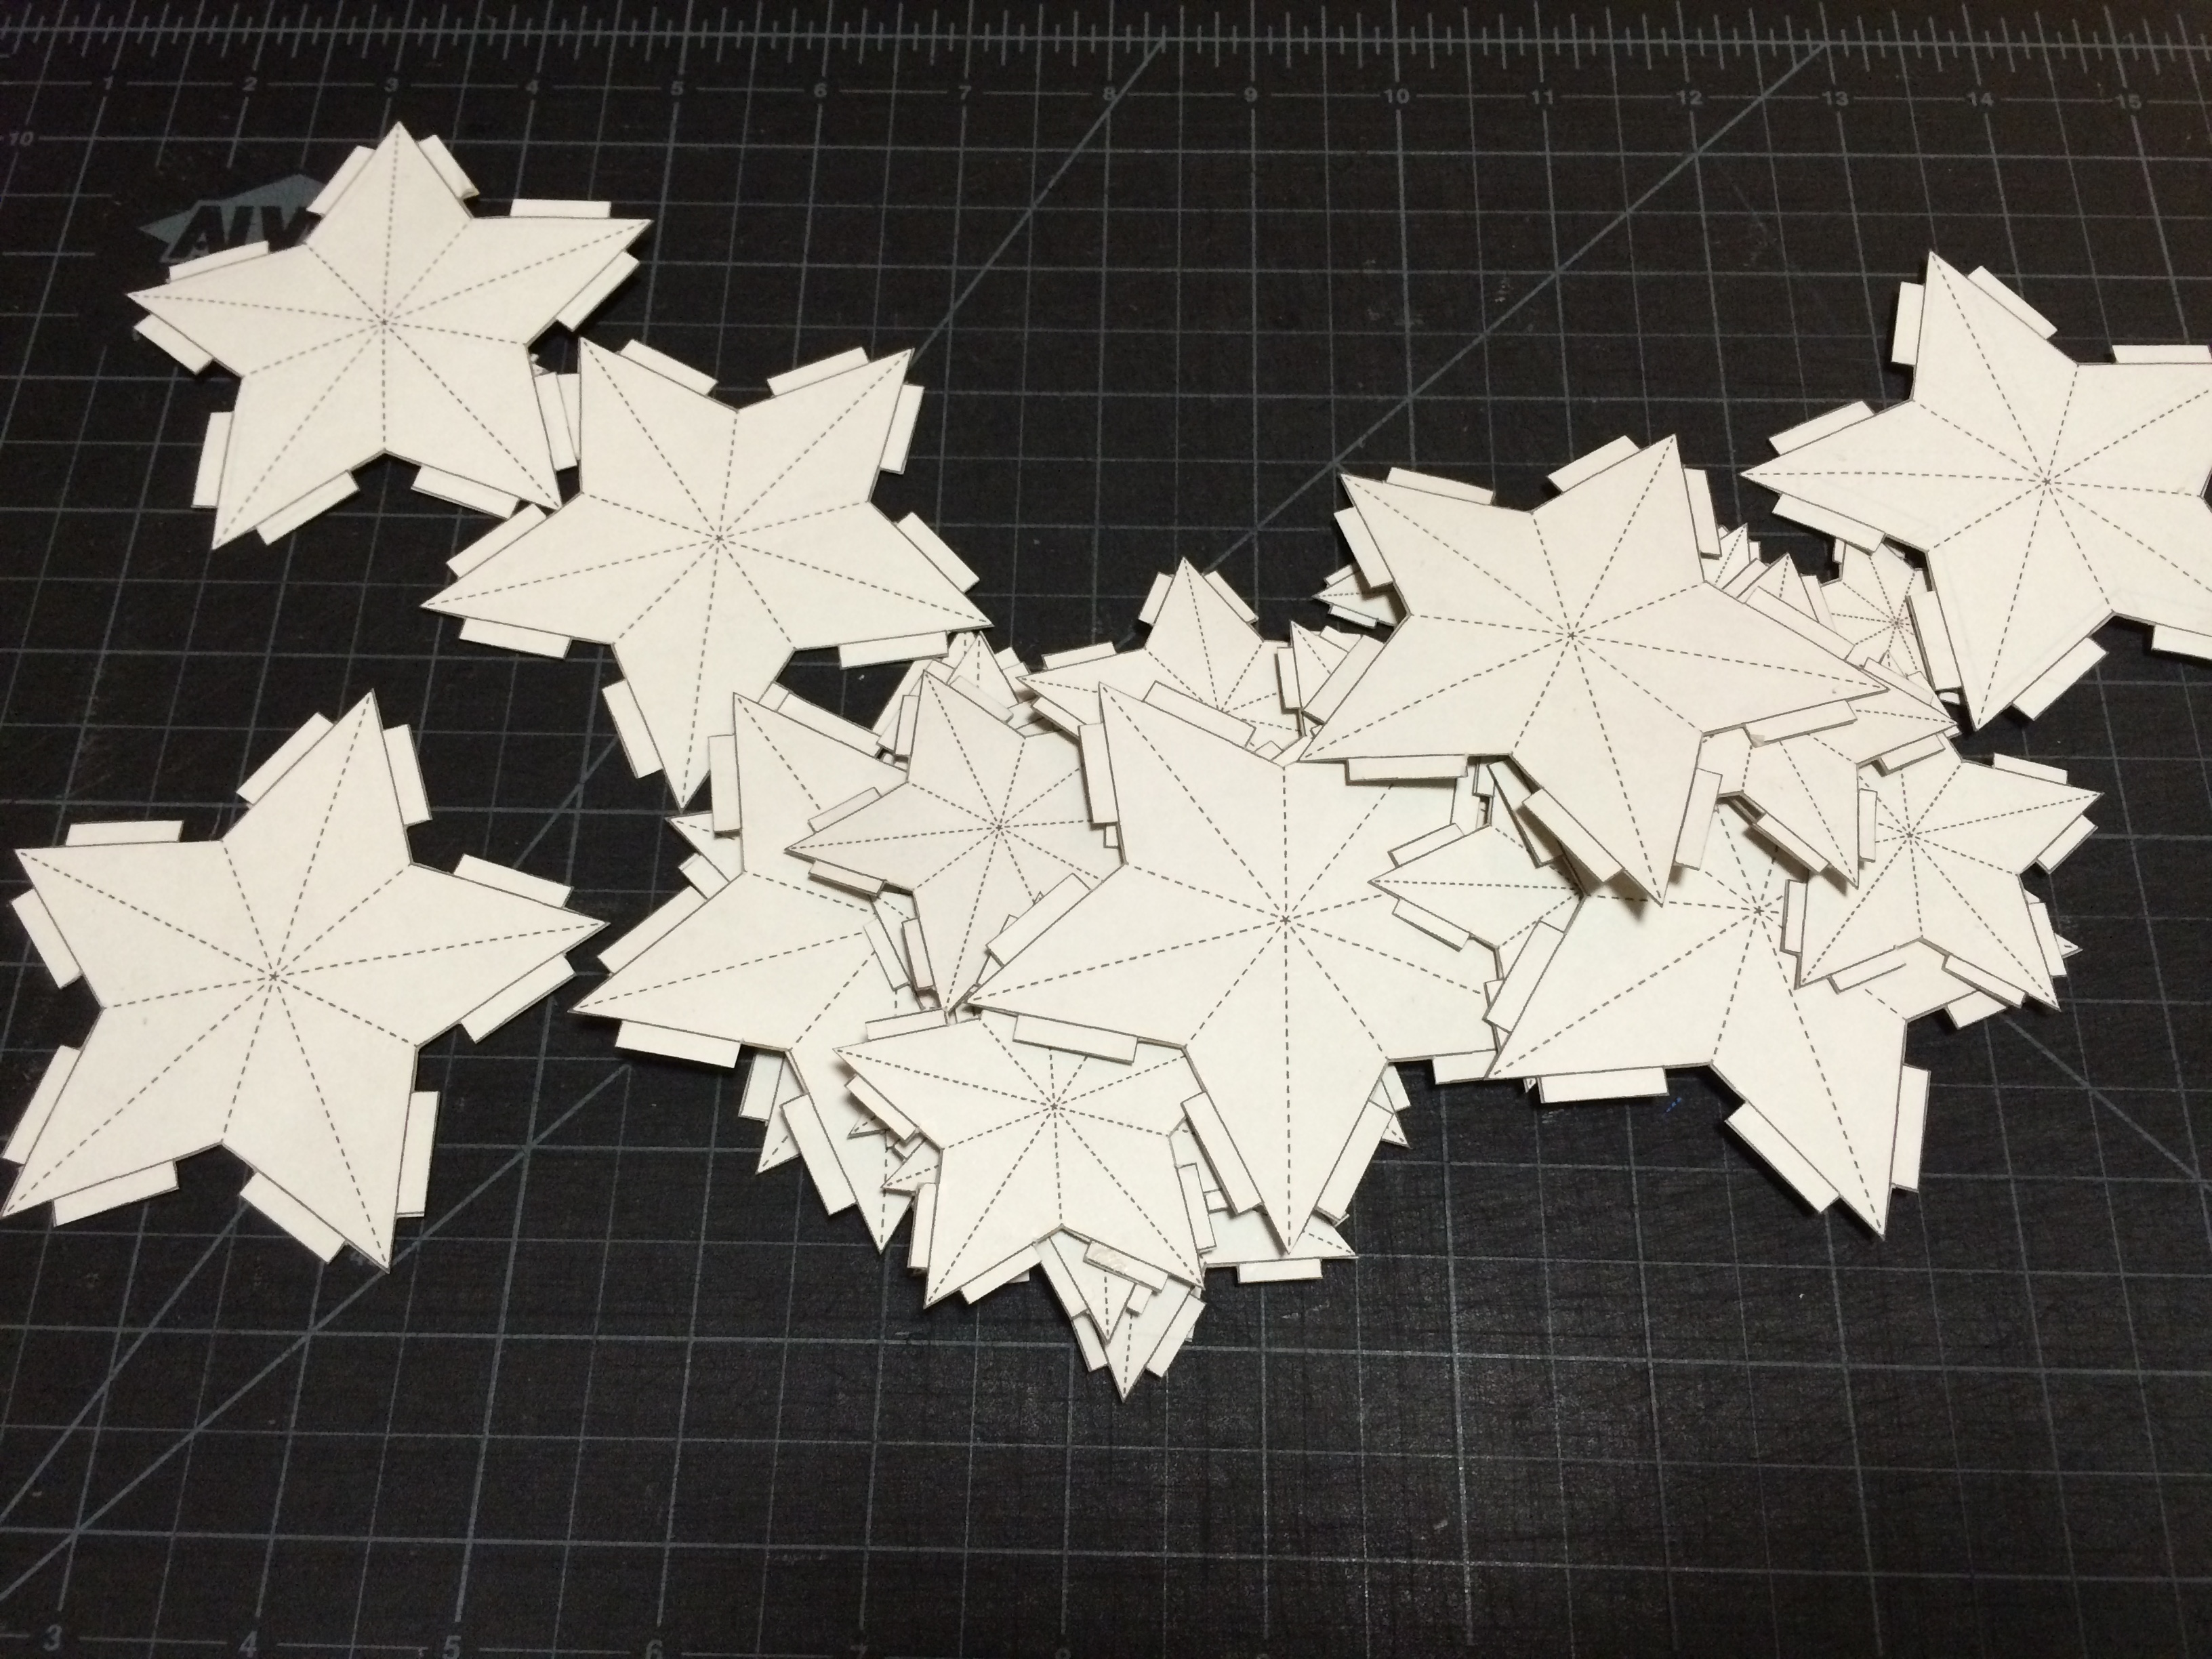
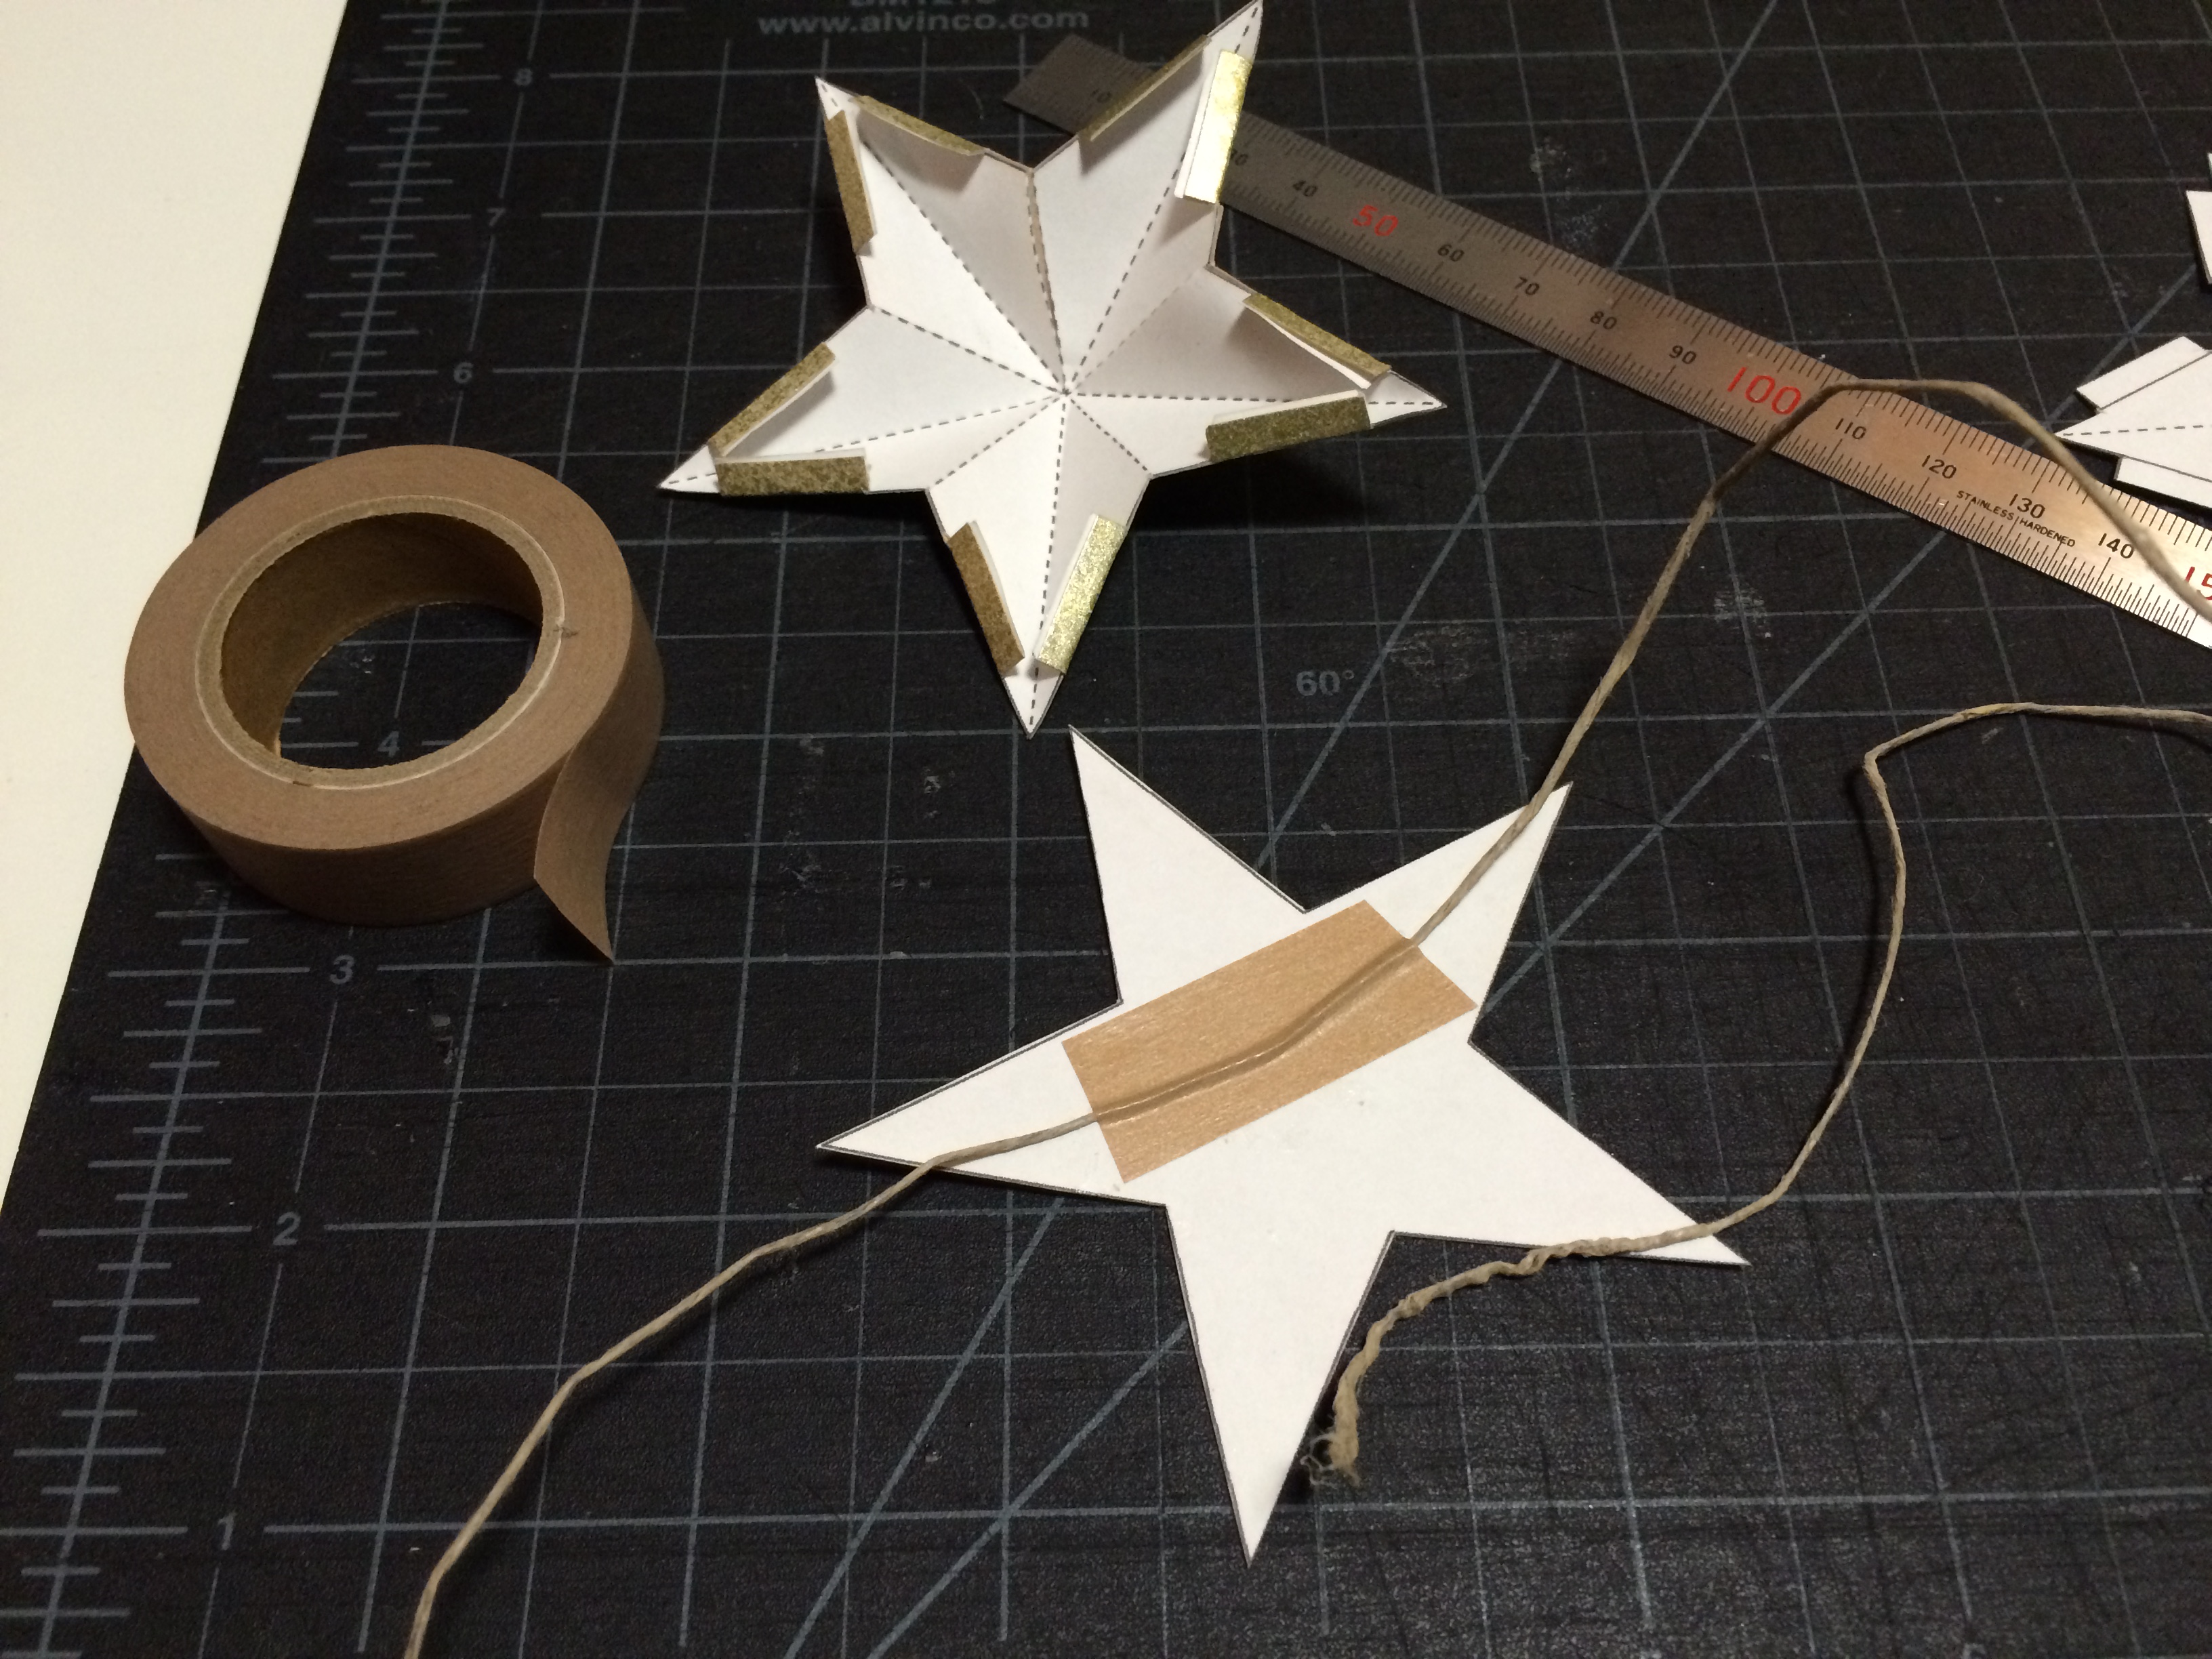
// set aside the B stars (the plain stars) and we will work on the A stars (the ones with glue tabs and dotted lines) for STEPS 5-7 //
// 一度 Bの星(無地のシンプルな星)をよけて、ステップ5〜7では、Aの星を加工します。//
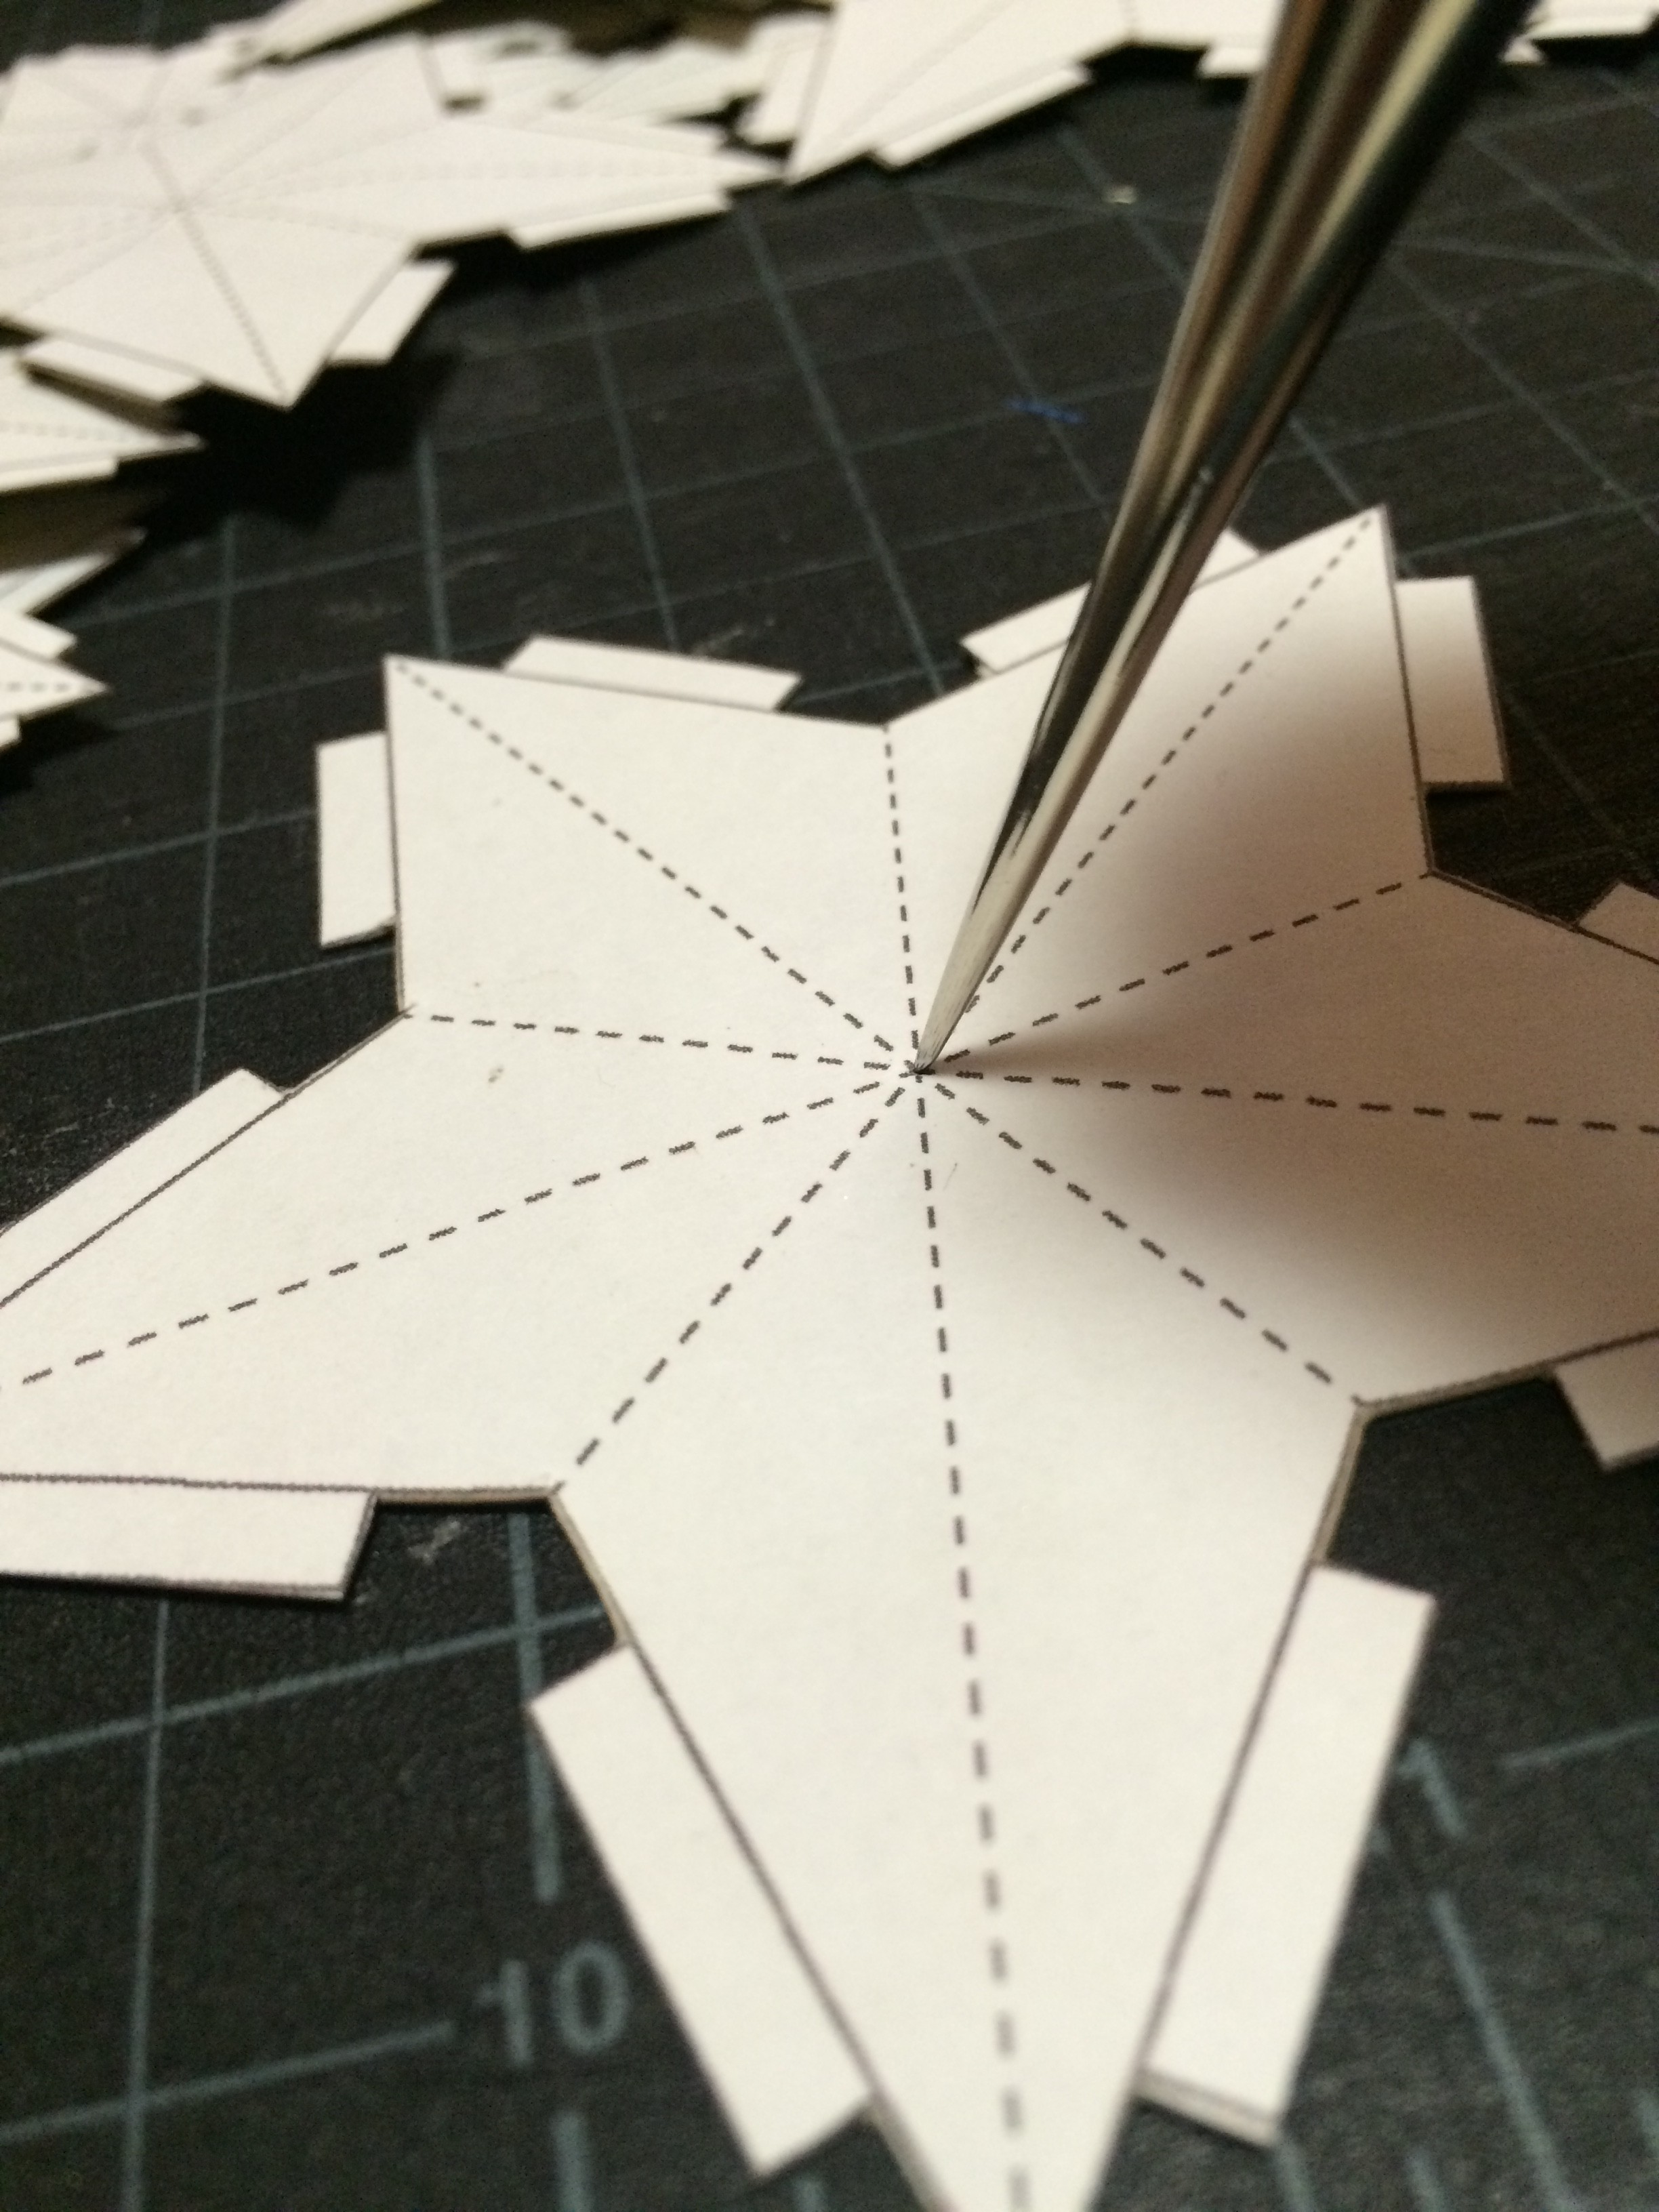
5. for the A stars (or the stars with tabs) poke a very small hole where the lines meet in the center of the star. / Aの星の線が重なり合う中心点に目打ちで小さく穴を刺す。
6. use a cutter to gently score along the lines as shown in above picture. for the lines that need to be scored from the outside, 1. score from the center hole to each of the five points of the star and 2. connect the two points of the glue tab folds. / 上記図の通りにカッターで優しく、浅く溝を切り込む。表面の線は、1. 中心の穴から星の5つの頂点まで一つずつ線を引く。2. のり代の折り線は、端点の間を線を引く。
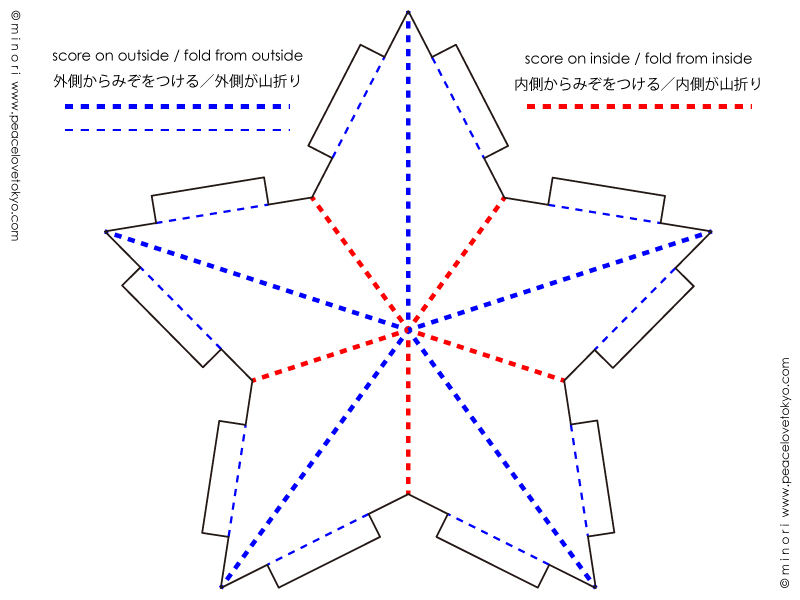
7. fold the scored lines. see the picture in step 6.: for the blue lines, the fold (or mountain fold) should be on the outside. for the red lines, the fold (or mountain fold) would be on the inside. / 溝に沿って折る。ステップ6.の図の青い破線は表面が山折りになります。赤い破線は内側が山折りになります。
8. returning to the B stars (the plain ones), lay out your cord and plan where to attach the B stars. tape the garland cord onto the insides of these stars. / ここからBの星(無地タイプ)に戻ります。ガーランドの紐とBの星の位置を決めます。Bの星の内側に紐をテープで固定します。
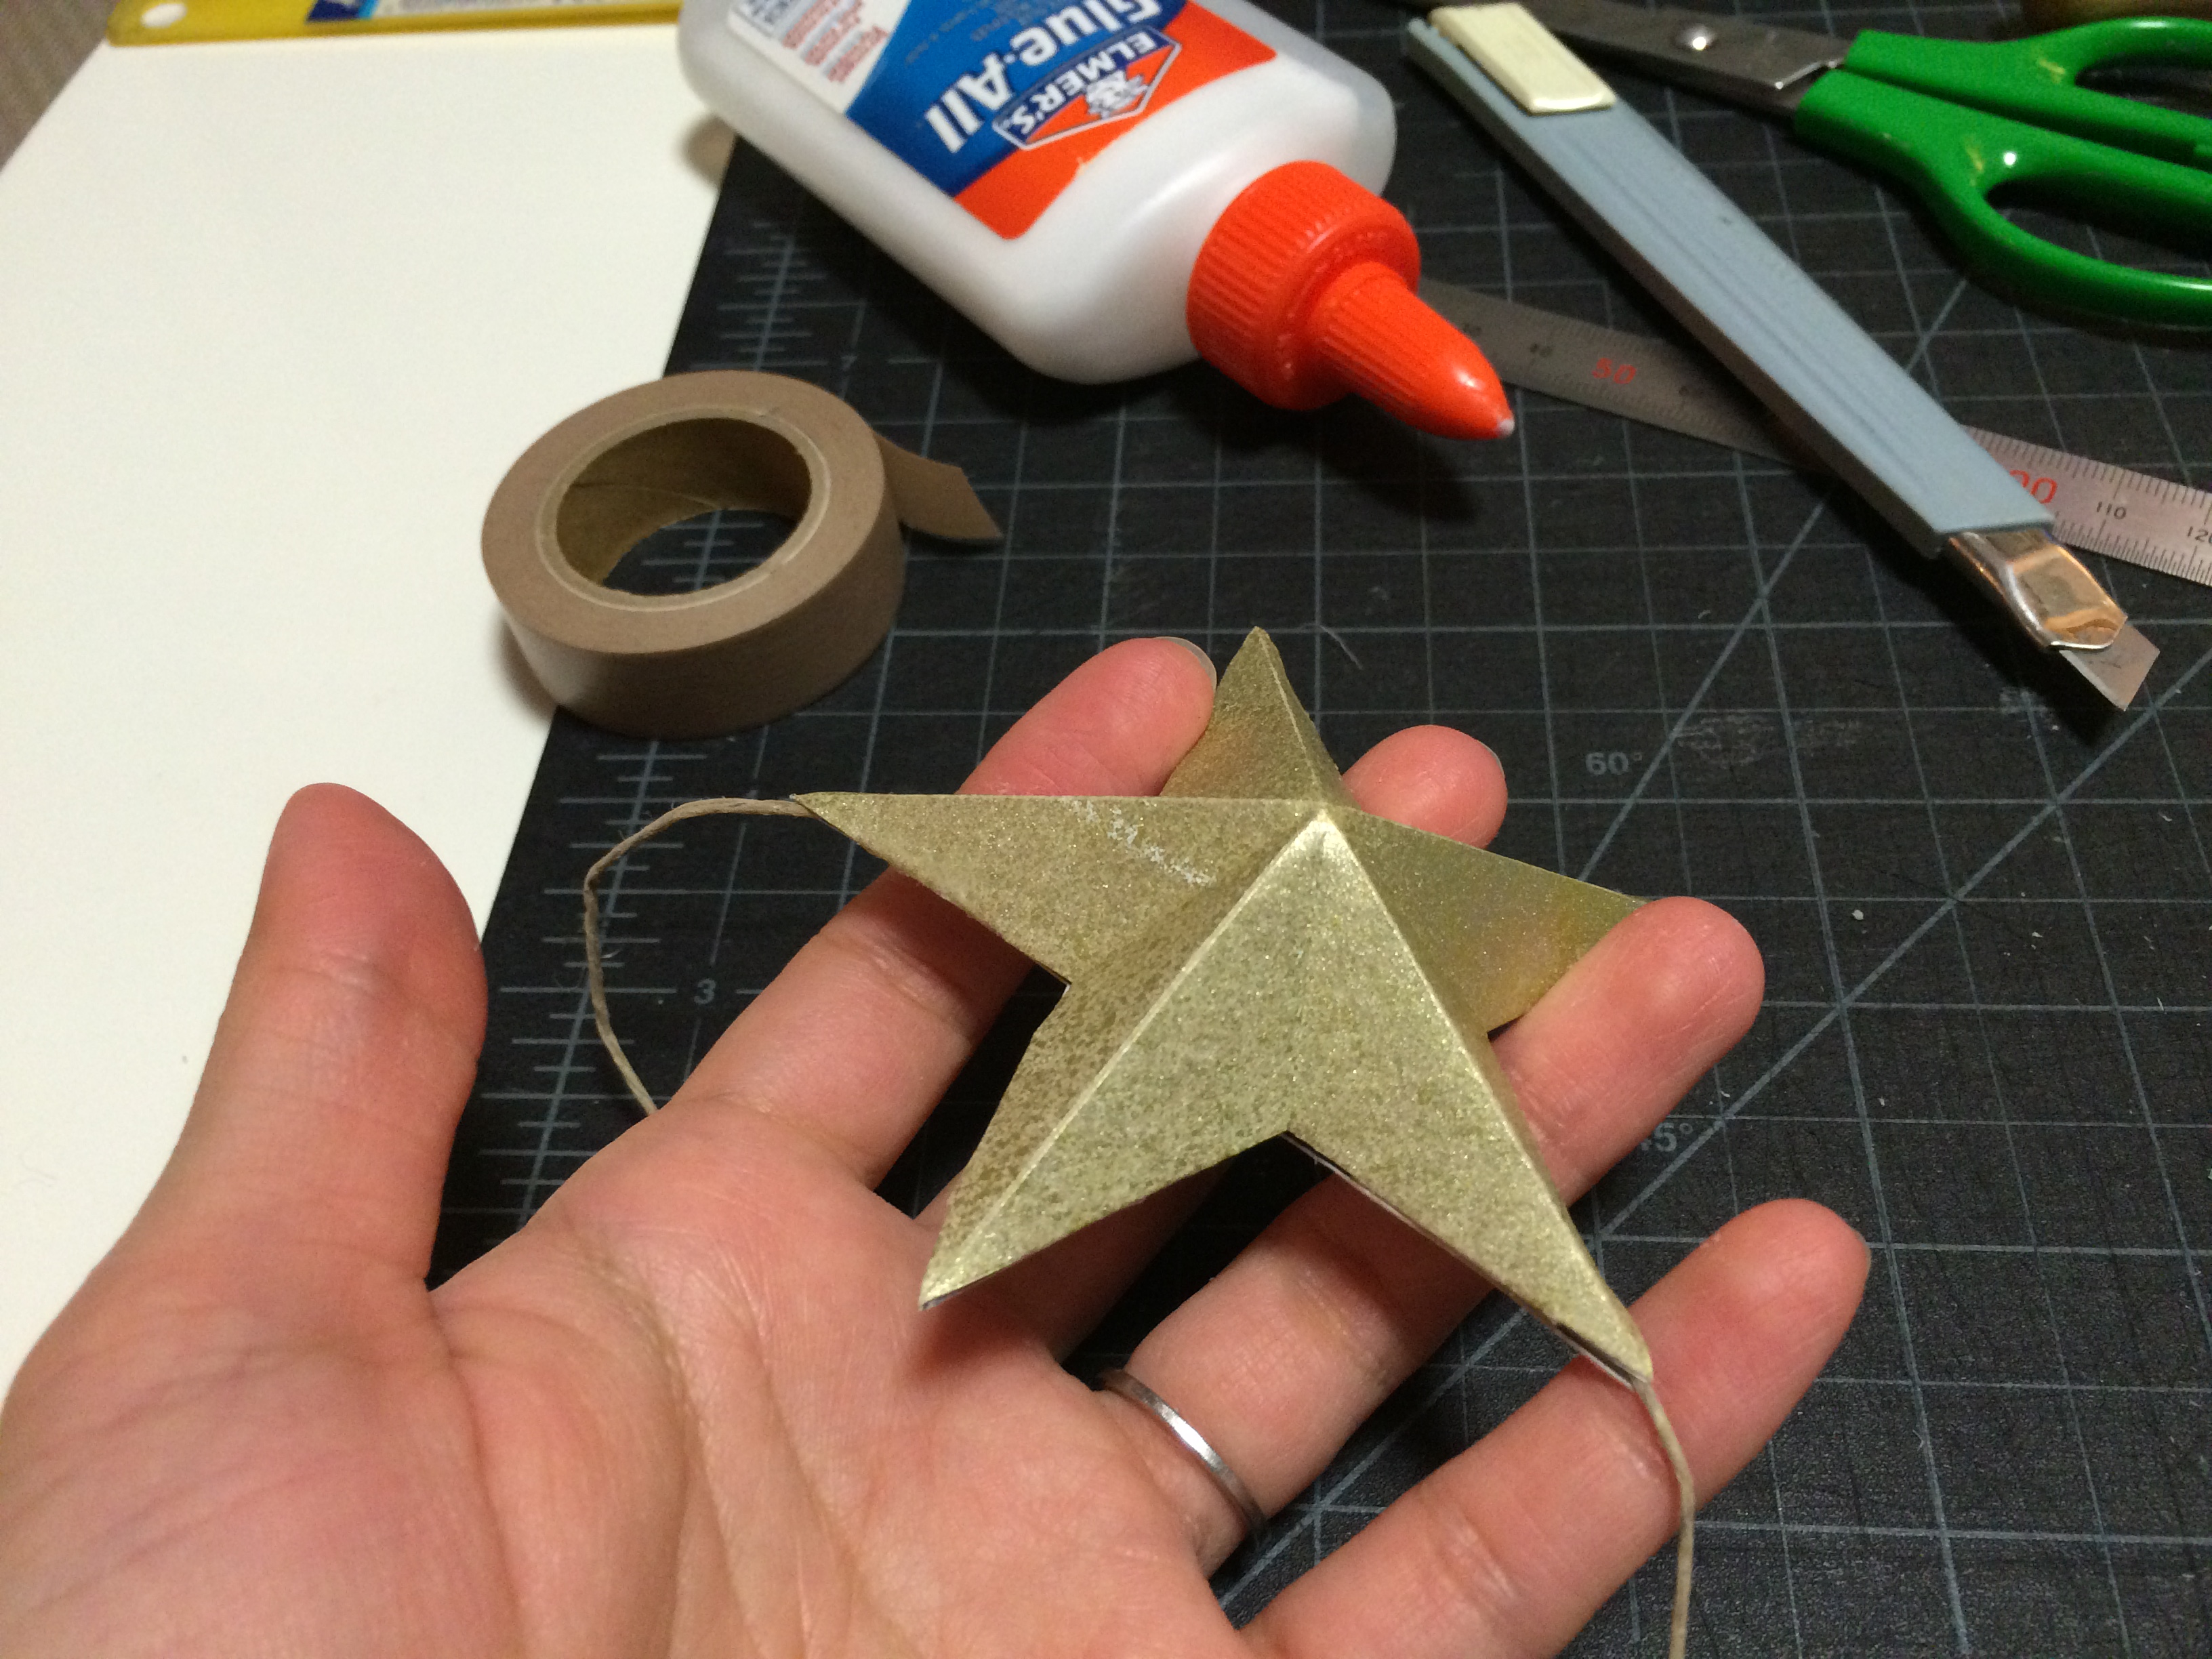
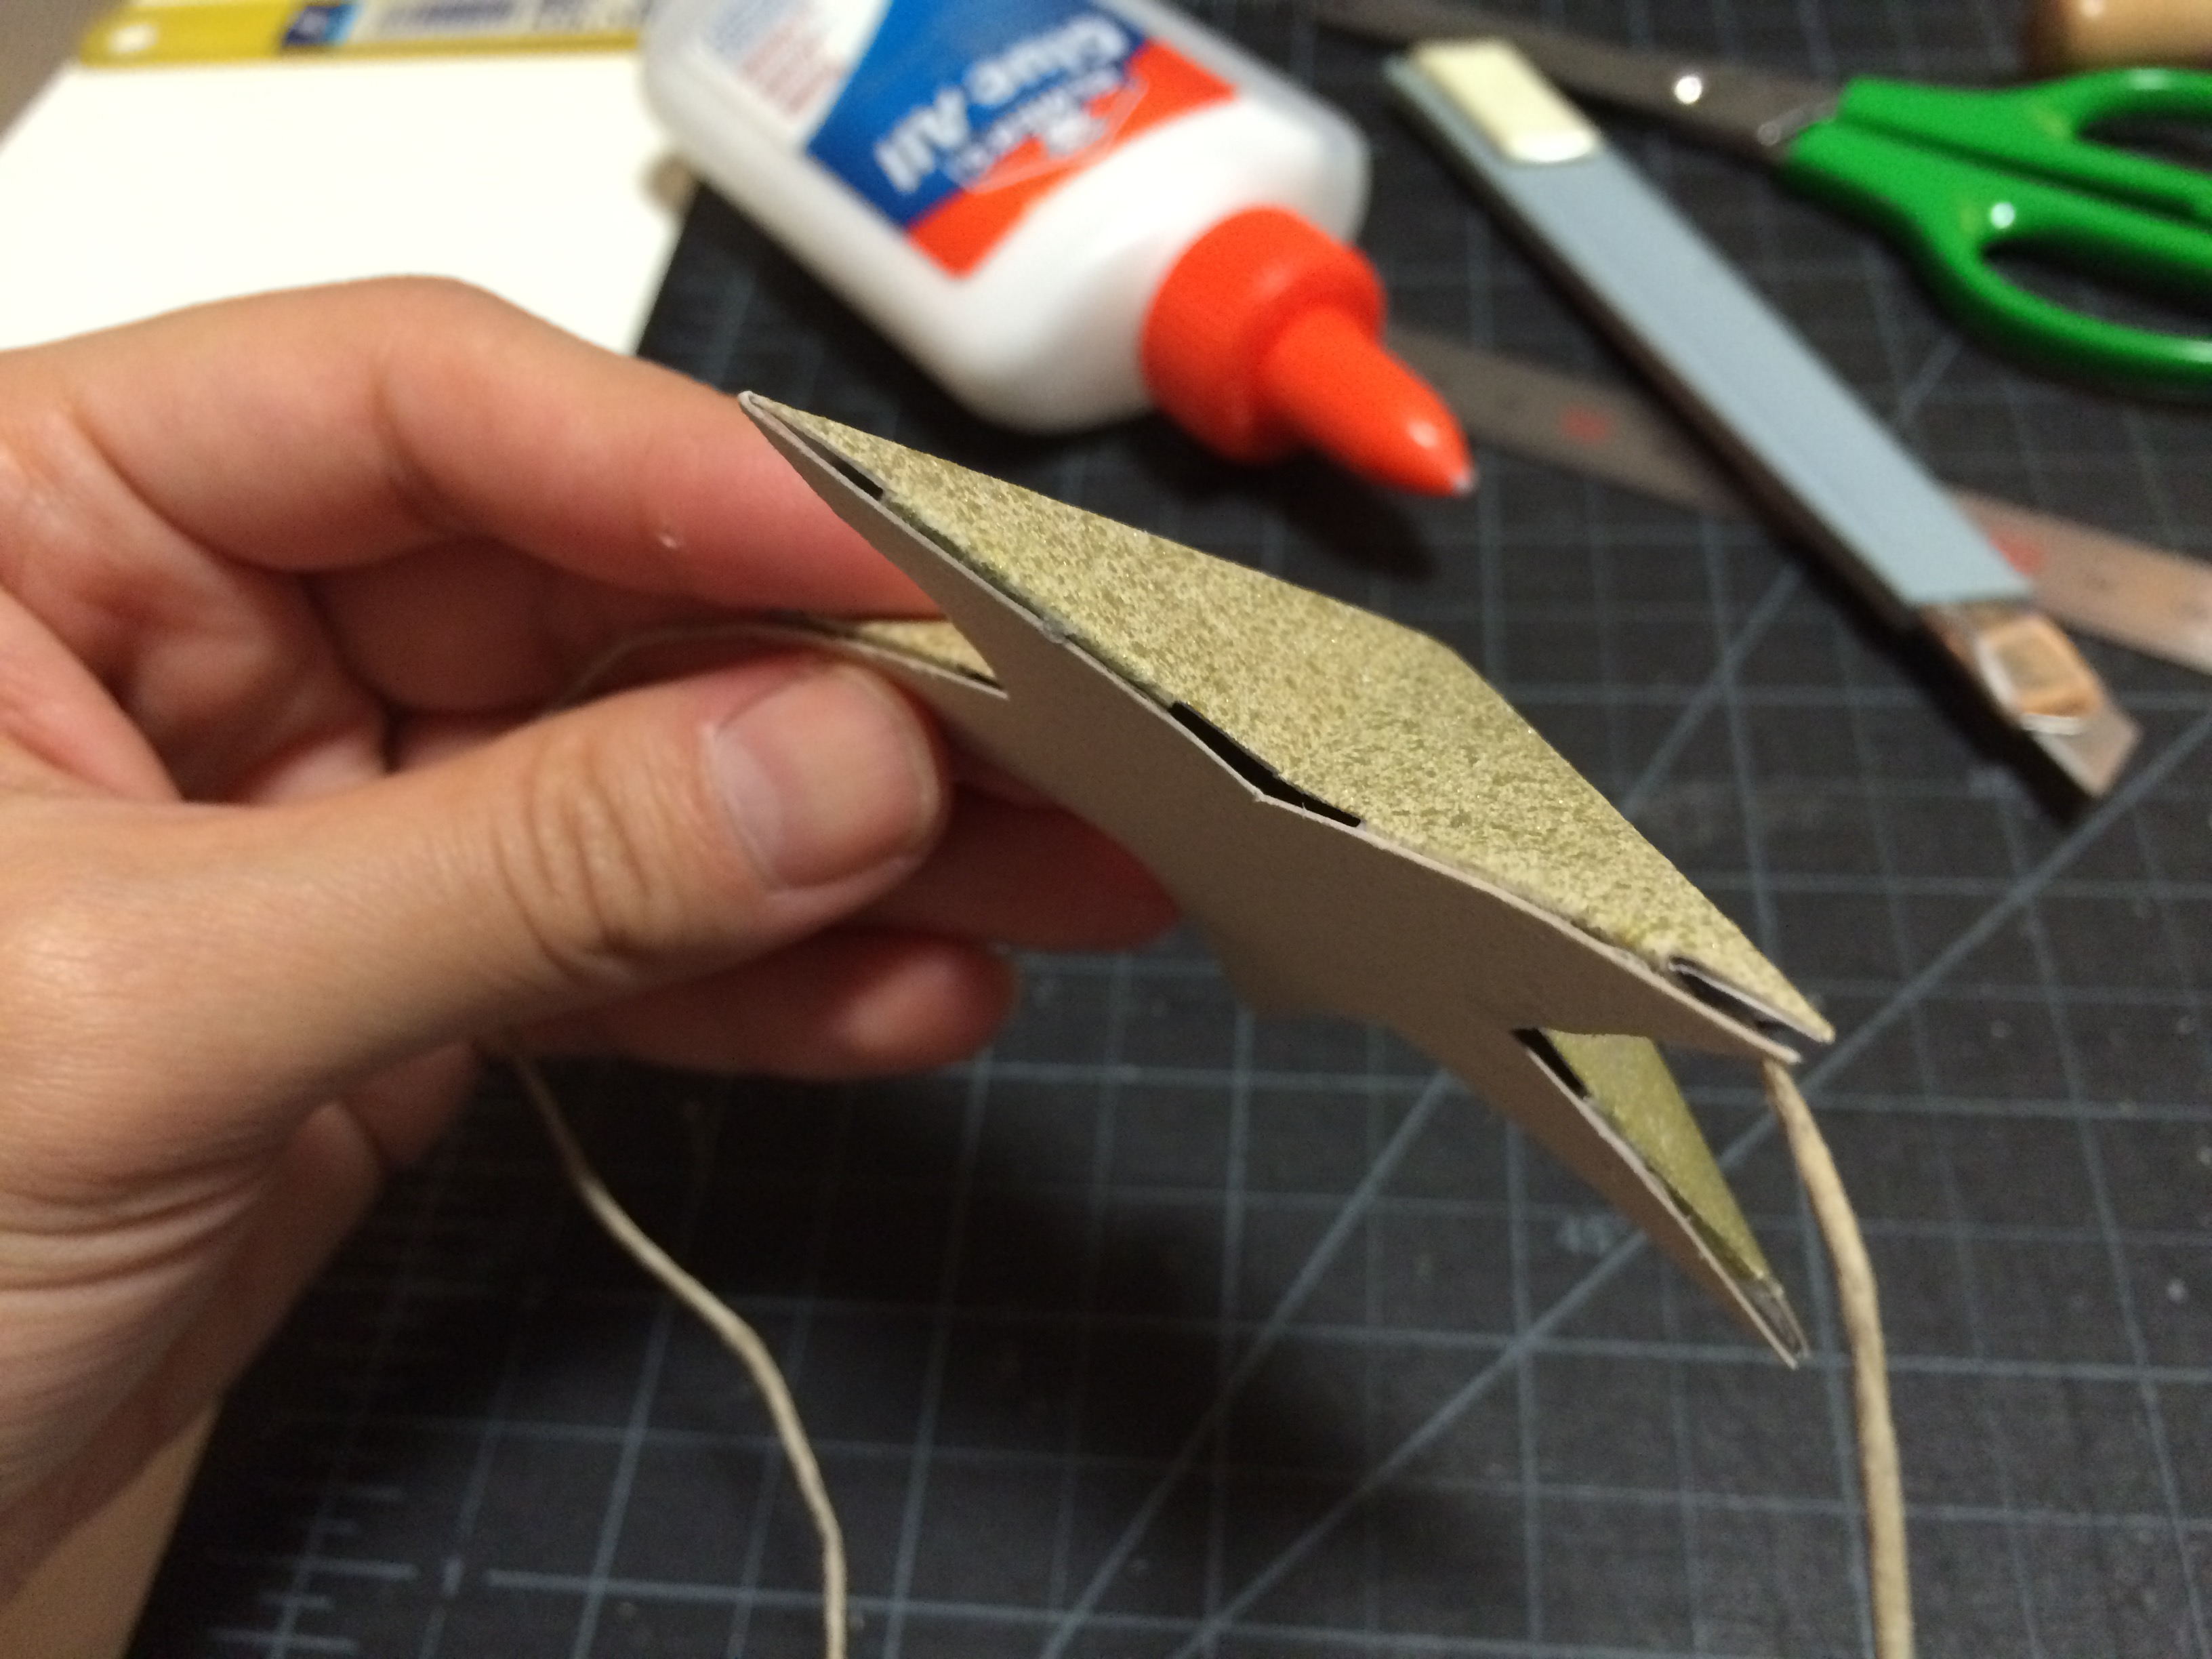
9. find the corresponding sized A star for each B star from step 8 (star sizes 1-3). place a small amount of glue on the glue tabs on both sides of a single star point and attach to B star. this step takes a lot of patience: hold the point in place for about 30 seconds to 1 minute. then move on to the next two glue tabs, and repeat until you complete the star. remember, PATIENCE IS KEY! / テープで固定したB星のサイズ(1〜3)に合うA星を探す。一つの頂点の両のり代に少量の糊をつける。丁寧にB星にのせ、30秒〜1分間手で押し付ける。このステップでは、一回に一つの頂点を終わらせてから次の頂点へ進めます。気長〜に丁寧に進めるのがキーポイントです!!
FINISHED! / 出来上がり!
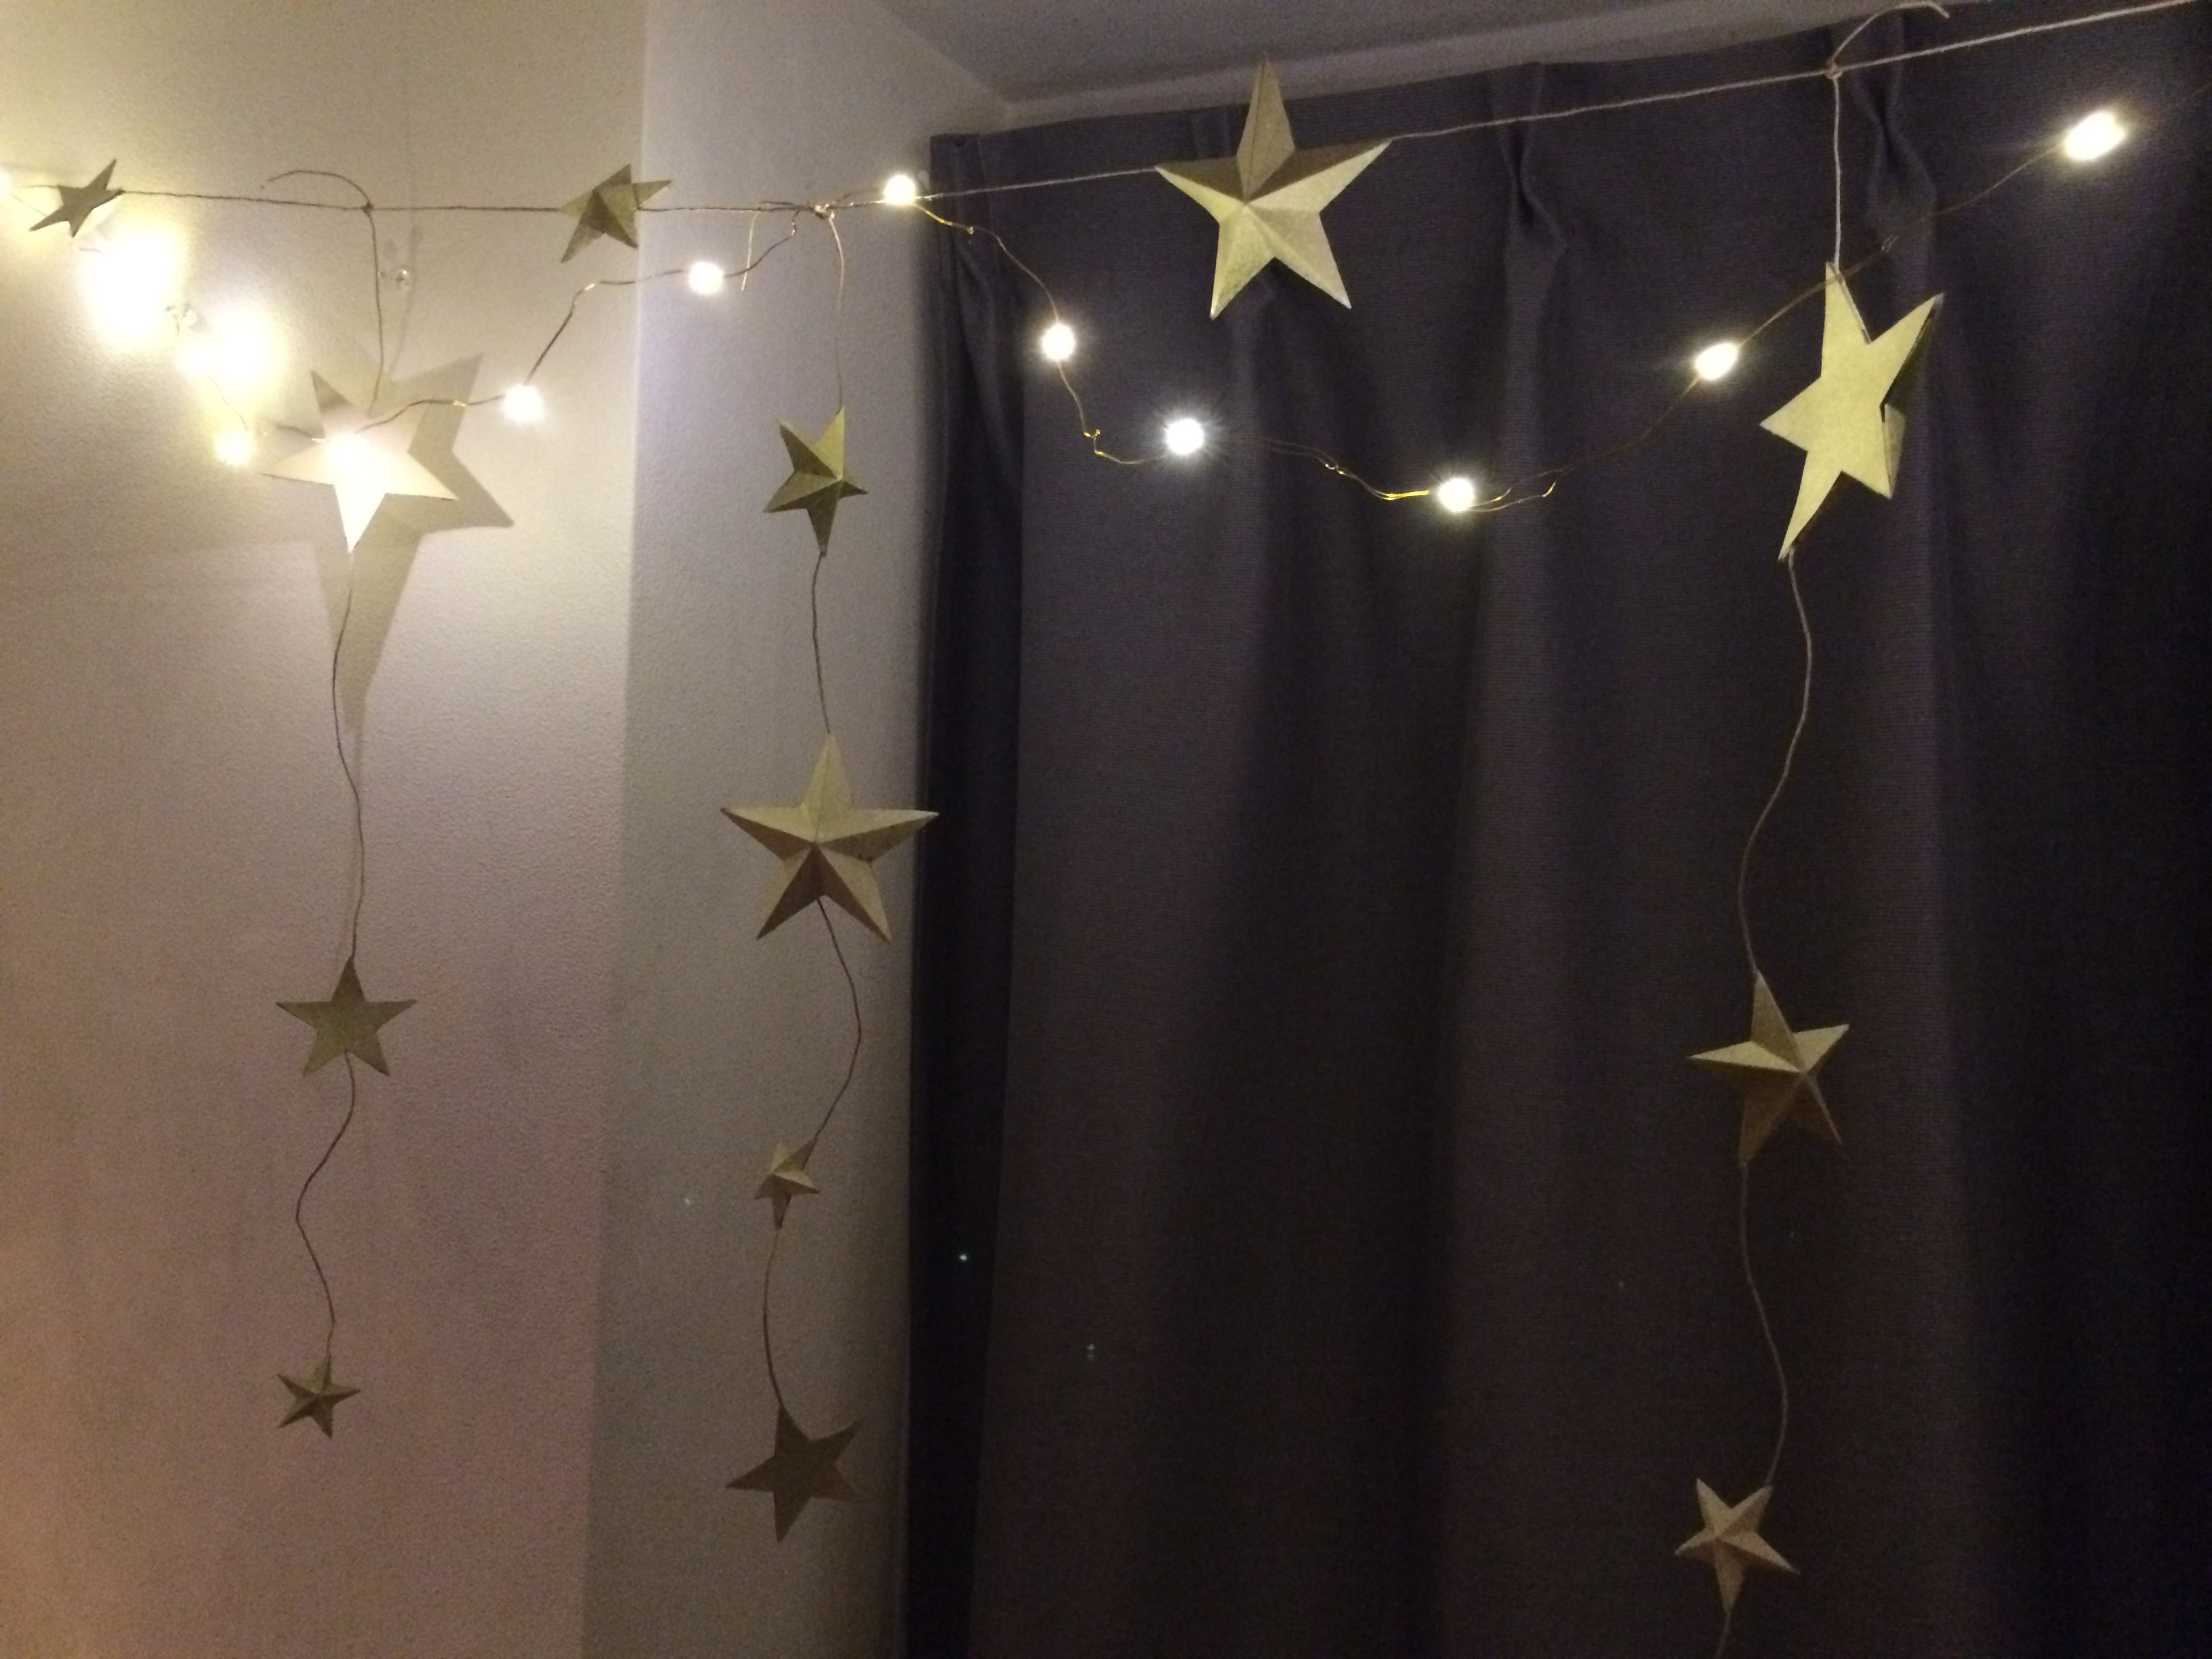
they really are dreamy when combined with these fairy lights! / フェアリーライトと組み合わせて暗い部屋でも暖かくて夢のような空間に仕上がりました。
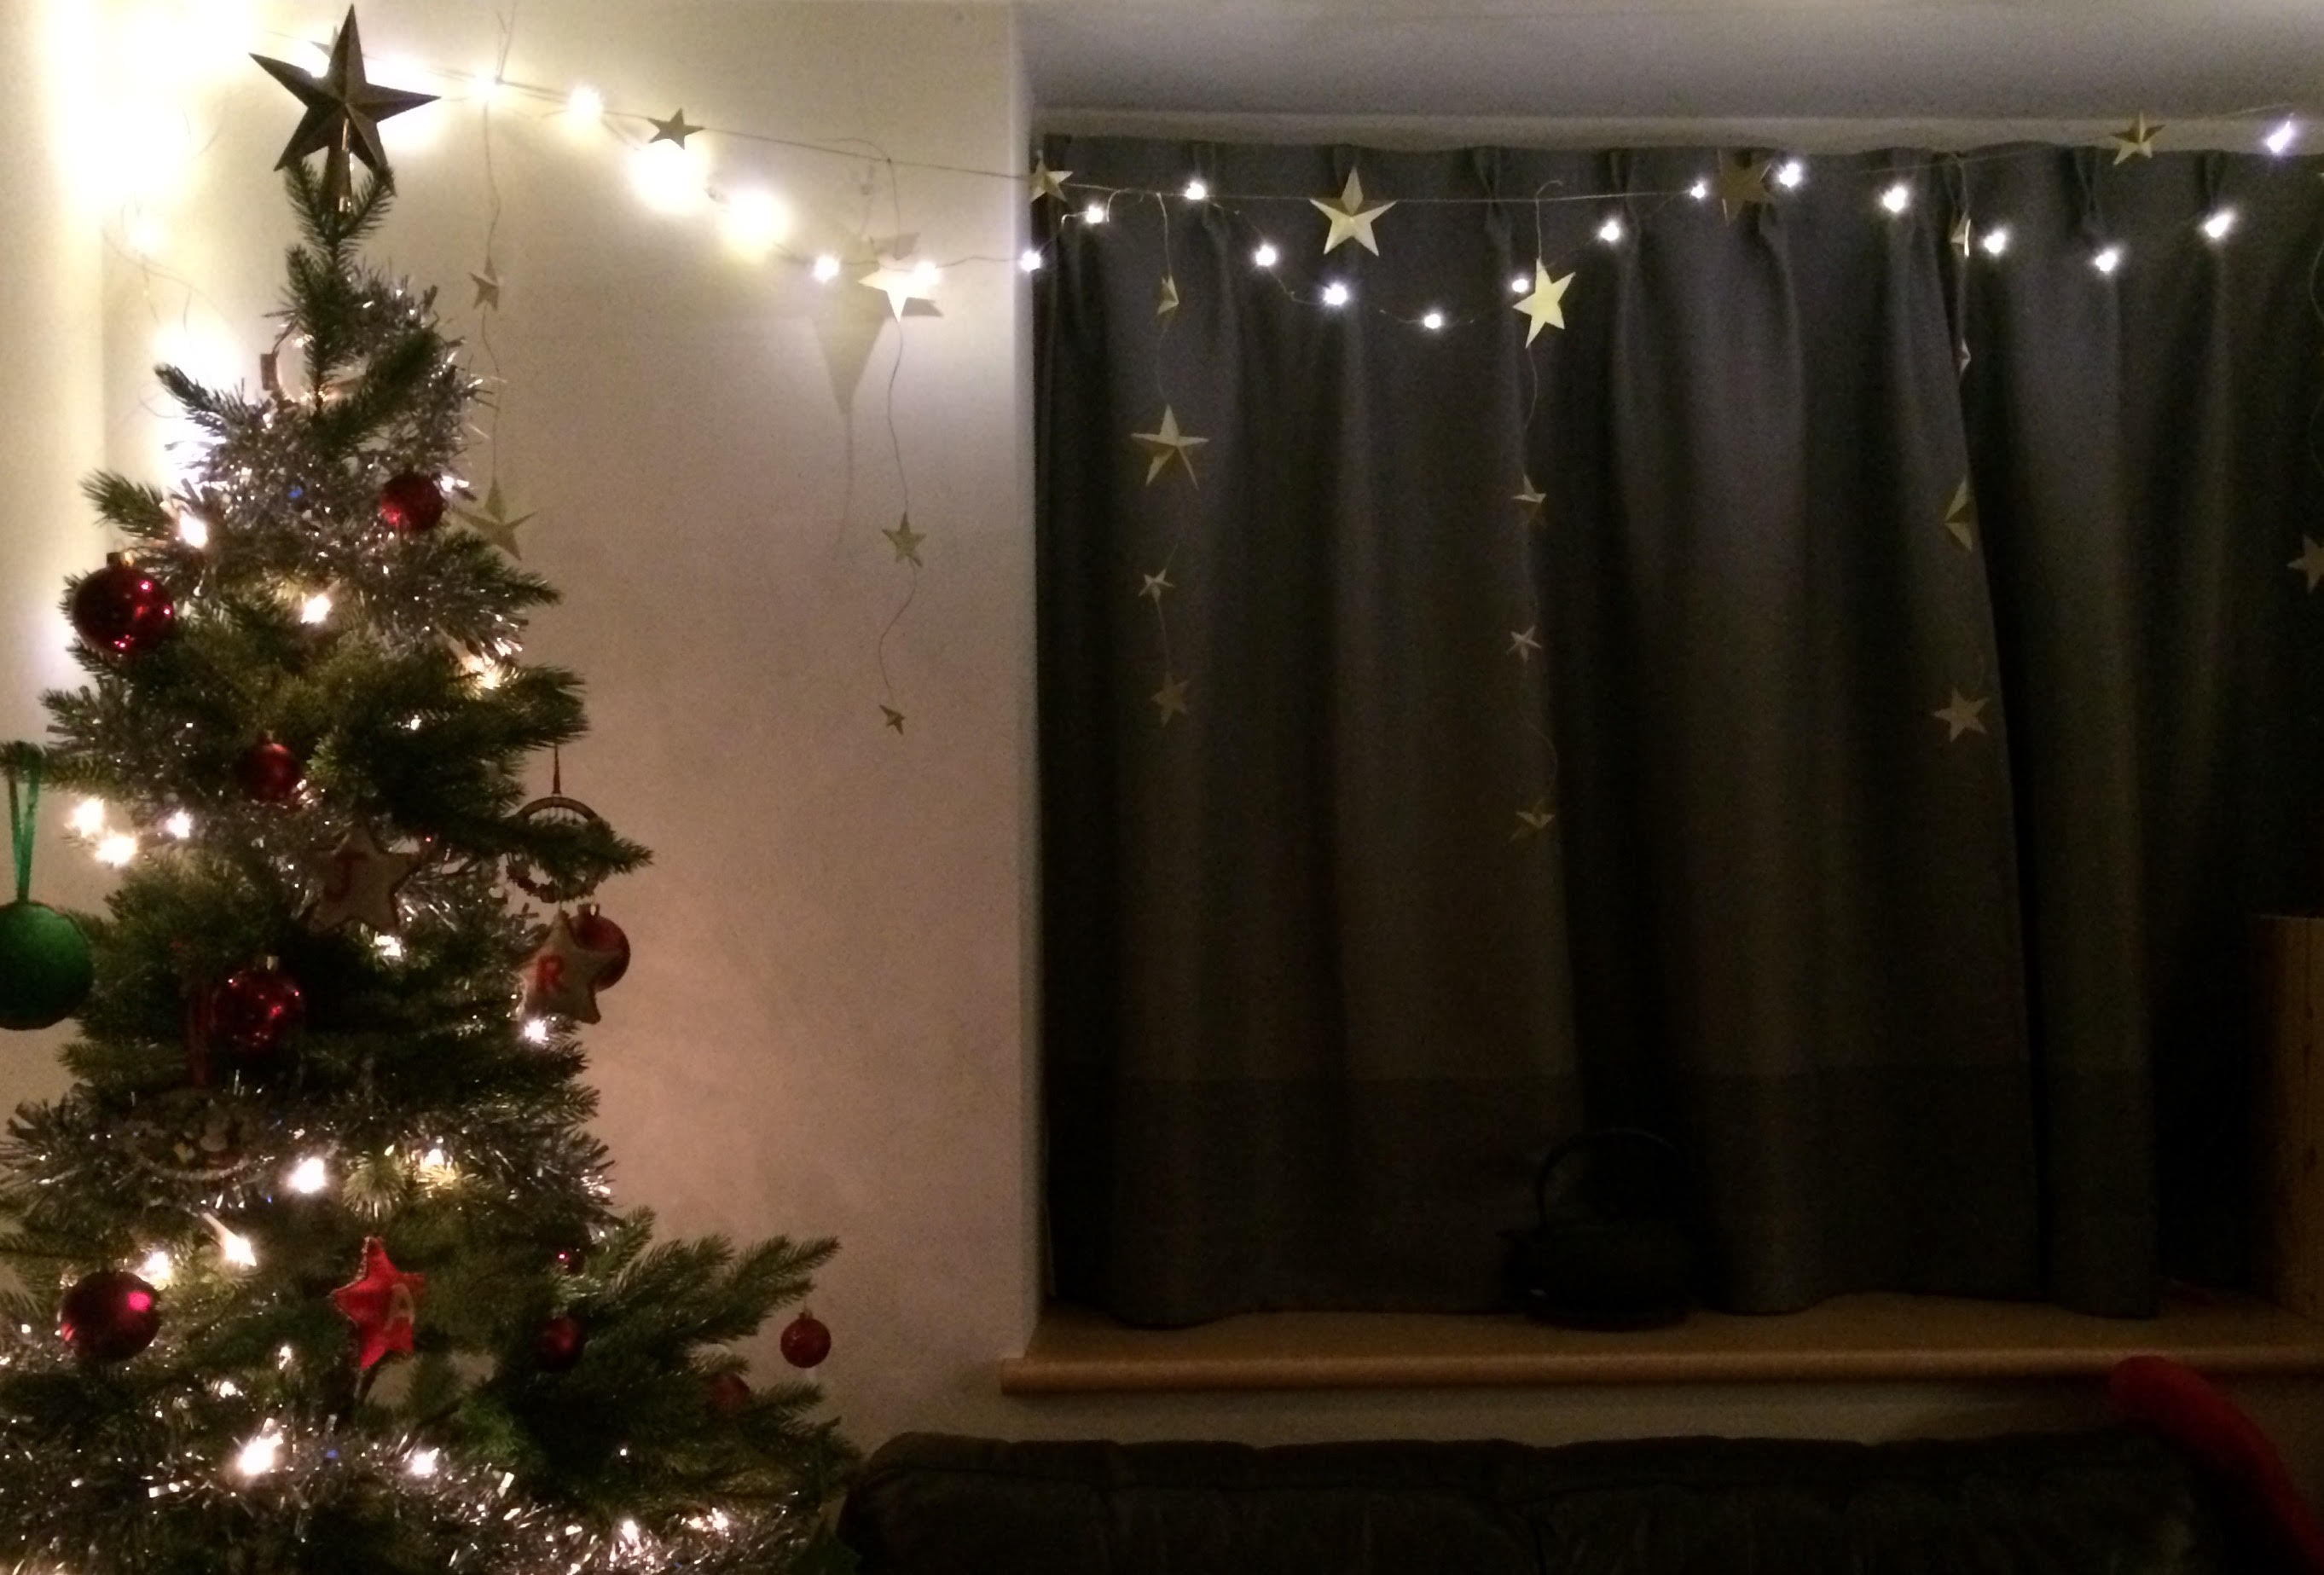
this is what it looks like with the christmas tree. i plan on keeping them up through the winter (or maybe through the year…) though. / クリスマスツリーと組み合わせています。クリスマスだけでなく、少なくても冬の間はずっと飾り続ける予定です!
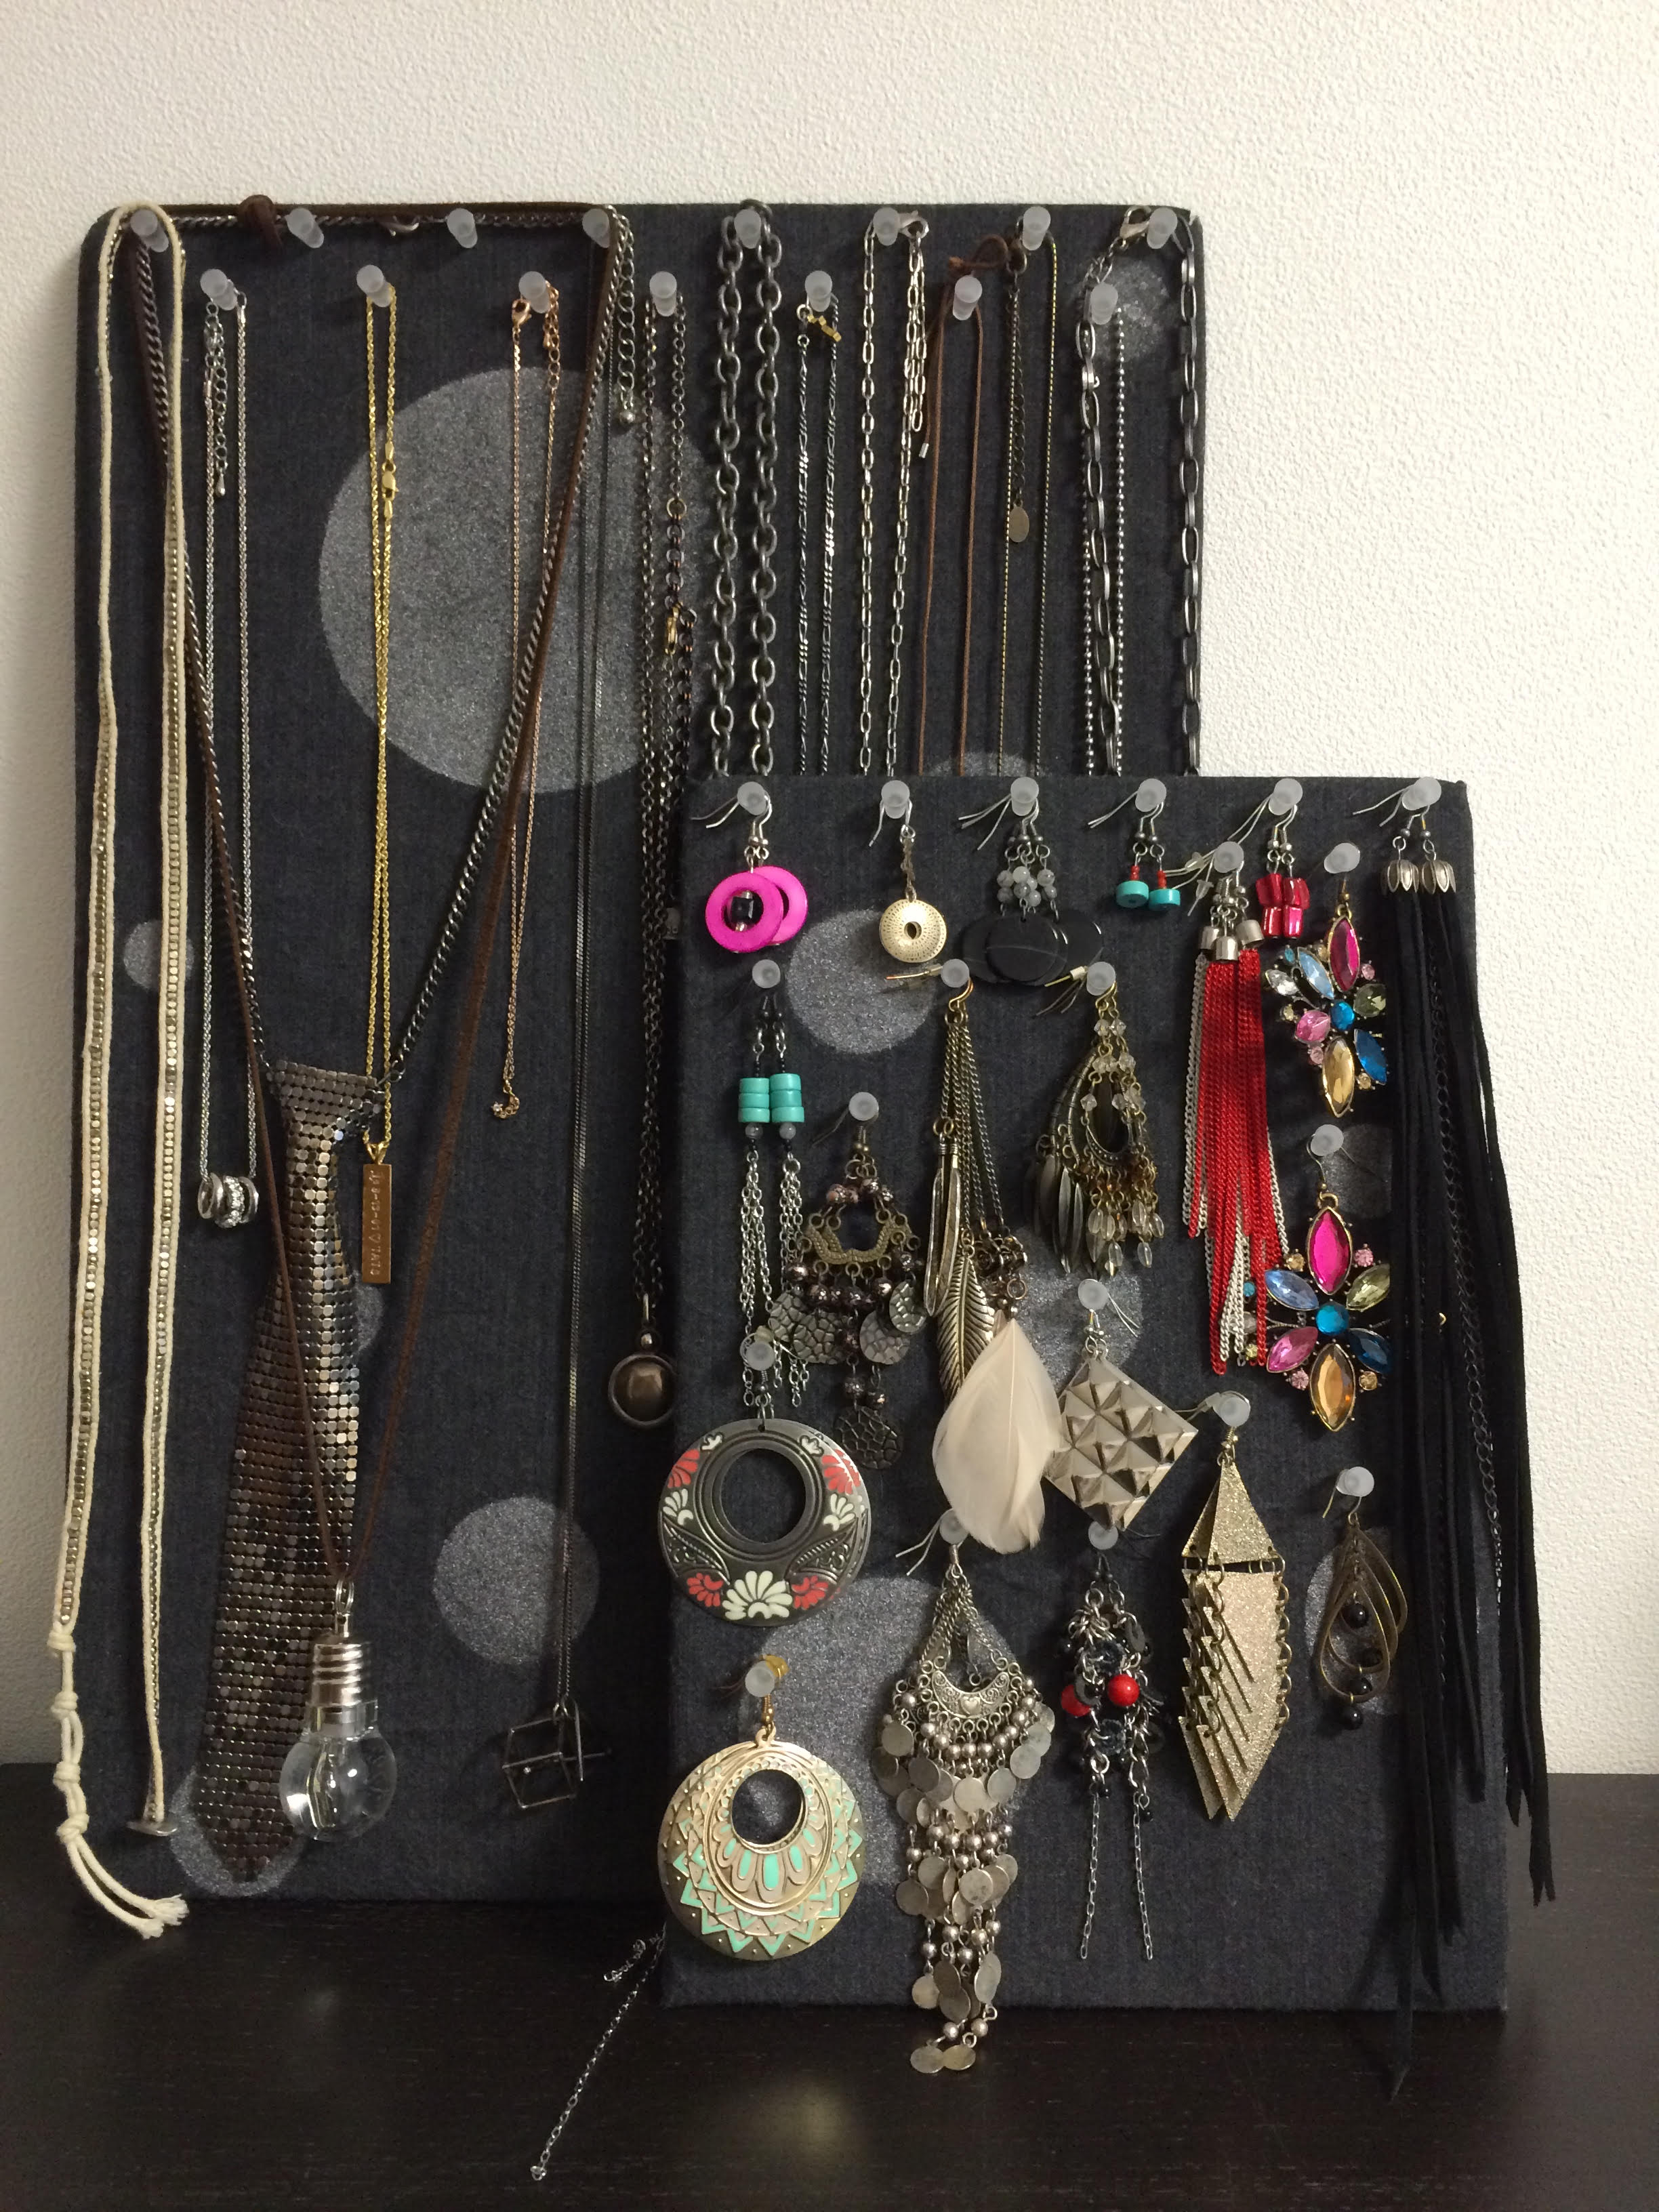
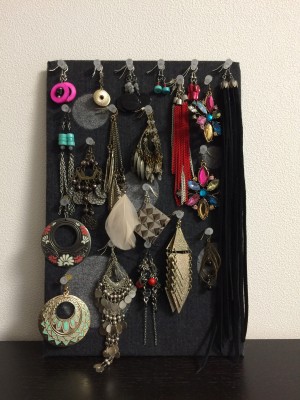
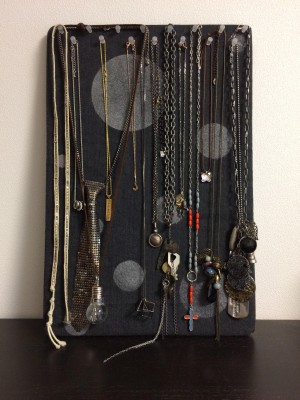
in addition to the ring & earring holder d.i.y. i posted earlier yesterday, i did this super easy three-step necklace & hook earring holder. this one is easily modifiable (i.e. adding a decorative frame, hanging on the wall or setting on the dresser) and worth every second to make it. check it out!
what you need / 材料:
cork board / コルクボード
fabric / 生地
ruler / 定規
scissors / ハサミ
glue gun / グルーガン
tacks / 画鋲
[optional / お好みで]
cardstock for stencil / ステンシル用の画用紙
compass / コンパス
fabric spray paint (i used Somay-Q in silver) / 生地用スプレーカラー染めQ エアゾール ギンギラ銀
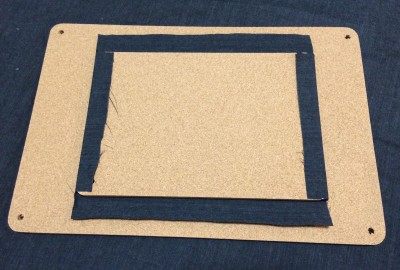
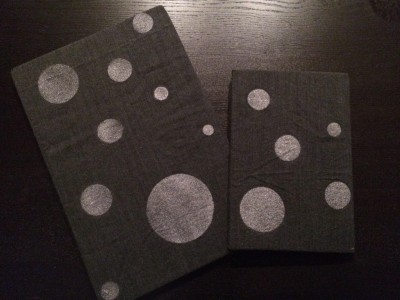
1. place cork board (the top one is MUJI’s M size for earrings and the bottom is the L size for necklaces) on fabric and cut about 1.5 inch/3~4cm around the board as seam allowance. fold and glue edges to the back side using a glue gun. (OPTIONAL: i cut/ripped a separate fabric slightly smaller than the cork board and glued it to cover the edges of the first fabric. i decided to leave them frayed since the glue would prevent further fraying.)
コルクボードを生地の中心に置く。(フック/フープピアス用には無印良品のMサイズ、ネックレスにはLサイズを使用しました。)コルクボードの厚みに合わせて縫い代を3~4cmで周囲をカット。縫い代を裏面に折り返してグルーガンで止める。(お好みで表地の縫い代を隠す為に裏にもお好きな生地を糊で止める。糊で生地が固まるので、私はあえて割いて裁断をし、端の始末をしていないです。)
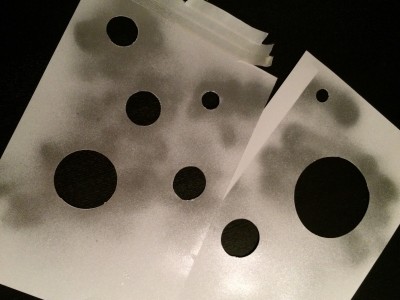
2. [this step is optional!] make stencil and spray. i cut out a random circle pattern. / [柄を加えるステップです。必要なければ次へ!] 染めQなどスプレーカラー用のステンシルを作り、スプレーする。こちらはサークル柄にしてみました。
3. after drying the spray for at least 24 hours, use tacks (i used MUJI’s) to hang hook/hoop earrings and necklaces. / 24時間ほど乾燥させてから画鋲(こちらも無印良品)を指し、ネックレスやピアスをかける。

![[CREEMA] PATCHWORK TEEPEE](http://www.peacelovetokyo.com/home/wp-content/uploads/2016/06/IMG_0744.jpeg)
![[CREEMA] PATCHWORK TEEPEE MOCKUP](http://www.peacelovetokyo.com/home/wp-content/uploads/2016/07/teepeemockup.jpg)
![[CREEMA] UPCYCLED CLUTCH](http://www.peacelovetokyo.com/home/wp-content/uploads/2016/03/knitclutchfinalcrop.jpg)
![[CREEMA] UPCYCLED CLUTCH](http://www.peacelovetokyo.com/home/wp-content/uploads/2016/03/unnamed-1.jpg)
![[CREEMA] UPCYCLED CLUTCH](http://www.peacelovetokyo.com/home/wp-content/uploads/2016/03/knitclutchfinalcropclose.jpg)
![[CREEMA] UPCYCLED CLUTCH](http://www.peacelovetokyo.com/home/wp-content/uploads/2016/03/knitclutchillustrationfinal.jpg)
![[CREEMA] UPCYCLED CLUTCH](http://www.peacelovetokyo.com/home/wp-content/uploads/2016/03/P1010133editsize.jpg)